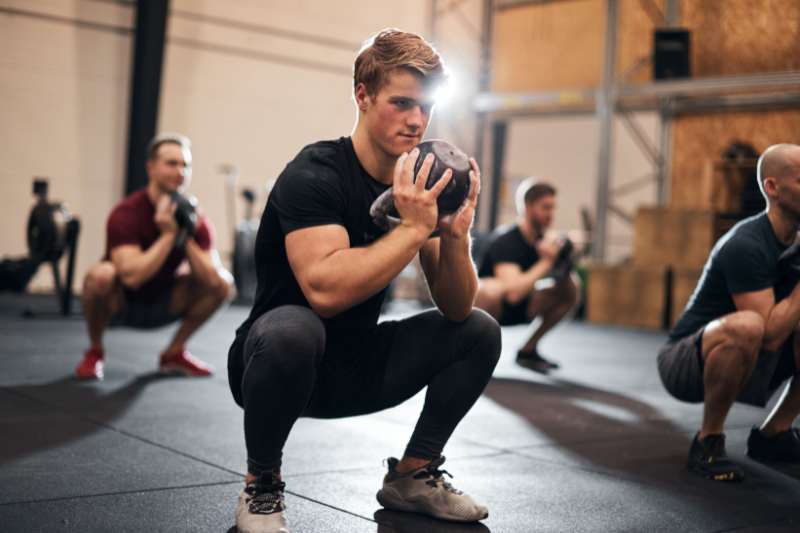
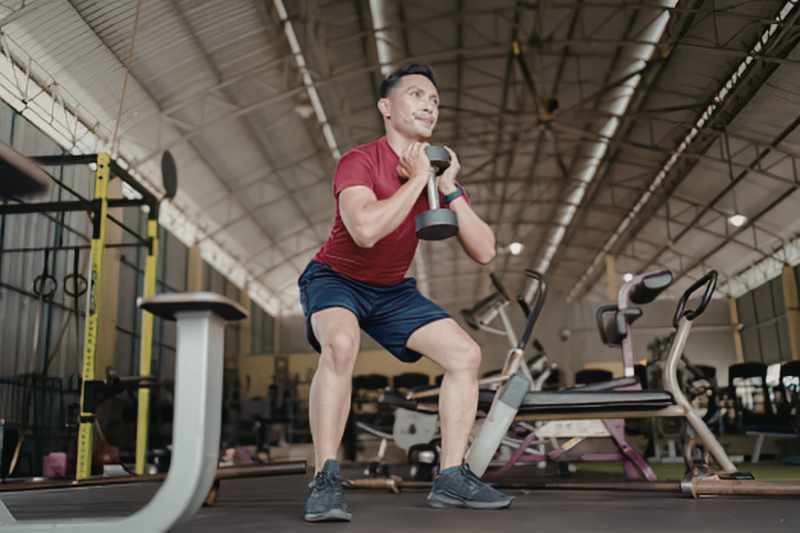
To do a goblet squat, hold a dumbbell or kettlebell vertically against your chest, stand with feet shoulder-width apart, then sit your hips down between your knees until your thighs are parallel to the floor — keeping your heels flat, chest up, and elbows tracking inside your knees — before driving back up to standing.
Keep reading for a full breakdown of form, common mistakes, how to progress, and variations worth adding to your routine.
What Is the Goblet Squat and Why It Works
Strength coach Dan John invented the goblet squat in the late 1990s — not in a lab, but out of necessity. He needed to teach roughly 400 high school athletes to squat correctly, all at once.
His solution was to have them hold a kettlebell at chest height and squat down between their hips. It worked immediately, and the movement has been a staple in gyms ever since.
The setup is simple: hold a dumbbell vertically by one end, or grip a kettlebell by its horns, and keep it pressed against your upper chest. From there, you squat down between your knees rather than sitting straight back, then stand back up.
What makes it different from other squat variations is where the weight sits. Holding the load in front of your chest acts as a counterbalance, which naturally pulls you into an upright position. If you round forward, the weight tips away from your body — so the movement essentially corrects your form for you. No coach required.
That same anterior loading reduces how much stress lands on your lower back. Unlike a barbell back squat, there's no axial compression on your spine, which makes it a practical option for anyone managing disc issues, SI-joint problems, or chronic lower-back pain.
Research also shows anteriorly-loaded squats produce greater quad activation than back squats — particularly in the vastus medialis — making this a genuinely quad-dominant movement, not just a beginner alternative.
It's a good fit for:
- Beginners learning to squat for the first time
- Home trainees with limited equipment
- Older adults who need a joint-friendly loading option
- Anyone rehabbing a back injury
- Advanced lifters using it as a warm-up or high-rep accessory
How to Do the Goblet Squat Step by Step
Picking your weight and stance
Use a dumbbell held vertically by one end, or a kettlebell gripped by the horns — the two sides of the handle where they meet the bell. For your stance, stand roughly shoulder-width apart with toes pointed 5–20° outward. If you're unsure where to place your feet, do three quick vertical jumps and look down at where you landed. That's your natural squat stance.
Getting set up
Bring the weight up to your chest so it rests against your upper sternum and collarbones, with your elbows pointing straight down. Squeeze the bell hard — that full-body tension transfers into a more stable, controlled rep. Stand tall with your shoulder blades pulled back and down, chin slightly tucked, and chest up.
The rep, step by step
- Take a deep breath into your belly, sides, and lower back — a full 360° expansion, not a chest breath. Then brace your core as if you're about to take a punch.
- Initiate by pushing your hips back slightly, then bend your knees. Leading with the knees alone is one of the most common form errors.
- As you descend, let your elbows track inside your knees and push your knees outward over your toes. Keep your heels planted and the bell in contact with your chest the entire way down.
- Lower until your thighs are at least parallel to the floor. Most people can go deeper, and that's fine — stop where your spine stays neutral and your heels stay flat.
- Drive through your whole foot on the way up. Your hips and chest should rise together; if your hips shoot up first, the weight is too heavy.
- Exhale through the hardest part of the ascent, then finish with your hips and knees fully locked out and glutes squeezed at the top. Don't hyperextend your lower back to get there.
How many sets and reps
For general fitness and muscle building, 3–4 sets of 8–15 reps works well. If you're using it as a skill or strength drill, 2–3 sets of 5 with a heavier load is the better approach.
Muscles Worked
The goblet squat is primarily a quad and glute exercise. Your quadriceps — all four heads — drive knee extension on the way up, while your gluteus maximus handles hip extension. Those two muscle groups are doing the bulk of the work on every rep.
Supporting them are the adductors, hamstrings, and calves, which assist with hip extension and keep the movement stable, especially once you hit parallel and below.
Stabilizers — the underrated part
Where the goblet squat separates itself from other squat variations is how much stabilizer demand it creates. Holding a load in front of your chest produces a constant forward pull that your trunk has to resist the entire time — not just at the bottom, but throughout the whole rep. That isometric demand is greater than what you'd get from a back squat, where the load sits closer to your center of mass.
The muscles working to hold everything together:
- Core: rectus abdominis, internal and external obliques, transverse abdominis, erector spinae
- Upper back: lats, rhomboids, mid and lower trapezius, rear deltoids — keeping the bell locked at your chest
- Forearms and grip: holding the bell isometrically for every second of every set
One research finding worth knowing: a 2021 study found that women showed greater activation in the vastus medialis and lateralis than men when performing goblet squats at the same relative load. So if quad development is a priority for you, the goblet squat tends to deliver — particularly on the inner and outer quad.
Common Mistakes and How to Fix Them
Most goblet squat errors fall into one of two categories: positioning the weight wrong or letting the lower body break down under load. Here's what to watch for.
Knee valgus (knees caving inward)
This is the most common squat fault across all variations. As you descend, your knees drift inward instead of tracking over your toes. To fix it, think “spread the floor apart” with your feet — that external cue activates the hip abductors and pulls the knees out automatically.
You can also actively push your knees out with your elbows at the bottom of each rep. If the cues alone aren't sticking, put a mini-band just above your knees and train against it for a few sessions.
Heels lifting off the floor
If your heels rise as you descend, ankle mobility is usually the culprit. Short-term fix: place a 1–2 inch plate or wedge under your heels to reduce the dorsiflexion demand. Longer term, address ankle mobility directly and avoid forcing depth until you can reach it with heels flat.
The remaining mistakes — and their fixes:
| Mistake | Fix |
|---|---|
| Forward torso collapse | Drive elbows toward the floor; reduce weight; keep the bell pinned to your sternum |
| Initiating with knees only | Push hips back slightly before bending the knees |
| Bell floating away from the chest | Squeeze it hard into your sternum; tuck elbows down |
| Short range of motion | Place a box at parallel as a depth target until confidence builds |
| Too much weight too soon | Pick a load you can control on the last rep of every set — not just the first |
That last point matters more than most people realize. The goblet squat is self-limiting by design — your grip and upper back will give out before your legs do if the weight gets too heavy. Respect that built-in ceiling rather than fighting it.
Foot Positioning and Weight Progression
Stance options
There's no single correct foot position — the right stance depends on your hip anatomy, mobility, and training goal. That said, here are the four practical options:
| Stance | Width | Toe Angle | Best For |
|---|---|---|---|
| Standard | Shoulder-width | 5–15° out | Balanced quad and glute work |
| Wide/sumo | 1.5–2× shoulder-width | 30–45° out | Glutes, adductors; easier depth for tight hips |
| Narrow | Hip-width or less | Mostly forward | Quad emphasis; needs good ankle mobility |
| Heels elevated | Any | Any | Maximum quad emphasis; compensates for tight ankles |
Regardless of which stance you use, one rule applies across all of them: your knees track in the same direction as your toes throughout the entire rep. Wider stance means more toe-out; narrower stance means toes more forward.
How to load and progress
Start light — 5 to 15 lb is the right range for beginners. The goal at this stage is to own the movement pattern, not to accumulate fatigue. Once you can complete multiple sessions of 3×10 with clean form, start adding weight.
- Beginner: 5–15 lb, focus on pattern
- Intermediate: 25–50 lb for 8–12 reps
- Benchmark targets: 24 kg × 10 for men, 12 kg × 10 for women
Only add 5–10% to the load after you've completed all prescribed reps with solid form across several sessions — not just one good day.
When load isn't the answer
If your form holds up but progress has stalled, add difficulty through technique rather than weight. A 3–5 second eccentric, a 2–3 second pause at the bottom, or 1.5 reps — down, halfway up, back down, then all the way up — all increase demand without requiring a heavier bell.
Once you're consistently hitting around 70 lb for 8–10 clean reps, the goblet squat has done its job. At that point your grip and upper back become the limiting factor, not your legs. That's the signal to move on to front squats or barbell variations and keep goblet squats as a warm-up or accessory tool.
Goblet Squat Variations and Who Should Use Them
Once you have the standard goblet squat dialed in, there are several ways to adjust it based on your goals, limitations, or where you are in your training. These aren't just novelty options — each one serves a specific purpose.
For building the pattern or working around limitations
- Box goblet squat: Squat down to a bench or box set at parallel. Removes the guesswork around depth and gives beginners a clear target. Also useful for anyone returning from injury who needs a controlled range of motion.
- Heel-elevated goblet squat: Plates or a wedge under the heels reduces ankle dorsiflexion demand, making it easier to hit depth. As a bonus, it shifts more load onto the quads — useful on days when that's your focus.
- Sumo goblet squat: Wider stance, toes pointed further out. Puts more emphasis on the glutes and adductors, and tends to make depth easier for people with tighter hips.
For adding difficulty without adding weight
These three variations increase the training stimulus through time and control rather than load — a smart option when you're approaching the goblet squat's loading ceiling:
- Paused goblet squat: Hold the bottom position for 2–3 seconds before standing. Builds mobility, eliminates the stretch reflex, and increases hypertrophy stimulus.
- Tempo goblet squat: A 3-0-1 or 4-1-1 tempo means a slow, controlled descent with an optional pause, followed by a normal ascent. Improves technique and time under tension simultaneously.
- 1.5-rep goblet squat: Descend fully, come halfway up, go back down, then stand all the way up — that's one rep. Significantly increases quad demand without needing a heavier bell.
The natural progression out of the goblet squat
When you've maxed out the goblet squat's useful load range, the double-kettlebell front squat is the logical next step. Two kettlebells racked at shoulder height allows far more loading while keeping the anterior position your body has already adapted to. From there, barbell front squats or back squats open up depending on your goals.
Who should stay with goblet squats longer
Not everyone needs to rush toward a barbell. Beginners, older adults, home trainees, and anyone managing lower-back issues can continue getting real results from goblet squats well beyond the point where others might move on — especially using the variation and progression tools above.
Conclusion
The goblet squat is one of the few movements that works just as well on day one as it does years into your training — the execution is simple, the feedback is immediate, and the carry-over to other squat variations is real.
Focus on getting the basics right first: flat heels, chest up, elbows inside the knees, and a controlled rep from top to bottom. Do that consistently, progress the load sensibly, and this one movement will take your lower body strength further than most people expect.