Looking to build your neck muscles without stepping out of your home? You're in the right place!
There are six key exercises that can effectively strengthen your neck: isometric neck strengthening, wall lean neck strengthening, supine neck rotation, neck stretches, neck rotation, and neck flexion.
While resistance bands and dumbbells can amplify your efforts, always remember to consult with a medical expert before diving in. Dive deeper into this article for a step-by-step guide on each exercise.
General Precautions Before Starting
Embarking on any new exercise routine, especially one that targets sensitive areas like the neck, warrants caution.
Ensuring that you're well-informed and taking necessary precautions can make the difference between reaping benefits and regretting injuries.
Let's delve into the key things you need to bear in mind.
The Need to Consult with a Physician or Physical Therapist
Before starting any new exercise routine, particularly one that focuses on the neck, it's paramount to consult with a healthcare professional.
The neck, being a delicate and crucial region, houses vital structures like the spinal cord, blood vessels, and various muscles.
Each person's physical condition is unique, and what works for one might not work for another.
A physician or physical therapist can provide individualized advice, ensuring the exercises you plan to undertake are safe and beneficial.
They can assess your current neck health, consider any pre-existing conditions or injuries, and suggest modifications to exercises if necessary.
This initial consultation can save you from potential harm and ensure you’re on the right track from day one.
Safety Tips and Things to Avoid to Prevent Injuries
When dealing with neck exercises, safety should always be at the forefront.
First and foremost, always warm up.
A gentle warm-up, like some simple neck stretches or rotations, can prepare the muscles and make them more pliable, reducing the risk of strains or pulls.
Second, never force a movement. The neck region is not where you want to test your limits aggressively.
If you feel any sharp pain, stop immediately.
A little discomfort is natural when starting, but pain is your body’s way of signaling something is amiss.
Paying attention to your posture is essential.
Whether seated or standing, ensure your spine is aligned, and you’re not slouching.
Proper posture reduces undue strain on the neck muscles and optimizes the benefits of the exercises.
Lastly, be mindful of the frequency and intensity.
Start slow and gradually increase the intensity of your workouts.
It's tempting to rush into things, especially when you start noticing benefits.
However, overexertion can lead to muscle fatigue, increasing the risk of injury.
Listen to your body and give it adequate rest between sessions.
Remember, consistency over intensity will yield the best results in the long run.
Required Equipment and Setup
Embarking on a home workout journey, especially for a region as specialized as the neck, demands more than just determination.
The right tools and an optimal setup can make the difference between an efficient exercise routine and a haphazard one.
So, let’s deep dive into the equipment you'd need and how best to create a conducive environment for your exercises.
Introduction to Resistance Bands and Dumbbells
Resistance bands and dumbbells aren't just for your traditional strength training; they can be instrumental in building neck muscles too.
Resistance bands are elastic bands that come in various strengths and lengths.
They provide adjustable resistance, making them perfect for both beginners and seasoned exercisers.
For neck exercises, the band's resistance can help target and challenge the neck muscles, leading to increased strength over time.
The stretchy nature of the bands allows for smooth, controlled movements, which is crucial when working with the neck.
Additionally, they're lightweight, portable, and easy to store, making them a favorite for home workouts.
Dumbbells, on the other hand, offer a more static form of resistance.
They are weights that can be held in one or both hands, and for neck exercises, they can be utilized in exercises where you might move your head against the weight's resistance.
However, it's vital to approach dumbbell exercises with caution, especially when focusing on the neck.
Start with lighter weights to understand the movement and prevent any potential strain.
Setting Up a Safe Space at Home for the Exercises
The environment in which you exercise is almost as important as the exercise itself.
For neck exercises, you'd want a space that is both comfortable and free from potential distractions or hazards.
Start by choosing a quiet spot. The less noise and interruptions, the better you can concentrate on your form and technique.
This could be a corner in your living room, bedroom, or even a dedicated workout space if you have one.
Ensure the area is well-lit, either by natural light or artificial lighting, so you can clearly see what you're doing.
The flooring is crucial. Opt for a flat, non-slip surface.
Wooden floors or tiles can sometimes be slippery, especially if you're sweating.
Consider placing a non-slip mat or even a yoga mat in your workout area.
Not only will this provide grip, but it will also offer some cushioning, essential if you're doing exercises where you need to lie down.
Keep the area free from clutter.
Remove any potential tripping hazards, such as loose wires, toys, or other small objects.
This ensures you have enough room to move freely and safely.
Lastly, have all your equipment within arm's reach.
Set up a small station with your resistance bands, dumbbells, a towel, and a bottle of water.
This way, you won't need to interrupt your flow searching for your tools.
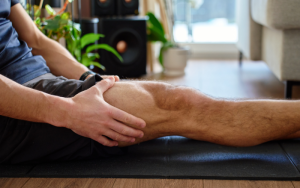
Isometric Neck Strengthening
When it comes to building neck strength without using weights or any extra equipment, isometric neck strengthening is your go-to.
It's simple yet effective, tapping into the power of resistance without any actual movement.
But what exactly is it, and how do you get it right? Let's break it down.
What it is and how it works
Isometric exercises, in essence, involve contracting a muscle or muscle group without any visible movement in the angle of the joint.
The word “isometric” comes from the Greek words “isos,” meaning “equal” or “same,” and “metron,” meaning “measure.”
Thus, in isometric neck exercises, the neck muscles are activated, but the neck itself doesn't move.
Instead, you'll be using your hand or an immovable object to create resistance against which the neck muscles work.
What makes isometric exercises particularly interesting is that they allow for targeted muscle engagement.
Because there's no motion, the stress is placed solely on the contracted muscle.
For the neck, this means you can target specific areas, whether that be the sides, front, or back of the neck, by simply changing the direction of resistance.
Step-by-step guide on how to perform it
Let's get into the nitty-gritty of performing isometric neck strengthening exercises.
Remember, the key here is resistance and not movement.
- Front Neck Isometric Exercise:
- Sit or stand upright, ensuring your spine is straight.
- Place your palm on your forehead.
- Push your head forward while resisting the motion with your hand. You should feel the front of your neck working.
- Hold the contraction for about 5-10 seconds.
- Relax, then repeat for the desired number of repetitions.
- Side Neck Isometric Exercise:
- Maintain your upright position.
- Place your right hand on the right side of your head.
- Try to push your head to the right while using your hand to resist any movement.
- Hold this for 5-10 seconds, feeling the right side of your neck engage.
- Switch to the left side and repeat.
- Back Neck Isometric Exercise:
- Once again, sit or stand upright.
- Interlace your fingers and place your hands on the back of your head.
- Attempt to push your head backward, resisting any movement with your hands.
- Hold the tension for about 5-10 seconds, focusing on the muscles at the back of your neck.
- Relax and then repeat.
Wall Lean Neck Strengthening
Navigating the myriad of neck exercises, the wall lean stands out not just for its simplicity but also its efficacy.
Utilizing the support and resistance of a wall, this exercise helps fortify the neck muscles.
But why is it revered, and how exactly do you do it? Let’s uncover the secrets of the wall lean.
Benefits of this method
- Accessibility: Unlike some exercises that require specialized equipment, all you need for the wall lean is a sturdy wall. This makes it incredibly accessible and easy to incorporate into any routine.
- Full Neck Engagement: While some exercises target specific parts of the neck, the wall lean engages the entirety of the neck musculature, ensuring a comprehensive workout.
- Controlled Resistance: The wall provides a stable and consistent resistance level. This allows you to easily adjust the intensity by changing your distance from the wall or the angle of your body.
- Safety: Given the static nature of the wall, the chances of overextending or straining the neck are minimized. This makes the wall lean a safer option for those new to neck exercises or those recovering from injury.
- Improved Posture: Regularly practicing the wall lean can help in correcting posture. As the neck and upper back muscles strengthen, they provide better support to the spine, leading to a more upright stance.
Detailed Instructions
- Positioning: Begin by standing a couple of feet away from a wall. Your feet should be shoulder-width apart, and your body should be in a straight line from your head to your heels.
- Engage Core: Before leaning, tighten your core muscles. This will provide stability and ensure that the exercise is effective without straining the lower back.
- Lean Back: Gently lean back until the back of your head touches the wall. Ensure your chin remains tucked in and not jutting out.
- Hold and Push: Once your head is against the wall, push back with your neck muscles as if you're trying to push the wall away from you. This will activate the muscles at the back of your neck.
- Maintain Position: Hold this position for about 5-10 seconds, ensuring you breathe normally throughout.
- Return to Start: Relax the neck muscles and gently move away from the wall to return to the starting position.
- Repeat: Do this for multiple repetitions, taking breaks in between to avoid fatigue.
Supine Neck Rotation
The supine neck rotation, though a mouthful to say, is as basic as they come.
Done while lying on one's back, it's both a strengthening and stretching exercise, melding therapeutic benefits with muscle fortification.
So, why should you incorporate it into your routine, and how can you perfect its execution? Let's explore.
Explanation and Importance
The term “supine” denotes the position of lying face up, which sets the foundation for this exercise.
“Rotation” naturally refers to the act of turning or revolving a part of the body around its axis.
When combined, supine neck rotation thus involves rotating the neck while lying on your back. Simple, right?
The importance of this exercise is multi-fold:
- Flexibility Boost: One of the key benefits is the increase in neck flexibility. By gently rotating the neck from side to side, the muscles and ligaments are stretched, enhancing the range of motion.
- Muscle Toning: Besides flexibility, the resistance encountered during the rotation helps in toning the neck muscles, especially the side muscles or the sternocleidomastoid.
- Relief from Stiffness: Sedentary lifestyles can lead to neck stiffness. The supine neck rotation provides relief by loosening tight muscles.
- Improved Blood Circulation: The rotation stimulates blood flow to the muscles, aiding in recovery and reducing muscle fatigue.
- Therapeutic Benefits: The gentle motion can help in the rehabilitation of certain neck injuries, provided it's done under proper guidance.
A Walk-through of the Procedure
- Positioning: Begin by lying flat on your back on a comfortable surface, like a yoga mat or soft carpet. Your legs can be straight out or knees bent, whichever is more comfortable.
- Hand Placement: Place your arms by your side or on your torso. This is just to ensure they're relaxed and not influencing the neck movement.
- Starting Point: With your eyes looking upwards, ensure your head is in a neutral position, neither tilted forward nor backward.
- Begin Rotation: Slowly turn your head to the right side, aiming to bring your ear as close to the ground as possible. However, don’t force the movement; go only as far as it's comfortable.
- Hold: Once you've reached your maximum comfortable rotation to the right, hold the position for a few seconds, feeling the stretch along the left side of your neck.
- Return to Center: Gently bring your head back to the neutral position, pausing for a moment.
- Rotate to the Left: Now, repeat the rotation, but this time to the left side. Hold the stretch and then return to the center.
- Repetition: Do several rotations, alternating between the right and left sides, ensuring the movement remains controlled and fluid.
Neck Stretches

Tightness in the neck isn't just a mere annoyance. It can be the precursor to headaches, poor posture, and even reduced mobility. But fret not!
Neck stretches, a series of simple yet profound exercises, are here to the rescue.
Why are these stretches more than just neck twirls, and which techniques can be your ticket to a supple neck? Dive in with me.
Why Stretching is Vital
- Pain Alleviation: One of the immediate benefits of neck stretching is the relief from discomfort and pain. By elongating and relaxing the neck muscles, stretches can alleviate the tightness that often results in pain.
- Improved Mobility: Regularly stretching the neck can help enhance its range of motion. This means turning, tilting, and nodding become smoother and more fluid, making daily activities easier.
- Counteracting Poor Posture: In the age of screens, many of us adopt a forward head posture. Stretching can help counteract this by strengthening and relaxing the neck muscles, promoting a more neutral spine.
- Stress Reduction: The neck is a common area where we hold tension, especially when stressed. Stretching helps release this tension, offering a sense of relaxation and calm.
- Prevention of Injuries: Flexible muscles are less prone to injuries. By stretching, you reduce the chances of strains and sprains in the neck.
- Increased Blood Flow: Stretching stimulates blood circulation, ensuring that the neck muscles receive adequate oxygen and nutrients. This not only aids in healing but also in preventing muscle fatigue.
Various Stretching Techniques
- Neck Tilt Stretch:
- Start in an upright position, either standing or seated.
- Gently tilt your head to the right, trying to bring your ear closer to your shoulder. Ensure you're not raising the shoulder.
- Hold the stretch for about 20-30 seconds, feeling the stretch on the opposite side.
- Return to the neutral position and repeat on the left side.
- Neck Turn Stretch:
- Begin upright.
- Slowly turn your head to the right until your chin is over your shoulder.
- Hold this position for 20-30 seconds, and then slowly return to center.
- Repeat the stretch on the left side.
- Chin to Chest Stretch:
- Start in the upright position.
- Slowly lower your chin to your chest, feeling a stretch in the back of your neck.
- Hold for 20-30 seconds and then lift your head back to the starting position.
- Neck Extension Stretch:
- Begin upright.
- Gently tilt your head backward, gazing upwards.
- Hold the position for 20-30 seconds, feeling the stretch in the front of the neck.
- Return to the neutral position.
- Seated Neck Release:
- Sit down on a chair or the floor.
- Place your right hand on the left side of your head and gently push, tilting your head to the right.
- Hold for 20-30 seconds, feeling the stretch on the left side.
- Switch sides and repeat.
Neck Rotation
Gazing over our shoulder during a drive, looking around to catch a friend's attention, or simply admiring nature’s beauty — these are all enabled by the magic of neck rotation.
But beyond these everyday activities, neck rotation exercises pack a punch of benefits that might be overlooked.
So, why are rotational movements paramount, and how can you ensure you're doing them right? Join me on this rotational journey.
The Significance of Rotational Movements
- Enhanced Range of Motion: Rotational exercises increase the neck's ability to turn from side to side. This greater degree of mobility can be essential for activities that require looking over your shoulder or turning to speak to someone.
- Muscular Balance: The neck houses several muscle groups. Without rotation exercises, some muscles might become dominant, leading to an imbalance. Rotational movements ensure all these muscles are engaged and strengthened uniformly.
- Relief from Stiffness: The sedentary lifestyles of today often lead to stiffness in the neck, causing discomfort and reduced mobility. Regular rotational exercises can alleviate this stiffness, restoring comfort.
- Posture Improvement: By strengthening the neck muscles, rotational exercises aid in maintaining a neutral spine, correcting posture anomalies stemming from weak neck musculature.
- Rehabilitation: After certain types of injuries or surgeries, rotational movements, when done correctly and under guidance, can assist in the rehabilitation process.
- Prevention of Strains: A flexible and strong neck is less likely to be strained. Regular rotation exercises reduce the risk of such injuries.
How to Do It Right
- Position: Begin in an upright seated or standing position. Ensure your spine is straight, and your shoulders are relaxed.
- Starting Point: Start with your head in a neutral position, eyes looking straight ahead.
- Slow and Steady: Gradually turn your head to the right, aiming to bring your chin over your right shoulder. The movement should be smooth, with no jerks.
- Hold: Once you've reached your maximum comfortable rotation, pause for a few seconds, ensuring there's no strain.
- Return to Neutral: Slowly bring your head back to the central position.
- Repeat on the Left: Follow the same steps, but rotate your head to the left this time.
- Frequency: It's advisable to do several repetitions, alternating between right and left.
- Breathe: It might sound obvious, but ensure you're breathing naturally throughout the exercise. Holding your breath can create unnecessary tension.
- Listen to Your Body: If at any point during the rotation you feel pain or discomfort, stop. This exercise should be about stretching and strengthening, not straining.
- Consistency is Key: Like all exercises, consistency can make a significant difference. It's beneficial to incorporate neck rotation into your daily routine.
Neck Flexion
You might've heard the term ‘flexion' thrown around in fitness circles, but what does it mean when it comes to our neck?
Neck flexion isn't just a fancy term. It's an essential movement that plays a pivotal role in our daily activities and overall neck health.
Let's delve deeper into understanding neck flexion and the steps to ace this exercise at home.
Understanding Flexion
- Basic Definition: Flexion, in the simplest terms, refers to the act of bending or decreasing the angle between two body parts. When talking about the neck, flexion involves moving the chin towards the chest.
- Functional Importance: Think about nodding or looking down at a book or your phone. That's neck flexion in action! This movement is integral to many daily tasks and activities.
- Muscle Engagement: The act of neck flexion primarily engages the muscles located at the front of your neck, specifically the sternocleidomastoid and scalene muscles. Strengthening these through flexion exercises can support the neck and enhance its mobility.
- Therapeutic Use: Neck flexion exercises are often used in therapeutic settings, especially for patients recovering from neck injuries or surgeries. These exercises aid in restoring mobility and strength.
Guided Steps on Performing Neck Flexion
- Starting Position: Begin by sitting or standing up straight. Your shoulders should be relaxed and not hunched. Ensure your eyes are looking forward, with your head in a neutral position.
- Initiating Movement: Slowly bend your neck forward, attempting to bring your chin towards your chest. Ensure the movement is gentle and controlled.
- Hold and Breathe: Once you've bent your neck as far as comfortably possible, hold the position for a few seconds. Remember to breathe naturally, allowing oxygen to flow to the working muscles.
- Returning to Neutral: Gently raise your head, coming back to the starting position. The movement should be smooth, ensuring there's no jerking.
- Repetition: It's beneficial to repeat the flexion several times, but always listening to your body. If you experience any discomfort, reduce the range of motion or take a break.
- Progression: As you become more comfortable with the movement and as your strength builds, you can introduce gentle resistance using your hand. Place your hand on your forehead and gently push against it as you try to flex your neck. This will engage the muscles more intensely.
- Stay Mindful: While performing neck flexion, it's crucial to remain mindful of any sensations. The exercise should produce a gentle stretch, not pain. If you feel sharp pain, stop immediately.
- Consistency: To reap the maximum benefits of neck flexion, it's advisable to integrate it into your daily routine, especially if you spend long hours at a desk or in front of screens.
Common Mistakes and How to Avoid Them
Ah, the road to fitness is often paved with the best intentions, but sometimes we might stumble with a few missteps along the way.
When it comes to neck exercises, a few common mistakes can make the difference between a beneficial workout and a potentially injurious one.
Let's address these mistakes head-on (pun intended) and navigate ways to sidestep them.
Overstretching or Exerting Too Much Pressure
Enthusiasm is fantastic, but when it morphs into overexertion, especially in neck exercises, it can be detrimental.
Overstretching or exerting excessive pressure on the neck can lead to strains or even more severe injuries.
The neck is a delicate region, housing vital nerves and blood vessels.
By applying excessive force, you risk injuring these structures.
But how does one know if they're overstretched? Typically, a gentle stretch feels like a mild tension or pull.
The moment you feel pain, sharp twinges, or any discomfort beyond this, it's a clear signal you've gone too far.
The best way to avoid this is by always starting your exercises gently, gradually increasing the stretch or pressure as you become more comfortable.
Also, never rush. Take your time, listen to your body, and always prioritize quality over quantity.
Not Maintaining Proper Posture
Good posture isn't just about looking confident (although that's a fantastic bonus).
When it comes to neck exercises, proper posture is vital in ensuring effectiveness and preventing injuries.
One might think they're doing an exercise correctly, but if their posture is off, they could be setting themselves up for unnecessary strains or imbalances.
The spine is like a stack of blocks. If the blocks are not aligned, they risk toppling over.
Similarly, if the spine isn't aligned during exercises, especially the neck, the muscles can't work efficiently, leading to potential issues.
For instance, if one does a neck rotation while slouched, they limit the movement range and put undue stress on certain neck muscles.
Maintaining proper posture means keeping a neutral spine.
Whether sitting or standing, it's crucial to ensure the head is aligned over the shoulders, and the shoulders are relaxed and not hunched.
Imagine a string attached to the top of your head, gently pulling you upwards.
This visualization can help maintain that erect posture.
Another tip is to regularly check your posture in a mirror or even film yourself while doing exercises.
This way, you can spot and correct any deviations.
Conclusion
As we journey through the world of neck exercises, it's evident that precision, awareness, and dedication are paramount.
Navigating common missteps and adhering to best practices ensures not just a safer workout regime but one that truly enhances our neck's strength and flexibility.
Here's to a healthier neck and a more informed approach to fitness!