Wall sits are a simple but powerful lower-body exercise, and adding variations can make them even more effective.
The five best wall sit variations are the Standard Wall Sit, Single-Leg Wall Sit, Wall Sit with Biceps Curl, Wall Sit with Shoulder Press, and Wall Sit with Heel Raises—each targets different muscles and adds unique benefits.
Keep reading to see exactly how to do each one and how they can fit into your workouts.
Mastering the Basics: The Standard Wall Sit
Before diving into more advanced variations, it’s important to get the foundation right.
The standard wall sit may look simple, but doing it correctly is key to getting real results—and avoiding strain on your knees or lower back.
How to Do a Standard Wall Sit
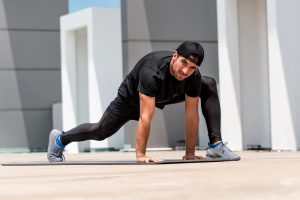
Start by standing with your back flat against a wall.
Your feet should be about shoulder-width apart and positioned roughly two feet away from the wall.
Slowly slide your back down the wall until your thighs are parallel to the ground, creating a 90-degree bend at your knees.
Your knees should be stacked directly above your ankles, not pushed forward over your toes.
Keep your back pressed flat against the wall—no arching or rounding—and let your arms rest at your sides or place them gently on your thighs (but don’t press down).
Hold the position for a set amount of time while keeping your breathing steady and your core engaged.
When you’re done, press through your heels and slide back up the wall to stand.
Muscles Worked
This move mainly targets the quadriceps—the front of your thighs—but it doesn’t stop there.
You’ll also feel your glutes (especially when you're keeping your back flat and core tight) and your calves, which help stabilize your lower legs throughout the hold.
Key Cues for Proper Form
Staying in good form makes the exercise more effective and prevents strain. Here are some tips to lock in your positioning:
- Keep your knees directly above your ankles, not past your toes.
- Your thighs should be parallel to the floor, forming a right angle at the knee.
- Back stays completely in contact with the wall—avoid arching your lower back.
- Engage your core muscles to support your spine.
- Keep your feet flat on the floor, with weight evenly distributed between heel and ball.
Common Mistakes to Avoid
A few small tweaks can make a big difference in your results and comfort:
- Letting knees drift forward: This puts extra pressure on your knee joints and reduces glute activation.
- Arching your lower back: A neutral spine pressed against the wall ensures full-body engagement and stability.
- Feet too close to the wall: This shortens the angle at your knees, increasing strain and reducing effectiveness.
- Holding your breath: Steady breathing keeps your muscles oxygenated and helps with endurance.
How Long to Hold a Wall Sit
If you're just starting out, aim for 20 to 30 seconds at a time.
As your strength builds, you can gradually increase the duration in 10- to 15-second increments.
A strong target for most people is 60 seconds or more per set.
Once you're consistently holding 60-second wall sits with good form and minimal discomfort, you're in a solid position to start adding variations for greater challenge and variety.
Single-Leg Wall Sit: Balance and Strength in One Move
Once you're comfortable with the standard wall sit, switching to a single-leg version is a smart way to build more strength and improve control.
This variation not only increases the load on one leg but also challenges your balance, coordination, and overall body awareness in a way the traditional version doesn’t.
How to Do a Single-Leg Wall Sit
Begin by getting into a standard wall sit position—back flat, knees at 90 degrees, and thighs parallel to the ground.
Once you're steady, shift your weight slightly to one leg and slowly extend the opposite leg straight out in front of you.
The lifted leg should stay parallel to the floor with your foot flexed.
Keep your hips level, avoid leaning to one side, and hold the position for a set duration before switching legs.
If you're wobbling or feel unstable, shorten the duration or start by keeping your extended leg just slightly off the floor instead of fully raised.
You can also keep your arms out in front of you for better balance.
What Makes It Effective
Doing a wall sit on one leg forces your working leg to support your entire body weight, significantly increasing the challenge for your quadriceps and glutes.
But the benefit goes beyond just strength—this move activates deep stabilizer muscles in your hips and ankles, which are key for joint support and injury prevention.
It’s also an excellent way to uncover and address strength imbalances.
Most people have a dominant leg, and single-leg training highlights differences that standard exercises might hide.
Fixing those imbalances can improve performance in everything from running to everyday movement.
Tips for Better Balance and Form
Maintaining symmetry is the biggest challenge here.
Keep your core tight to avoid swaying, and watch your hips—they should stay level throughout the hold.
If one hip hikes up or your body leans, that’s a sign to scale back or reduce the hold time.
It also helps to focus your gaze on a fixed point in front of you to stay centered.
Breathing is just as important here as it is in the basic wall sit.
Take slow, controlled breaths to help maintain your position and stay mentally focused.
Who Benefits Most from This Variation
Single-leg wall sits are especially useful for people who need strong, stable legs in motion—like runners, skaters, and other athletes.
They're also excellent for rehab scenarios where building strength in one leg at a time is safer or more targeted.
Even if you’re not training for performance, this variation builds the kind of lower-body control that supports healthy knees and hips over time.
Whether you're looking to break through a strength plateau or simply make your workouts more efficient, the single-leg wall sit is a smart next step once you've mastered the basics.
Wall Sit with Biceps Curl: Compound Efficiency
If you're looking to get more out of your wall sits without extending your workout time, adding biceps curls is an efficient way to do it.
This variation turns a lower-body isometric hold into a full-body strength move, helping you build muscle and endurance at the same time.
How to Do a Wall Sit with Biceps Curl
Start in a standard wall sit: feet shoulder-width apart, thighs parallel to the floor, and knees stacked above your ankles.
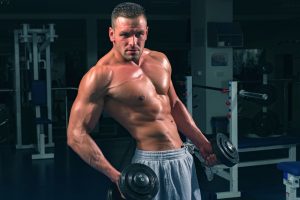
Once you're steady, hold a dumbbell in each hand with your arms fully extended at your sides, palms facing forward.
From there, curl both weights up toward your shoulders while keeping your elbows close to your torso.
Lower the weights slowly and with control, and repeat for the desired number of reps—all while maintaining the wall sit position.
Make sure your back stays flat against the wall and your lower body remains stable as you move through the curls.
Avoid swinging the weights or using momentum, especially as your arms start to fatigue.
Why It Works
This variation layers a dynamic upper-body movement onto the static lower-body hold.
Your quads, glutes, and calves stay fully engaged to hold your position, while your biceps and forearms work through the curl.
The result is a simple but highly effective compound exercise that hits multiple muscle groups without the need for extra time or space.
It’s a perfect option for anyone short on workout time or equipment, especially in a home gym setup.
You're also training your body to stay stable under tension—something that pays off in everyday activities like carrying groceries or lifting objects while standing.
Choosing the Right Dumbbell Weight
Start light if you're new to strength training or not used to combining movements.
- Beginners: 5 to 10 lb dumbbells are usually enough to feel the burn without compromising form.
- Experienced lifters: You can go heavier (12–20 lbs) as long as you can maintain proper curl technique and keep your lower body steady during the hold.
As a rule of thumb, if your form starts to break down before completing 8–12 curls, the weights are probably too heavy.
Modifications and Progressions
If holding both dumbbells feels unstable at first, try alternating arms—curling one side at a time while the other remains still.
This gives your core an extra challenge while reducing the load and complexity just enough to stay in control.
You can also shorten the wall sit duration and increase over time as your endurance builds.
Eventually, you can move toward longer sets, slower reps, or heavier weights to keep progressing.
This variation is scalable and efficient, making it a practical way to work your whole body without adding extra equipment or exercises.
Wall Sit with Shoulder Press: Upper Body Integration

This variation blends lower-body endurance with upper-body strength in a way that demands control, coordination, and full-body focus.
Adding an overhead press to the wall sit is a strategic way to target more muscle groups without needing to change your setup or position.
How to Do a Wall Sit with Shoulder Press
Get into a standard wall sit—feet about two feet from the wall, thighs parallel to the ground, and knees at a 90-degree angle.
From this position, hold a dumbbell in each hand at shoulder height, with your elbows bent and palms facing forward.
As you hold the wall sit, press both dumbbells straight overhead until your arms are fully extended.
Lower the weights back down to shoulder height with control, and repeat while maintaining the seated position against the wall.
Your back should stay firmly pressed into the wall throughout the entire set, and your core should remain engaged to support the spine.
Avoid letting your lower back arch as the weights go overhead—this is a common tendency that can lead to poor form or discomfort.
What It Targets
This variation lights up your shoulders, triceps, and upper traps while keeping your lower body fully activated.
You're combining isometric lower-body work with a dynamic upper-body movement, forcing your muscles to coordinate under tension.
This not only builds strength but also improves muscular endurance and stability from head to toe.
It’s particularly effective for improving postural strength.
Pressing overhead while your spine is locked in against the wall trains your body to maintain a strong, upright posture even under load—a helpful skill for lifting tasks outside the gym.
Key Form and Breathing Tips
Breathing plays a big role in this movement. Inhale as you lower the dumbbells and exhale as you press them overhead.
This rhythm helps manage tension and keep your movements steady.
Keep your core braced as if you’re preparing for a gentle punch—this prevents the lower back from arching and ensures that the press doesn't pull you out of position.
If you feel tension creeping into your neck or notice your shoulders shrugging during the press, reset your posture.
Lower the weights, take a breath, and realign before continuing.
Why It’s Worth Adding
The wall sit with shoulder press is more than just a time-saver—it teaches your body to coordinate effort across multiple regions.
It’s a great option for anyone looking to challenge both lower- and upper-body endurance, particularly in a compact routine.
Whether you're training for sport or simply aiming to move better in everyday life, this variation helps build functional strength under controlled conditions.
Wall Sit with Shoulder Press: Upper Body Integration
Adding an overhead press to your wall sit turns a lower-body isometric hold into a full-body strength challenge.
This variation calls on your shoulders, arms, and core to work just as hard as your legs—making it a smart, time-efficient upgrade.
How to Do a Wall Sit with Shoulder Press
Start by lowering into a standard wall sit, making sure your thighs are parallel to the floor and your back is pressed flat against the wall.
Hold a dumbbell in each hand at shoulder height with your palms facing forward.
From there, press both dumbbells straight up until your arms are fully extended overhead.
Lower them back to the starting position with control, and repeat while maintaining the wall sit.
The key here is to avoid letting your form slip while pressing.
Keep your lower back against the wall, and don’t allow your hips or knees to shift.
If you're using too much weight and feel your body compensating—arching the back, shifting your position, or leaning—drop to a lighter pair of dumbbells to stay in control.
What It Targets
This combination move works your shoulders, triceps, and upper traps through the press, while your quads, glutes, and calves stay active in the wall sit.
Because you're holding a static lower-body position while performing a dynamic upper-body movement, your core works overtime to keep your spine stable and your posture upright.
That extra postural demand is a big benefit.
Training your body to stay upright and braced while lifting overhead has crossover into real-world movements, especially anything that involves carrying or reaching overhead under load.
Breathing and Core Engagement Tips
Your breathing can make or break this variation.
Exhale as you press the weights overhead, and inhale as you bring them back down.
This helps stabilize your core and control your movement tempo.
Don’t hold your breath—it builds tension in the wrong places and can throw off your balance.
To keep your core engaged, imagine pulling your ribs down slightly and tightening your midsection as if bracing for impact.
This stabilizes your spine and keeps your upper body from swaying or arching during the lift.
Why This Variation Stands Out
The wall sit with shoulder press is particularly valuable because it forces your body to coordinate effort across multiple planes at once.
While your legs stay still, your arms are moving; meanwhile, your torso is working quietly in the background to keep everything aligned.
That mix of stability, strength, and coordination translates well to both athletic movements and everyday tasks.
It’s also highly scalable—if you’re new to this move, start with light weights or even no weights to nail the movement pattern.
As you get stronger, increase the load or the number of reps to keep pushing your limits.
Whether you're trying to build strength, improve posture, or make your training more efficient, this variation checks a lot of boxes.
Wall Sit with Heel Raises: A Calf-Focused Burn
This variation puts the spotlight on your calves and ankles—areas often overlooked in typical lower-body training.
By simply adding a heel raise to the wall sit, you turn a static hold into a dynamic stability and endurance challenge.
How to Do a Wall Sit with Heel Raises
Get into your usual wall sit position: back against the wall, thighs parallel to the floor, knees at a 90-degree angle, and feet flat.
From there, shift your weight slightly toward the balls of your feet and lift both heels off the ground.
Pause at the top for a moment to feel the contraction in your calves, then slowly lower your heels back down with control.
Repeat this motion while maintaining the wall sit position.
The key is to keep the rest of your body still.
Don’t let your knees bounce or your hips shift as you lift your heels.
Staying grounded through your thighs and core allows the calves to do the work.
Why It Matters
This variation directly targets the calf muscles—especially the gastrocnemius—and also engages the smaller stabilizers around the ankles.
These muscles are critical for explosive movements like sprinting and jumping, but they also support your balance and help absorb shock during everyday activities.
Strong calves contribute to overall lower-body power and injury prevention, particularly in sports where quick direction changes or landing mechanics are important.
Runners, basketball players, and other athletes who rely on lower-leg endurance will benefit from the added focus this variation provides.
How to Increase the Challenge
To make this move harder without adding equipment, play with tempo.
Try lifting your heels slowly over 2–3 seconds, pausing at the top for another 2 seconds, then lowering just as slowly.
The increased time under tension lights up the calves and adds an extra layer of control work for the ankles.
You can also increase reps gradually or mix this variation with others for a combo set—like alternating between heel raises and biceps curls while holding the wall sit.
Just be sure your form stays consistent across all movements.
When and How to Use It
You can treat this as a finisher at the end of a lower-body workout or include it in a circuit targeting multiple muscle groups.
If your calves are a weak link or tend to fatigue early during running or plyometric drills, adding this move to your routine a few times a week can help close that gap.
And because it requires no extra space or setup, it’s an easy variation to integrate into home workouts or warmups.
Just be mindful of ankle fatigue—stop if your form starts to slip or if your balance gets shaky.
Like any small-muscle movement, quality beats quantity here.
How to Structure a Wall Sit Variation Workout
Once you’ve learned how to perform each variation correctly, the next step is putting them together into a workout that fits your goals.
Whether you’re aiming to build strength, improve muscular endurance, or just stay consistent with home-based training, a structured approach makes all the difference.
Sample Circuits Using the Five Variations
There are a few ways to organize your workout depending on how much time you have and what you want to focus on.
A simple starting point is a circuit-style routine, rotating through all five wall sit variations in one session.
Here’s one example:
- Standard Wall Sit – Hold for 45 seconds
- Wall Sit with Biceps Curl – 8 to 12 reps
- Single-Leg Wall Sit (each leg) – Hold for 20 to 30 seconds per leg
- Wall Sit with Shoulder Press – 8 to 10 reps
- Wall Sit with Heel Raises – 12 to 15 reps
Complete the full circuit 2 to 3 times, resting 30 to 60 seconds between each variation, and 1 to 2 minutes between rounds.
How Many Sets, Reps, or Time to Aim For
If you’re new to wall sits or bodyweight training, start with one or two sets of each variation. Aim for:
- Holds: 20 to 45 seconds
- Reps: 8 to 15 per exercise, depending on difficulty and form quality
Over time, build up to longer holds (up to 60–90 seconds) and heavier weights for movements like biceps curls and shoulder presses. Always prioritize form over duration or load.
Rest Periods and Exercise Order
Organize your workout so that more complex movements come first—like the wall sit with shoulder press—when your form and energy are at their best.
Simpler variations like heel raises or the basic wall sit can be slotted later in the session.
As a general rule:
- Take 30 to 60 seconds of rest between variations if you’re focused on endurance.
- Take 60 to 90 seconds if you’re using heavier weights or prioritizing strength.
You can also split the workout across multiple days. For example, combine upper-body wall sit variations (like biceps curls and shoulder presses) into one session, and focus on single-leg and heel raises in another.
How to Progress Over Time
Progression is key to getting results. You can increase the difficulty in several ways:
- Extend the hold time (add 5 to 10 seconds each week)
- Increase reps (go from 8 to 15 over time)
- Add weight to upper-body variations as strength improves
- Slow the tempo (especially for heel raises or curls)
- Combine movements, like holding a single-leg wall sit while performing biceps curls
Tracking your performance each week helps you stay accountable and gives you a clear signal when it’s time to step things up.
Weekly Frequency for Best Results
Most people can benefit from wall sit training 2 to 3 times per week, depending on recovery and how it's integrated into the rest of their fitness routine.
If you're using wall sits as a lower-body strength builder, give your muscles at least 48 hours between sessions.
If you're doing them for endurance or stability, you might include them more frequently in shorter, lighter sessions.
Consistency matters more than intensity at first.
Stick with a repeatable routine, and gradually layer in difficulty as your control and confidence grow.
Conclusion
Wall sit variations are a simple way to get more out of a basic exercise without needing extra space or equipment.
By mixing in these five options, you can target more muscles, improve balance, and keep your workouts fresh.
Start with strong form, progress gradually, and use these variations to build strength that carries over into real life.