The clamshell exercise is a side-lying Pilates movement that strengthens your gluteus medius muscle, which directly improves your squat form by preventing knee cave-in and enhancing hip stability.
You perform it by lying on your side with bent knees and lifting your top knee while keeping your feet together, creating a clamshell-like motion that activates the exact muscles you need for stronger, more stable squats.
Keep reading for the complete technique breakdown, progression strategies, and a full resistance band workout that will transform your squat performance.
Why Clamshells Are Your Missing Link to Stronger Squats
When you're at the top of a clamshell movement, your hip position mirrors exactly where you need to be at the bottom of a squat.
Your hips are slightly open with optimal glute tension—the same muscular engagement pattern that separates a weak squat from a powerful one.
This isn't coincidental; it's biomechanical precision that most lifters overlook.
The Hidden Culprit Behind Squat Failures
Your gluteus medius sits on the outer edge of your buttocks and acts as your hip's primary stabilizer.
When this muscle weakens, your knees cave inward during squats—one of the most common and dangerous compensation patterns you'll see in any gym.
This knee valgus doesn't just limit your lifting potential; it sets you up for injury.
The glute med controls three critical functions that directly impact your squat:
- Hip abduction: Moving your leg away from your body's centerline
- External rotation: Turning your thigh outward to maintain proper knee tracking
- Pelvic stabilization: Keeping your pelvis level and secure under load
When any of these functions fail, your squat mechanics break down.
Your knees drift inward, your hips shift asymmetrically, and your power output plummets.
Why Your Current Warm-Up Isn't Enough
Traditional lower-body warm-ups focus on the bigger, more obvious muscles—your quads, hamstrings, and main glute muscles.
They miss the smaller stabilizers like the gluteus medius that work behind the scenes to keep everything aligned.
You might spend ten minutes on leg swings and bodyweight squats, but if your glute med isn't firing properly, you're building strength on an unstable foundation.
The research backs this up dramatically.
When lifters performed clamshells before their squat sessions, their gluteus maximus activation increased by 57% during regular squats and 53% during single-leg variations.
That's more than half again as much muscle activation from a simple two-minute exercise addition.
Creating the Mind-Muscle Connection
Clamshells do more than just strengthen weak muscles—they teach your nervous system to recruit the right muscles at the right time.
This mind-muscle connection ensures your glutes work as prime movers rather than letting other muscles compensate.
When you can feel your glutes engaging during the clamshell movement, you'll maintain that awareness when you transition to loaded squats.
The beauty lies in the specificity.
You're training the exact hip position and muscle activation pattern you need for squat success, but at a manageable intensity that allows perfect form and conscious muscle recruitment.
Perfect Clamshell Form: Step-by-Step Technique Breakdown
Getting the clamshell right isn't just about lying on your side and lifting your knee.
Every positioning detail matters because small form deviations completely change which muscles do the work.
Setting Up for Success
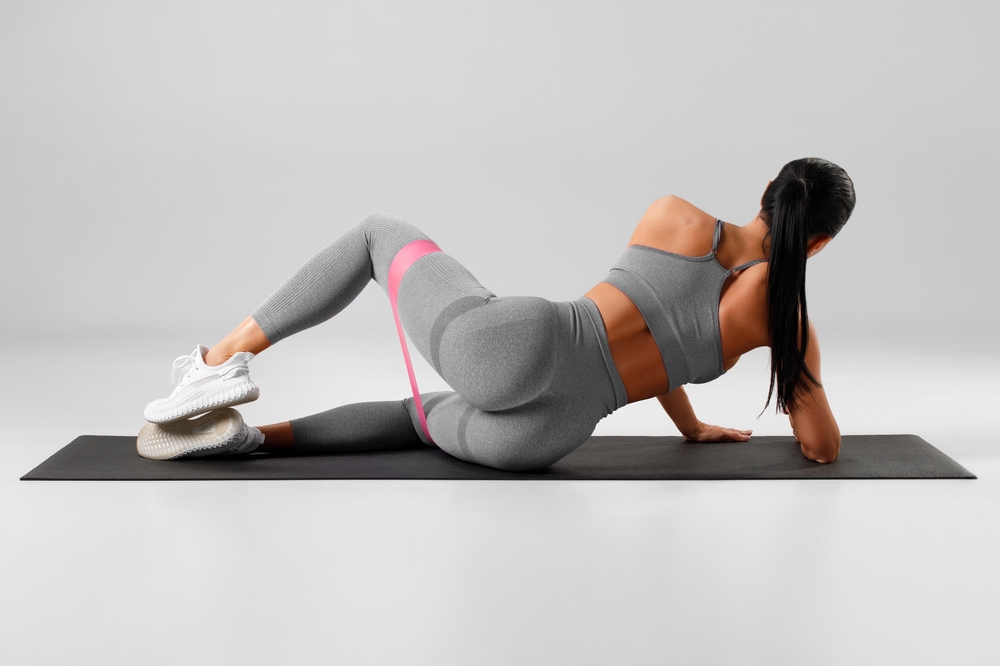
Start by lying on your right side with your knees bent to 90 degrees.
This isn't arbitrary—the 90-degree angle puts your hip in the optimal position to target the gluteus medius while minimizing compensation from other muscles.
Your feet and hips should stack directly on top of each other, creating a straight line from your head to your tailbone.
Draw your knees toward your body until your feet align with your butt.
This tucked position engages your core and prevents your lower back from taking over the movement.
Rest your head on your right arm for support, but keep your neck in a neutral position.
Hand Placement That Makes All the Difference
Place your left hand on your left hip bone—this isn't just for comfort.
Your hand acts as a feedback mechanism to catch any unwanted hip tilting.
The moment you feel your top hip trying to roll backward or forward, you know your form is breaking down.
Keep gentle pressure with your fingertips to maintain awareness throughout the entire set.
The Movement Itself
Here's where most people go wrong.
Keep your feet glued together and raise your left knee as high as possible without letting your hip rotate or your bottom knee lift off the floor.
The movement should feel controlled and deliberate, not like you're trying to open your leg as wide as possible.
Think of it as creating space between your knees while maintaining perfect hip alignment.
You should feel the work happening on the side of your hip, not in your lower back or the front of your thigh.
Critical Form Cues That Separate Good from Great
Your hips must stay vertical throughout the movement.
Picture a wall behind you—your top hip should maintain contact with that imaginary surface without leaning forward or backward.
Engage your core muscles gently, as if someone might tap you in the stomach, but don't hold your breath or create excessive tension.
The real test comes in keeping your feet touching.
This forces your gluteus medius to do all the work instead of letting your hip flexors or other compensatory muscles take over.
Avoiding the Form-Killers
The biggest mistake you can make is turning this into a hip flexor exercise by allowing your knee to drift forward.
Another common error is lifting the bottom knee off the ground, which reduces the stabilization challenge and lets you cheat the movement.
Some people try to maximize their range of motion by rotating their entire torso, but this completely defeats the purpose.
The gluteus medius works best when everything else stays stable—that's literally its job in squats.
When Side-Lying Doesn't Work
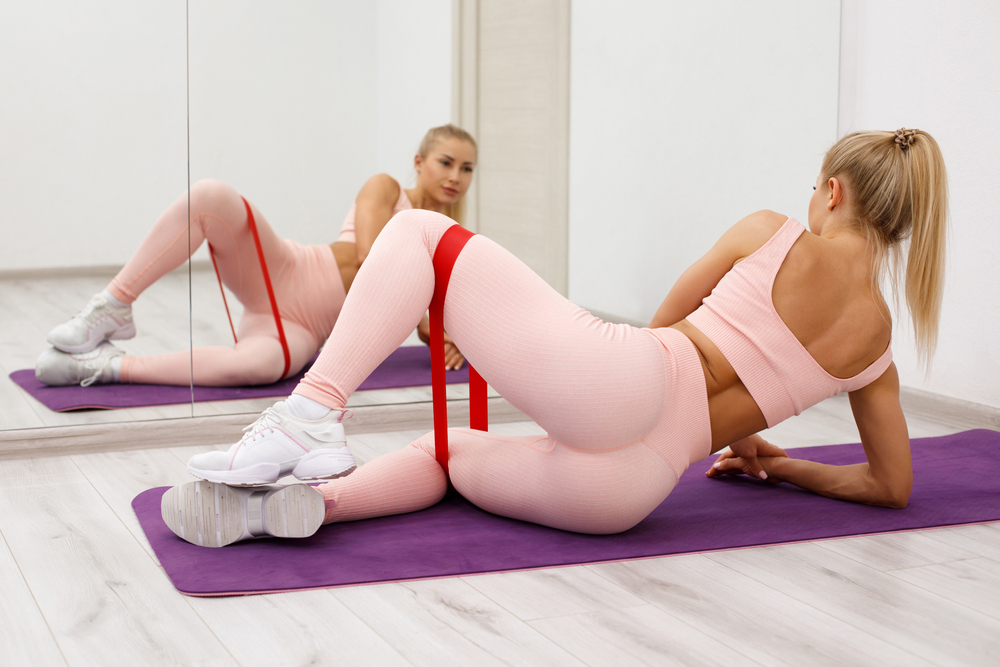
If lying on your side causes hip pain or neck discomfort, you can perform clamshells on your back with a resistance band.
Loop the band around both legs just above your knees, then lie flat with your knees bent and feet flat on the floor.
Push your knees apart against the band resistance while keeping your core engaged.
This variation provides similar gluteus medius activation without the positional challenges of side-lying.
Clamshell Progressions: From Beginner to Advanced
Your progression strategy determines whether clamshells become a game-changing exercise or just another movement you outgrow in two weeks.
The key lies in mastering each level completely before moving forward.
Master Bodyweight First
Never rush past the bodyweight clamshell.
This foundation phase teaches your nervous system the correct movement pattern while allowing you to focus entirely on form.
You should be able to perform 30 consecutive reps with perfect hip alignment and zero compensation before adding any external resistance.
During this phase, concentrate on feeling the burn specifically on the side of your hip.
If you feel it in your lower back, hip flexors, or nowhere at all, your form needs work.
Most people spend 2-3 weeks in this stage, which isn't wasted time—it's investment in long-term results.
Adding Resistance Intelligently
Once bodyweight feels manageable, place a mini resistance band around your thighs just above your knees.
This placement targets the gluteus medius directly while maintaining the natural movement pattern.
Start with the lightest resistance band you can find, typically yellow or red depending on the brand.
The band should provide noticeable resistance without restricting your range of motion.
You want to complete the full movement against resistance, not struggle through a shortened range because the band is too strong.
If you can only lift your knee halfway up, the band is too heavy for your current strength level.
The Progressive Overload Ladder
Resistance band progression follows a logical sequence:
Level 1: Light resistance (yellow/red band) – 3 sets of 15-20 reps
Level 2: Medium resistance (green/blue band) – 3 sets of 12-15 reps
Level 3: Heavy resistance (black/purple band) – 3 sets of 8-12 reps
Move to the next level only when you can complete all prescribed reps with perfect form and the exercise feels notably easier.
This typically takes 2-4 weeks per level, depending on your training frequency and starting strength.
Advanced Variations for Continued Growth
When heavy bands become manageable, you have several options for continued progression.
Try clamshells with a pause at the top position—hold your knee at maximum height for 2-3 seconds before lowering.
This isometric challenge significantly increases difficulty without requiring heavier equipment.
Another advanced option involves combining clamshells with other movements.
Perform a set of clamshells immediately followed by bodyweight squats or glute bridges.
This pre-fatigue approach forces your gluteus medius to work harder during the compound movements.
Smart Progression Timing
Progress when you can complete all sets and reps with textbook form and the last few reps don't feel challenging.
Don't progress if you're compensating with other muscles, can't maintain hip alignment, or feel the exercise in the wrong places.
A good rule of thumb: if you're not sure whether to progress, wait another week.
Moving too quickly leads to form breakdown and reduces the exercise's effectiveness for squat improvement.
Breaking Through Plateaus
When progress stalls, first check your form.
Video yourself from the side to ensure your hips stay vertical and your movement pattern remains clean.
Often, what feels like a strength plateau is actually a form issue that's limiting muscle activation.
If your form is solid but the exercise feels too easy with your current band, try increasing the time under tension.
Slow your movement to a 3-second lift and 3-second lower.
This tempo manipulation can double the difficulty without requiring new equipment.
Another plateau-buster involves changing your knee angle.
Instead of the standard 90 degrees, try 45 degrees or 120 degrees.
These variations challenge your gluteus medius at different muscle lengths and can restart your progress.
Programming Clamshells for Maximum Squat Benefits
How you program clamshells determines whether they become a powerful squat enhancement tool or just another exercise that takes up time.
The difference lies in understanding when, how often, and at what intensity to use them.
Pre-Workout Activation That Actually Works
Three sets of 25-30 bodyweight or light-band clamshells before your squat session creates the ideal glute activation.
This isn't about fatigue—you should feel a good burn and heightened awareness in your glutes, not exhaustion.
The goal is to establish the mind-muscle connection and ensure your gluteus medius is firing properly before you add load.
Perform these activation sets immediately before your first squat exercise, not at the beginning of your entire workout.
The neural activation effects fade within 10-15 minutes, so timing matters more than most people realize.
Frequency for Sustainable Progress
Two to three sessions per week provides optimal results without overdoing it.
Your gluteus medius recovers quickly compared to larger muscle groups, but it still needs time to adapt and strengthen.
Most people see noticeable squat improvements within 3-4 weeks of consistent programming.
Space your clamshell sessions at least 48 hours apart when using them for strength development.
For pure activation purposes, you can perform them before every lower body workout regardless of frequency.
The Complete Corrective Sequence
Effective glute activation follows a specific four-phase protocol that addresses the root cause of weak gluteus medius muscles:
Phase 1 – Inhibit: Foam roll your IT band, tensor fasciae latae, and hip flexors for 60-90 seconds each. These overactive muscles often prevent proper glute function.
Phase 2 – Activate: Perform your clamshells here, focusing on establishing the mind-muscle connection and proper movement patterns.
Phase 3 – Strengthen: Progress to more challenging variations like banded glute bridges or wall sits with external rotation.
Phase 4 – Integrate: Apply the activation to compound movements like banded squats or single-leg exercises where you can practice the motor pattern under load.
Activation vs. Strengthening Applications
Use clamshells differently depending on your primary goal.
For activation, stick to higher reps with lighter resistance, focusing on muscle recruitment and movement quality.
This approach works best as a warm-up tool before squats or deadlifts.
For strengthening, employ lower reps with heavier band resistance, treating clamshells as a legitimate strength exercise.
These sessions should leave your glutes genuinely fatigued and contribute to progressive overload over time.
Volume Guidelines by Training Goal
Your training objective dictates the optimal volume and intensity:
Squat Performance Enhancement: 3 sets of 25-30 reps with light resistance, 2-3x per week
Injury Prevention/Rehab: 2 sets of 15-20 reps daily with bodyweight or minimal resistance
Glute Strength Development: 3-4 sets of 8-15 reps with moderate to heavy resistance, 2x per week
Never sacrifice quality for quantity. Perfect form with lower reps beats sloppy execution with higher numbers every time.
Integration with Compound Movements
The real magic happens when you combine clamshells with multi-joint exercises in the same session.
After your activation sets, move directly into banded glute bridges, which maintain the same muscle activation pattern but add load and range of motion.
Follow this with banded squats, where you can practice maintaining proper knee tracking under resistance.
This progression from isolated activation to integrated strength creates lasting improvements in your regular squat performance.
Some advanced lifters perform clamshells between squat sets as an active recovery method.
This keeps the glutes engaged and can help maintain proper form as fatigue sets in during heavy squat sessions.
Complete Resistance Band Leg Workout for Squat Strength
Resistance bands can build serious leg strength and muscle mass when programmed correctly.
The key lies in choosing the right equipment and understanding how to manipulate variables like tempo and resistance to maximize muscle activation.
Equipment That Actually Works
Heavy-duty 41-inch loop resistance bands are non-negotiable for effective leg training.
These bands provide enough resistance to challenge your muscles in the 8-15 rep range, which is optimal for strength and hypertrophy.
Lighter bands might work for activation, but they won't build the kind of strength that translates to heavier squats.
Look for bands that offer progressive resistance throughout the range of motion.
Unlike free weights that remain constant, bands increase tension as they stretch, providing maximum muscle activation at the strongest point of each movement.
The Seven-Exercise Foundation
This comprehensive routine targets every major movement pattern your legs need for complete development:
1. Resistance Band Back Squats – 4 sets × 10-15 reps
Stand on the band with feet shoulder-width apart, pull the band over your head to rest on your traps. This setup mimics a barbell back squat while providing accommodating resistance that increases as you stand up.
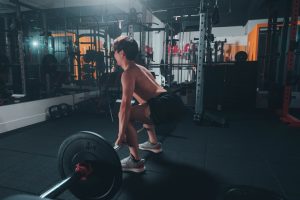
2. Resistance Band Deadlifts – 4 sets × 8-12 reps
The explosive nature of banded deadlifts teaches power development while strengthening your posterior chain. Your hands can move to a neutral position, which often feels more comfortable than a barbell grip.
3. Resistance Band Glute Bridges – 3 sets × 10 reps (pause at top)
This horizontal hip hinge movement complements the vertical patterns and directly targets glute strength. The pause at the top maximizes time under tension and muscle activation.
4. Bulgarian Split Squats – 3 sets × 10-15 reps each leg
Single-leg training exposes and corrects strength imbalances while improving stability. The band provides consistent resistance throughout the movement, unlike dumbbells that can feel easier at certain positions.
5. Romanian Deadlifts – 3 sets × 10-15 reps
These target your hamstrings and glutes through a different range of motion than conventional deadlifts, improving flexibility and strength simultaneously.
Lateral Movement for Complete Development
6. Lateral Band Walks – 2 sets × 12 steps each direction
Place the band around your legs just above your knees and maintain a quarter-squat position throughout. This frontal plane movement strengthens the same gluteus medius muscles targeted in clamshells, but in a functional, weight-bearing position.
7. Resistance Band Clamshells – 3 sets × 25-30 reps each side
These serve as both activation and targeted strengthening, addressing the specific muscle weaknesses that limit squat performance.
Advanced Circuit for Metabolic Conditioning
When you're ready for a serious challenge, perform these six exercises back-to-back with no rest between movements:
- Overhead Squats × 10 reps
- Front Squats × 10 reps
- Zercher Squats × 10 reps
- Deadlifts × 10 reps
- Romanian Deadlifts × 10 reps
- Sumo Deadlifts × 10 reps
Rest 1-2 minutes between complete circuits and repeat 2-4 times total. This approach builds muscular endurance while maintaining strength benefits, creating a potent combination for squat improvement.
Tempo Strategies for Maximum Activation
Higher volume works exceptionally well with bands, but slow tempo manipulation can be even more effective.
Focus on a controlled 3-second lowering phase (eccentric) on every rep.
This time under tension approach maximizes muscle fiber recruitment and creates significant strength adaptations.
For example, during band squats, take three full seconds to lower into the bottom position, pause briefly, then stand up at normal speed.
This simple tempo change can double the difficulty without requiring heavier bands.
Programming for Progressive Results
Choose band resistance that challenges you in the specified rep ranges with perfect form.
If you easily complete 15 reps on squats, move to a heavier band.
The resistance should feel challenging by the final few reps of each set.
Integrate this workout 2-3 times per week, either as a standalone session or combined with your regular training.
The combination of targeted glute activation from clamshells with comprehensive strength training from the other movements creates the perfect environment for squat improvement.
Measuring Progress and Troubleshooting Common Issues
Real progress isn't just about completing more reps—it's about recognizing the subtle changes that indicate your glutes are working better and your squats are improving.
Here's how to track meaningful improvements and solve problems before they derail your progress.
Signs Your Glutes Are Actually Working
You'll notice several key indicators when clamshells are improving your squat performance.
During the exercise itself, you should feel a distinct burn on the side of your hip rather than in your lower back or hip flexors.
This sensation should intensify as you progress through your sets without compensatory movements creeping in.
More importantly, watch what happens during your squats.
Your knees should track better over your toes instead of caving inward, and you'll likely feel more stable in the bottom position.
Many people report that their squat warm-up sets feel more solid and their working weights feel more manageable after 3-4 weeks of consistent clamshell work.
The ultimate test is whether you can maintain proper knee alignment under fatigue.
If your form stays clean through your final squat reps when it used to break down, your gluteus medius is doing its job.
Solving Comfort Problems
Hip pain during side-lying clamshells usually stems from pressure on the bottom hip bone.
Try placing a small pillow or folded towel under your hip for cushioning, or switch to the back-lying variation with a resistance band around your knees.
Neck discomfort typically happens when you crane your head up to watch your movement.
Keep your head in neutral alignment with your spine—you don't need to see your legs to perform the exercise correctly.
Focus on feeling the movement rather than watching it.
If neither position works comfortably, you can perform standing clamshells against a wall.
Stand with your back against the wall, place a band around your legs just above the knees, and push one knee out to the side while maintaining contact with the wall.
This variation provides similar muscle activation without the positioning challenges.
Self-Assessment Checkpoints
Video yourself from behind during the clamshell exercise to check for unwanted hip movement.
Your top hip should stay perfectly vertical throughout the movement—any rolling forward or backward indicates compensation patterns that reduce effectiveness.
During squats, film yourself from the front to assess knee tracking.
Your knees should move in line with your toes, not cave inward toward each other.
This improvement often becomes noticeable within 2-3 weeks of consistent clamshell training.
Another useful checkpoint involves the mind-muscle connection.
Can you consciously contract your glutes during bodyweight squats?
This awareness, developed through clamshells, translates directly to better muscle recruitment during loaded squats.
When to Progress and How to Know
Advance to the next difficulty level when you can complete all prescribed reps with perfect form and the exercise feels notably easier.
For bodyweight clamshells, this typically means 30 consecutive reps without form breakdown or excessive fatigue.
With resistance bands, progression readiness shows up as maintained range of motion throughout all sets.
If you can lift your knee to the same height on rep 30 as you could on rep 1, you're ready for more resistance.
Integration with Your Current Program
Clamshells work with any squat program, but timing matters.
For powerlifting-focused training, use them as activation before your main squat work.
For general fitness programs, they can serve as both activation and accessory strength work.
During deload weeks, maintain clamshell frequency but reduce intensity.
This keeps the motor pattern active while allowing recovery.
During peak training phases, prioritize the activation benefits over trying to progress the exercise itself.
Long-Term Benefits Beyond Squats
Consistent clamshell training creates lasting improvements in hip stability that benefit all lower body movements.
Your single-leg exercises will feel more stable, your walking and running mechanics will improve, and you'll likely experience fewer hip and knee issues over time.
The pelvic stability improvements from strong gluteus medius muscles also enhance your deadlifts, lunges, and even upper body exercises that require a stable base.
Think of it as insurance for your entire movement quality.
Breaking Through Plateaus
When progress stalls, first examine your consistency.
Skipping sessions or performing half-hearted reps will limit improvements regardless of your program design.
Most plateaus result from inconsistency rather than program flaws.
If you're consistent but stuck, try changing one variable at a time.
Modify your tempo, adjust your knee angle, or add pauses at different points in the movement.
These small changes can restart progress without requiring major program overhauls.
Sometimes plateaus indicate that you've achieved the goal.
If your squats feel stable, your knees track properly, and you can feel your glutes working during compound movements, you may have successfully addressed the initial problem.
At this point, maintain your current level rather than pursuing endless progression for its own sake.
Conclusion
The clamshell exercise transforms weak squats into powerful, stable movements by targeting the often-neglected gluteus medius muscle that controls hip stability and knee tracking.
When you consistently perform clamshells with proper form and progressive resistance, you'll notice improved squat mechanics, reduced knee cave-in, and enhanced glute activation that carries over to all your lower body training.
Start with bodyweight clamshells as activation before your next squat session, and within weeks you'll experience the difference that targeted glute strengthening makes in your lifting performance.