Are you looking to build strong and attractive arm muscles? You've come to the right place.
In this article, we'll dive deep into the six most essential exercises that'll help you achieve the arms you've always wanted.
By the time you finish reading, you'll have all the knowledge you need to tackle these workouts confidently and effectively.
So, let's get those arm muscles pumping and start your journey towards powerful, sculpted arms!
Anatomy of the arm
Before we dive into the exercises, it's essential to understand the structure and function of your arm muscles.
A solid grasp of the anatomy will help you target the right areas during your workouts and ensure that you're building the arm muscles effectively.
So, let's dive in and explore the major muscle groups and their functions in detail.
Major muscle groups
There are two primary muscle groups you'll be focusing on when working on your arm strength:
- Biceps: The biceps are located at the front of your upper arm and consist of two parts: the long head and the short head. They're responsible for bending your arm at the elbow and play a significant role in supination, which is rotating your palm upward.
- Triceps: The triceps are situated at the back of your upper arm and consist of three parts: the long head, the lateral head, and the medial head. They're primarily responsible for straightening your arm at the elbow.
In addition to these main muscle groups, there are also some smaller muscles in your arms, such as the brachialis and brachioradialis.
These muscles assist the biceps and triceps during certain movements and help stabilize the elbow joint.
Understanding muscle functions
Having a clear understanding of the roles and functions of your arm muscles will help you target them effectively during your workouts.
Here's a brief rundown of the key functions of the major arm muscles:
- Biceps:
- Flexion: Bending your arm at the elbow.
- Supination: Rotating your forearm, so your palm faces upward.
- Shoulder flexion: Lifting your arm in front of you.
- Triceps:
- Extension: Straightening your arm at the elbow.
- Shoulder extension: Bringing your arm down and back behind you.
Keep these muscle functions in mind as you perform the essential exercises we'll cover later in this article.
Focusing on engaging the right muscles and performing the movements with proper form will ensure that you get the most out of your workouts and build strong, well-defined arms.
#1: Bicep curls
Let's kick things off with a classic arm exercise, the bicep curl!
This staple move targets the bicep muscles in the front of your upper arm and is essential for building well-rounded, powerful arms.
To make the most of this exercise, we'll dive into the proper form and technique, explore different variations, and highlight common mistakes to avoid.
So, roll up your sleeves and get ready to pump those biceps!
Proper form and technique
- Stand tall with your feet shoulder-width apart and your core engaged.
- Hold a weight in each hand (dumbbells or a barbell) with your palms facing forward, arms extended, and elbows close to your body.
- Slowly curl the weight up towards your shoulders, keeping your elbows stationary and only moving your forearms.
- Squeeze your biceps at the top of the movement for a brief moment.
- Gradually lower the weight back to the starting position with control, resisting the urge to let the weights drop quickly.
- Repeat for the desired number of reps and sets.
Variations
- Dumbbell Bicep Curl: This is the most common variation, as it allows you to work each arm independently, ensuring that both sides develop evenly.
- Barbell Bicep Curl: This variation uses a straight or EZ curl bar, which can help you lift heavier weights and target your biceps more intensely.
- Cable Bicep Curl: By using a cable machine, you can maintain constant tension throughout the exercise, which may lead to increased muscle activation and growth.
Common mistakes to avoid
- Swinging the weights: Using momentum to swing the weights up and down can reduce the effectiveness of the exercise and increase the risk of injury. Focus on engaging your biceps and controlling the movement.
- Moving the elbows: Keep your elbows close to your body and stationary throughout the exercise. Allowing them to move away from your body may shift the focus to other muscle groups.
- Hyperextending the wrists: Maintain a neutral wrist position throughout the movement to avoid unnecessary strain on your wrists.
- Going too heavy: Lifting weights that are too heavy for you can compromise your form and lead to injuries. Start with lighter weights and gradually increase as your strength improves.
#2: Tricep dips
Time to shift gears and focus on the other side of your upper arms—the triceps!
Tricep dips are an effective and versatile exercise that targets the muscles at the back of your arms.
To make the most of this exercise, we'll discuss proper form and technique, delve into some useful variations, and point out common mistakes to avoid.
So let's dive in and give those triceps the attention they deserve!
Proper form and technique
- Position yourself between parallel bars or on the edge of a bench or chair with your hands gripping the surface.
- Straighten your arms and keep your legs extended in front of you or bent at a 90-degree angle (depending on the variation).
- Lower your body by bending your elbows until they form a 90-degree angle or slightly less. Make sure your shoulders don't dip below your elbows.
- Press your hands into the surface and extend your arms to lift your body back to the starting position.
- Repeat the movement for the desired number of reps and sets.
Variations
- Bench Dips: Place your hands on the edge of a bench, with your legs either straight out in front of you or bent at a 90-degree angle. This variation is beginner-friendly and can be easily adjusted to suit your fitness level.
- Parallel Bar Dips: This variation requires you to use parallel bars or dip bars to support your body weight. It can be more challenging than bench dips, as you'll need to lift your entire body weight during the exercise.
- Chair Dips: Similar to bench dips, you can use a sturdy chair for support. Make sure the chair is on a non-slip surface to avoid any accidents.
Common mistakes to avoid
- Flaring your elbows: Keep your elbows close to your body during the movement to engage your triceps effectively and reduce strain on your shoulders.
- Shrugging your shoulders: Relax your shoulders and focus on using your triceps to lift your body. Tense shoulders can lead to poor form and unnecessary strain.
- Dropping too low: Lowering your body too much can put excessive stress on your shoulders. Aim for a 90-degree elbow bend or slightly less to maintain proper form.
- Rushing through reps: Perform each repetition with control to maximize tricep engagement and minimize the risk of injury.
#3: Hammer curls
Ready to add another fantastic bicep exercise to your repertoire?
Hammer curls are a great addition to any arm workout, targeting not only the biceps but also the brachialis and brachioradialis, which contribute to overall arm strength and definition.
We'll cover proper form and technique, examine some interesting variations, and point out common mistakes to avoid.
Let's hammer away at those arm muscles!
Proper form and technique
- Stand tall with your feet shoulder-width apart, core engaged, and knees slightly bent.
- Hold a dumbbell in each hand with a neutral grip (palms facing your thighs) and arms extended down by your sides.
- Curl the weights up towards your shoulders while maintaining the neutral grip and keeping your elbows close to your body.
- Squeeze your biceps at the top of the movement for a brief moment.
- Slowly lower the weights back to the starting position with control.
- Repeat for the desired number of reps and sets.
Variations
- Dumbbell Hammer Curl: This is the most common variation, as it allows you to work each arm independently and promotes balanced development.
- Cable Hammer Curl: By using a cable machine and a rope attachment, you can maintain constant tension throughout the movement, which can lead to increased muscle activation and growth. This variation also allows for smooth, controlled movement.
Common mistakes to avoid
- Swinging the weights: Avoid using momentum to swing the weights up and down, as this can reduce the effectiveness of the exercise and increase the risk of injury. Focus on engaging your biceps and controlling the movement.
- Moving the elbows: Keep your elbows stationary and close to your body throughout the exercise. Allowing them to move away from your body may shift the focus away from the target muscles.
- Rushing through reps: Performing each repetition with control helps maximize muscle engagement and minimize the risk of injury. Take your time and focus on the quality of each rep.
- Lifting too heavy: Using weights that are too heavy can compromise your form and lead to injuries. Start with lighter weights and gradually increase as your strength improves.
#4: Close-grip push-ups
Get ready to take your arm workout to the next level with close-grip push-ups!
This effective bodyweight exercise not only targets your triceps but also works your chest, shoulders, and core.
We'll break down the proper form and technique, explore some helpful variations, and discuss common mistakes to avoid.
So, let's push through and fire up those triceps!
Proper form and technique
- Start in a high plank position with your hands placed slightly narrower than shoulder-width apart, directly under your shoulders.
- Engage your core and keep your body in a straight line from head to heels.
- Lower your body towards the ground by bending your elbows, keeping them close to your sides.
- Continue lowering until your chest is almost touching the ground or your arms form a 90-degree angle.
- Press through your palms to extend your arms and return to the starting position.
- Repeat for the desired number of reps and sets.
Variations
- Knee Push-ups: If you're new to close-grip push-ups or find the standard version too challenging, you can perform the exercise on your knees. This variation reduces the amount of body weight you need to lift, making the exercise more accessible.
- Inclined Push-ups: Place your hands on an elevated surface, such as a bench, step, or wall, to perform an inclined close-grip push-up. This variation also reduces the amount of body weight you need to lift, making it a great option for beginners or those looking to ease into the exercise.
Common mistakes to avoid
- Flaring your elbows: Keep your elbows close to your body throughout the movement to engage your triceps effectively and reduce strain on your shoulders.
- Arching or sagging your lower back: Engage your core and maintain a straight body line from head to heels to avoid placing unnecessary stress on your lower back.
- Not going low enough: Aim to lower your body until your chest is almost touching the ground or your arms form a 90-degree angle to ensure you're engaging your triceps and chest effectively.
- Rushing through reps: Perform each repetition with control to maximize muscle engagement and minimize the risk of injury. Focus on the quality of each rep rather than the quantity.
#5: Skull crushers

Don't be intimidated by the name—skull crushers are a fantastic exercise for targeting your triceps and adding serious power to your upper arms.
We'll walk you through the proper form and technique, delve into some useful variations, and share common mistakes to avoid.
So, let's get ready to crush those tricep goals!
Proper form and technique
- Lie down on a flat bench with your feet flat on the ground and your back pressed firmly against the bench.
- Hold a weight (barbell, dumbbell, or EZ bar) with a narrow grip, arms extended straight above your chest, and palms facing each other or away from you, depending on the equipment.
- Bend your elbows and slowly lower the weight towards your forehead, keeping your upper arms stationary.
- Stop just short of touching your forehead and engage your triceps to extend your elbows, lifting the weight back to the starting position.
- Repeat for the desired number of reps and sets.
Variations
- Dumbbell Skull Crushers: Using dumbbells for this exercise allows you to work each arm independently, ensuring balanced development. Hold a dumbbell in each hand with your palms facing each other.
- Barbell Skull Crushers: Perform the exercise using a straight bar or an EZ curl bar with a narrow grip. This variation can help you lift heavier weights and target your triceps more intensely.
- EZ Bar Skull Crushers: The EZ bar has angled grips, which may provide a more comfortable grip and reduce strain on your wrists during the movement.
Common mistakes to avoid
- Flaring your elbows: Keep your elbows close to your body during the movement to engage your triceps effectively and reduce strain on your shoulders.
- Lowering the weight too fast: Control the descent of the weight to ensure you're engaging your triceps properly and minimizing the risk of injury.
- Bouncing the weight off your forehead: Avoid letting the weight touch your forehead, as this can lead to injuries. Lower the weight until it's just above your forehead, then engage your triceps to lift it back up.
- Overextending your wrists: Maintain a neutral wrist position throughout the movement to avoid unnecessary strain on your wrists.
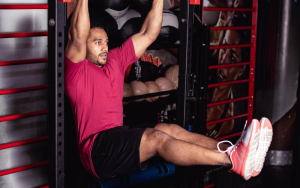
#6: Chin-ups
Chin-ups are an excellent compound exercise that targets not only your biceps, but also your back, shoulders, and core.
Though they might be challenging at first, they're incredibly rewarding and a fantastic addition to your arm-strengthening routine.
We'll cover proper form and technique, explore some helpful variations, and discuss common mistakes to avoid.
So let's get ready to lift your way to stronger arms!
Proper form and technique
- Find a sturdy pull-up bar and grasp it with an underhand grip (palms facing you), hands shoulder-width apart.
- Hang from the bar with your arms fully extended and your feet off the ground.
- Engage your core and pull your body up towards the bar by bending your elbows and driving them down and back.
- Continue pulling until your chin clears the bar.
- Lower your body with control until your arms are fully extended again.
- Repeat for the desired number of reps and sets.
Variations
- Assisted Chin-ups: If you find standard chin-ups too challenging, use an assisted pull-up machine or a resistance band looped around the pull-up bar and under your feet to help support your body weight.
- Weighted Chin-ups: To increase the difficulty of the exercise, add weight by using a weight belt, a weighted vest, or by holding a dumbbell between your ankles.
- Mixed Grip Chin-ups: Using a mixed grip (one palm facing you and the other facing away) can add variety to your workout and engage your muscles differently. This variation can also help you work on any imbalances in your upper body strength.
Common mistakes to avoid
- Using momentum: Avoid swinging your body or using momentum to complete the movement, as this can reduce the effectiveness of the exercise and increase the risk of injury. Focus on engaging your muscles and performing each rep with control.
- Incomplete range of motion: To fully engage your muscles, make sure you start each rep with your arms fully extended and finish with your chin above the bar. Half-reps can limit your progress and muscle development.
- Not engaging your core: Keep your core engaged throughout the movement to maintain proper form and prevent your body from swinging.
- Rushing through reps: Take your time and focus on the quality of each rep rather than the quantity. Perform each repetition with control to maximize muscle engagement and minimize the risk of injury.
Incorporating these exercises into a workout routine
Now that you're armed with these six essential exercises, it's time to learn how to incorporate them into a workout routine for maximum results.
We'll discuss a suggested arm workout plan, tips for mixing and matching exercises, and provide guidance on the frequency and volume needed for optimal results.
So let's put those newfound exercises to work and build the arm muscles you've been dreaming of!
Suggested arm workout plan
Here's a sample arm workout plan that includes all six exercises:
- Warm-up: 5-10 minutes of light cardio and dynamic stretches
- Bicep Curls: 3 sets of 8-12 reps
- Hammer Curls: 3 sets of 8-12 reps
- Chin-ups: 3 sets of 6-10 reps (or as many as you can do)
- Tricep Dips: 3 sets of 8-12 reps
- Close-grip Push-ups: 3 sets of 10-15 reps (or as many as you can do)
- Skull Crushers: 3 sets of 8-12 reps
- Cool-down: 5 minutes of light stretching and deep breathing
Mixing and matching exercises
To keep your workouts fresh and engaging, consider mixing and matching different exercises on different days.
For example, you might alternate between bicep curls and hammer curls, or between tricep dips and close-grip push-ups.
Rotating exercises can help target different muscles and prevent boredom, while also ensuring that you're consistently challenging your body.
Frequency and volume for optimal results
For optimal results, aim to perform your arm workout routine 2-3 times per week, allowing for at least 48 hours of rest between sessions to give your muscles time to recover and grow.
It's important to strike a balance between working your muscles hard and allowing them to recover.
Listen to your body, and adjust the volume (number of sets and reps) and frequency (number of workouts per week) as needed.
Remember, consistency is key, and incorporating these exercises into a well-rounded workout routine that also includes other muscle groups and cardiovascular training will help you achieve your fitness goals faster.
Stay committed, and you'll be well on your way to building stronger, more defined arm muscles!
Staying safe and preventing injuries
Safety should always be a top priority when working out, and staying injury-free is essential for reaching your fitness goals.
In this section, we'll discuss the importance of warming up and stretching, offer tips on proper lifting techniques, and help you understand your limits and when to rest.
Let's ensure you have a safe, enjoyable, and effective workout journey!
Importance of warming up and stretching
Warming up before a workout increases blood flow to your muscles, preparing them for the upcoming exercise, while stretching helps improve flexibility and reduce the risk of injury.
Both activities are crucial for maintaining muscle health and optimizing performance.
- Warm-up: Spend 5-10 minutes on light cardio, such as jumping jacks, brisk walking, or jogging, to get your heart rate up and loosen up your muscles.
- Dynamic stretches: Perform dynamic stretches that mimic the movements you'll be doing in your workout. For arm exercises, try arm circles, shoulder rolls, and wrist circles to target the relevant muscle groups.
- Cool-down: After your workout, spend 5 minutes performing static stretches to help your muscles recover and prevent stiffness.
Proper lifting techniques
Using proper lifting techniques not only ensures you're effectively targeting the intended muscles but also helps minimize the risk of injury.
Some general lifting tips include:
- Maintain a neutral spine: Keep your back straight and avoid rounding or arching during exercises.
- Control the movement: Lift and lower weights with control to maximize muscle engagement and prevent injuries caused by momentum or poor form.
- Breathe: Exhale during the effort phase (lifting or pushing) and inhale during the recovery phase (lowering or releasing).
- Focus on form: Prioritize correct form over the amount of weight lifted. If you can't maintain proper form, consider reducing the weight.
Knowing your limits and when to rest
- Start with lighter weights: Begin with lighter weights and gradually increase as you become stronger and more comfortable with the exercises.
- Don't push through pain: If you experience pain during an exercise, stop immediately to prevent injury. Consult a fitness professional or healthcare provider for guidance.
- Allow time for recovery: Give your muscles at least 48 hours to recover between workouts targeting the same muscle group. Overworking your muscles can lead to injuries and hinder your progress.
- Listen to your body: Your body can provide valuable feedback about when it's time to rest. Pay attention to signs of fatigue, such as poor form, a drop in performance, or increased muscle soreness.
By following these safety tips and staying in tune with your body, you can enjoy a healthy, effective workout journey that leads to stronger arms and better overall fitness.
Conclusion
In conclusion, these six essential exercises are key to building strong, well-defined arm muscles.
By incorporating them into your workout routine, focusing on proper form and technique, and prioritizing safety and injury prevention, you'll be well on your way to achieving the toned and powerful arms you desire.
Remember, consistency is crucial, so stay dedicated to your workouts and keep challenging yourself as you progress.
Happy lifting!