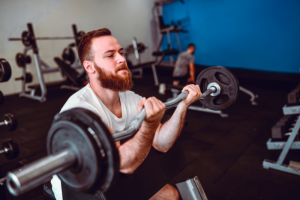
The EZ-bar preacher curl is a biceps isolation exercise where you rest your upper arms on an angled pad, curl the bar up with strict form, and lower it slowly — keeping your arms locked against the pad throughout.
Read on for a full breakdown of setup, execution, common mistakes, and how to program it effectively.
What the EZ-Bar Preacher Curl Actually Does
The preacher curl's defining feature is the angled pad — typically set between 45 and 60 degrees — which pins your upper arms in place for the entire set. That fixed position is what separates it from most other curl variations. Without the ability to swing your torso or shrug your shoulders into the movement, the biceps have to do the work on their own.
The muscle breakdown looks like this:
- Primary mover: biceps brachii
- Secondary movers: brachialis and brachioradialis (forearm)
- Stabilizers: wrist flexors
Compared to a standing curl, there's significantly less involvement from the chest, shoulders, and core — which is exactly the point. You're not going to move as much weight, but the muscles you're targeting are actually doing the job.
One thing worth knowing before you load the bar: the preacher position holds your shoulder in slight flexion, which pre-shortens the biceps somewhat.
This shapes where the exercise feels hardest and easiest throughout the rep — something covered in more detail in the resistance profile section below.
As for the EZ bar specifically, the cambered (W-shaped) grips place your wrists in a semi-supinated position, somewhere between fully palms-up and neutral.
A straight bar forces full supination, which puts more strain on the wrists and medial elbow over time.
The activation difference between the two is small, and the EZ bar's comfort advantage makes it the smarter choice for anyone doing higher training volumes or dealing with any wrist or elbow sensitivity.
Setup and Equipment
Getting the setup right matters more here than on most exercises. A poorly adjusted seat or sloppy starting position bleeds tension away from the biceps before you've even lifted the bar.
Seat Height
This is the single most important adjustment. You want your upper arms to rest flat and comfortably on the pad, with your armpits sitting close to the top edge.
If the seat is too low, your arms angle downward and you lose pad contact at the top. Too high, and your shoulders creep into the movement to compensate. Take an extra thirty seconds to dial this in — it makes a real difference.
Once the seat is set, the rest of your body position follows naturally:
- Chest pressed against the top of the pad
- Feet flat on the floor
- Shoulders rolled back and down, not hunched forward
Grip and Bar Setup
Use the inner angled grips on the EZ bar with an underhand (palms-up) hold, roughly shoulder-width apart.
The bar itself typically weighs somewhere between 6 and 14 kg before any plates, so factor that in when loading — it's easy to underestimate on a movement where control matters this much.
On grip width, you'll hear that wider grips target the short (inner) head and narrower grips hit the long (outer) head more. The evidence behind this is thin, so don't overthink it.
A more practical approach is to find the width where you can feel the biceps working without any wrist discomfort, and stick with that.
Step-by-Step Execution
- Set your starting position. Unrack the bar with your arms nearly extended over the pad — elbows soft, not locked out. This is your starting point for every rep.
- Lower into the stretch. Let the bar descend slowly until your arms are almost straight and you feel a genuine stretch in the biceps. Stop just short of a hard lockout — the reasons for this are covered in the next section, but the short version is that full hyperextension under load puts stress on the elbow rather than the muscle.
- Curl up with control. Drive the bar toward your shoulders by flexing at the elbows, keeping the backs of your upper arms pressed firmly into the pad the entire way up. If your elbows are drifting or flaring, the weight is too heavy.
- Squeeze at the top. Hold the contracted position for about a second. In the preacher position, tension can drop off near the very top of the movement, so stop just before that point rather than chasing a higher range where the biceps are essentially unloaded.
- Lower slowly. Take 2–4 seconds on the way down and resist the urge to let the bar drop or bounce at the bottom. The controlled descent is where a significant portion of the stimulus comes from.
Throughout every rep, exhale on the way up and inhale on the way down. Keep your wrists straight and stacked with your forearms — letting them bend under the bar is a sign the load is too much or your grip position needs adjusting.
Understanding the Resistance Profile
The preacher curl feels different from a standing curl for a specific mechanical reason, and understanding it will change how you approach every rep.
In a standing curl, the movement is hardest around the midpoint where leverage is worst. On the preacher bench, that curve flips — the hardest point is at the bottom when your arms are extended, and it gets progressively easier as you curl up.
By the time you reach the top, there's very little tension left on the muscle at all.
This has two practical implications. First, the stretched position at the bottom is where the growth stimulus is highest, which means that's the part of the rep you should be most deliberate about. Rushing through it or cutting it short defeats much of the purpose of the exercise.
Second, that same bottom position is also where the risk is greatest. At or near full extension under load, tension shifts away from the muscle belly and toward the distal biceps tendon — the attachment point near the elbow — which doesn't tolerate heavy stretch-loading well.
The practical rule is straightforward: lower into a deep stretch with your arms nearly straight, but stop short of aggressive hyperextension. There's no benefit to that last few degrees of range, and the injury risk isn't worth it.
One technique worth adding once your form is solid: pause briefly at the bottom of each rep before curling back up.
This eliminates any tendency to bounce or use the stretch reflex to pop the weight up, keeping the tension where it belongs and making each rep noticeably harder — in the right way.
Mistakes That Kill Your Results
Most errors on this exercise trace back to one root cause: too much weight. When the load is too heavy, your hips lift off the seat, your torso swings, and what started as a strict isolation movement turns into a full-body effort. Drop the ego, drop the weight, and the rest of your form tends to fall into place.
That said, there are a few other patterns worth watching for:
Elbows leaving the pad. The moment your upper arms lift off the pad, the shoulders take over and the biceps get a free ride. Keep the backs of your arms glued down for the entire rep — if they're coming up, the weight is too heavy or you're fatiguing faster than you realize.
Bouncing out of the bottom. Using the stretch reflex to pop the bar up at the bottom of the rep removes tension from the biceps at the most important point of the movement. Lower with control, and if you're adding the brief pause mentioned in the previous section, this habit disappears quickly.
Partial range of motion. Operating only in the comfortable middle range — not reaching the bottom stretch and not fully contracting at the top — cuts out the two most productive portions of the rep. Full range matters here more than on most curl variations.
Rushing the eccentric. Dropping the bar quickly on the way down wastes the stimulus the preacher setup is specifically designed to provide. A 2–4 second lowering phase isn't optional — it's where a lot of the value lives.
Hard lockout at the bottom. Fully extending and then hyperextending under load shifts stress onto the elbow's passive structures rather than the muscle. Nearly straight is the target — not completely straight, and certainly not beyond it.
Programming and Progression
This is an accessory movement, not a strength lift — so expect to use less weight than you would on a standing curl and program it accordingly.
Set and Rep Ranges
Match your scheme to your goal:
- Hypertrophy: 3–4 sets of 8–12 reps, 60–90 seconds rest. A 10–15 rep range with slow eccentrics works well here too.
- Strength-leaning: 4–5 sets of 6–8 reps with a heavier load and longer rest periods — but strict form is still non-negotiable.
- Endurance/pump: 2–3 sets of 15–20 reps with short rest intervals.
Placement and Frequency
Program it mid-to-late in your session, after compound pulling movements like rows or chin-ups.
It fits naturally on a pull day or a dedicated arm day. Twice per week is a reasonable target, with at least 48 hours between sessions to allow recovery.
How to Progress
Once your form is consistent, work through this order:
- Load — add small increments of around 2.5–5 lb (1–2 kg) every couple of weeks while keeping reps and form constant. Small jumps feel disproportionately large on a strict movement like this.
- Volume — add reps or an extra set before forcing a weight increase.
- Technique — lengthen the eccentric to 3–4 seconds, or add a 1–2 second paused squeeze at the top.
Advanced Finishers
Once you've built a solid base, techniques like drop sets, rest-pause clusters, slow negatives, and 21s (seven bottom-half reps, seven top-half, seven full) can be useful as occasional finishers.
The locked-in pad position keeps tension on the muscle even as you fatigue, which makes these methods particularly effective here. Use them sparingly though — they're a tool, not a weekly staple.
Finally, the preacher curl works best as part of a broader curl rotation rather than your only biceps movement.
Pairing it with a contrasting variation — an incline curl or hammer curl, for instance — gives you better overall development than relying on any single exercise alone.
Conclusion
The EZ-bar preacher curl is one of the more straightforward biceps exercises to understand but one of the harder ones to actually do well — setup, control, and load selection make or break it.
Run through the setup checklist before each session, keep the weight honest, and treat the slow lowering phase as a non-negotiable part of every rep. Do that consistently, and the results will follow.