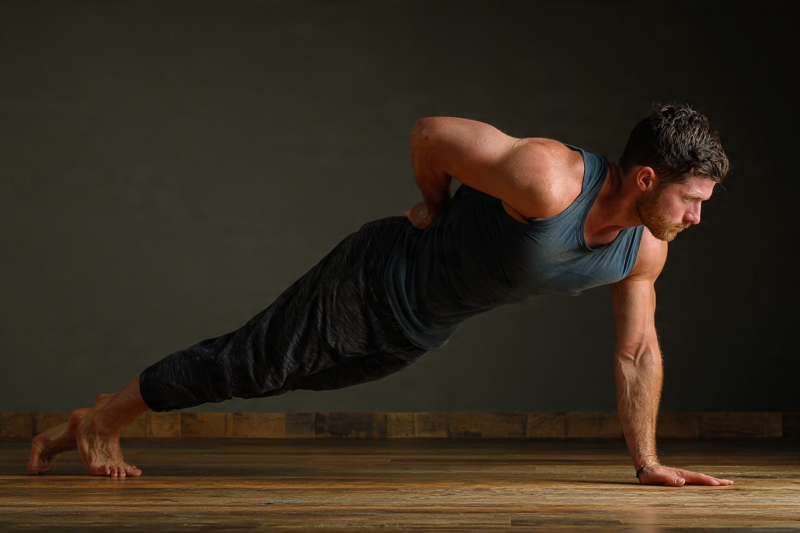
To do the elevated plank row properly, place hex dumbbells on a sturdy bench shoulder-width apart, get into a high plank with your shoulders stacked over your wrists and feet wider than hip-width, brace your entire body, then row one dumbbell toward your hip by retracting your shoulder blade first — keeping your hips square to the floor throughout.
Keep reading for a full breakdown of the setup, rowing mechanics, common mistakes, and how to scale the exercise to your level.
How to Set Up Before You Row
Your platform sets the difficulty before you even touch a dumbbell. A standard flat bench at 17–18 inches is the most common starting point, but a 6–8 inch plyo box or step works well for a harder variation.
The rule is simple: the higher the surface, the easier the exercise — so if you're newer to this movement, start higher and work your way down over time.
Once you've picked your platform, grab a pair of hex dumbbells. The flat sides matter — round dumbbells can shift under load, which is a stability and safety problem.
Place them shoulder-width apart on the bench with a neutral grip (palms facing each other), and make sure your shoulders are stacked directly over your wrists. Hands too far forward puts your shoulder joint in a compromised position from rep one.
Step back into a high plank and set your feet wider than hip-width — most coaches recommend at or just beyond shoulder-width. A wider base gives you more stability and makes anti-rotation easier to manage; narrowing your stance increases the core demand. Stay on the balls of your feet and check that your body forms one straight line from ear to ankle with your gaze down toward the floor.
Before you row a single rep, lock everything down:
- Take a deep breath 360 degrees around your spine
- Tuck your ribs toward your hips
- Squeeze your glutes to stabilize the pelvis
- Engage your quads to keep the lower body rigid
One easy cue for the support arm: actively push the bench away rather than just resting on it. This engages the serratus anterior and keeps the shoulder blade stable throughout the set. The whole-body tension you build here is what holds your position together once the row starts.
How to Row With Proper Mechanics
The most common mistake in this movement is letting the biceps lead the pull. Instead, start by retracting the shoulder blade — drawing it toward your spine — before the arm does anything. Once the scapula moves, the elbow follows. This sequencing puts the lats and rhomboids in charge of the movement, which is exactly where the work should be.
From there, keep your elbow tucked at roughly 30–45 degrees from your torso and drive it toward your hip, not toward the ceiling.
Row the dumbbell up to your lower rib cage so the elbow reaches or just clears torso level at the top. If your elbow is flaring wide, you've shifted the load onto your shoulders and away from the muscles that should be doing the work.
At the top of each rep, pause. A 1–2 second hold at peak contraction is standard; advanced lifters can push that to 3–5 seconds for more time under tension. Either way, squeeze the shoulder blades together before you lower the weight.
On the way down, reverse the pattern deliberately:
- Lower the dumbbell over 2–3 seconds — no dropping
- Let the shoulder blade protract (move away from the spine) as the weight descends
- For a harder variation, hover the dumbbell 1–3 centimeters above the bench rather than letting it rest, keeping tension through the whole set
- Reset your full-body brace before starting the next rep
Breathing is worth getting right. Inhale as the dumbbell lowers, exhale as you row. Some coaches prefer holding the breath for the duration of each rep and resetting between reps — either works, as long as your core stays rigid.
What doesn't work is holding your breath across multiple consecutive reps, which spikes blood pressure and is worth avoiding regardless of how experienced you are.
What Muscles Are Actually Working
The pulling side of this exercise is straightforward. Your lats and rhomboids drive scapular retraction and shoulder extension — the core mechanics of the row — with the mid and lower traps, rear deltoids, and biceps contributing to the pull. These are the muscles you feel working, but they're only part of the story.
What makes the elevated plank row different from a standard row is everything else that's firing at the same time.
The anti-rotation core demand is where this exercise earns its reputation. The moment one hand lifts off the bench, your body wants to twist open. The internal and external obliques are what stop that from happening — they're working hard every rep to resist the rotational torque created by the unilateral load.
Meanwhile, the rectus abdominis keeps your hips from sagging toward the floor, and the transverse abdominis — the deepest layer of your core — generates the intra-abdominal pressure that keeps your trunk rigid throughout.
The stabilizer list is longer than most people expect:
- Glutes — lock the pelvis and resist hip rotation
- Quads — keep the lower body stiff and in position
- Rotator cuff (all four muscles) — protect the glenohumeral joint on both arms
- Serratus anterior — protracts and stabilizes the scapula on the support side
- Triceps — keep the support elbow locked under load
- Forearms and grip — maintain dumbbell contact across every rep
The takeaway is that this movement taxes nearly everything from your hands to your hips at once. That's why load has to stay conservative — you're not just rowing weight, you're holding your entire body together while you do it.
The Most Common Mistakes (And How to Fix Them)
Hip rotation is the number-one form failure — and virtually every trainer who coaches this exercise says the same thing. When the rowing arm lifts, the hips and shoulders naturally want to twist open.
Letting that happen defeats the anti-rotation purpose of the exercise entirely and puts unnecessary stress on the lumbar spine. If you're rotating, the fix is usually one of three things: widen your stance, squeeze your glutes harder, or reduce the load. Often, it's all three.
Which brings up the second problem: too much weight. The load you'd use for a standard bent-over row is far too heavy here. Even experienced lifters find 10–16 lb dumbbells genuinely challenging when plank stability is part of the equation.
Excessive weight forces compensatory twisting, shrugging, and half-reps — none of which build anything useful. Start lighter than feels necessary and earn the right to add load.
Rushing is the other major issue. This is a control exercise, not a conditioning drill. The 2–3 second concentric and eccentric phases aren't optional — they're what makes the movement work. Speed kills core engagement and turns a precision drill into sloppy momentum work.
Beyond those three, here are the smaller errors that add up quickly:
- Hip sag — compresses the lumbar spine and signals your core has checked out
- Piked hips — reduces engagement in both the core and the working back muscles
- Flared elbows — shifts load onto the shoulders and away from the lats
- Shrugging the rowing shoulder — limits lat engagement and strains the neck
- Looking up instead of down — hyperextends the cervical spine and breaks alignment
A reliable self-check: if your hips rotate even with the lightest weights available, you're not ready to add load yet.
Regress the movement first — raise the surface, widen your stance, or go back to unweighted shoulder taps — and build from there. Quality of position always comes before progression.
Weight Selection and Programming
Because this exercise combines a stability demand with a pulling movement, appropriate loads run significantly lower than what you'd use for any standard rowing variation. Here's a practical breakdown by level:
| Level | Load Range | Sets & Reps |
|---|---|---|
| Beginner | 2–10 lbs | 2–3 sets of 5–8 reps per side |
| Intermediate | 8–20 lbs | 3–4 sets of 8–10 reps per side |
| Advanced | 15–35+ lbs | 3–4 sets of 10–15 reps per side |
A few notes on each level. Beginners should master a 60-second plank before adding any weight at all — if you can't hold the position unloaded, a dumbbell will only make the problem worse.
Intermediate lifters should pair their sets with slow eccentrics and a deliberate pause at the top. Advanced lifters can add weight only in 2.5–5 lb increments, and only when every rep across every set shows zero hip rotation. That's a stricter standard than it sounds.
Where it fits in your session depends on your goal:
- Early in the workout — pairs well with other core movements as a full-body activation drill
- Mid-workout — works as an upper-body accessory alongside overhead pressing
- End of session — functions as a core finisher when the primary work is done
Two to three sessions per week is the standard recommendation, with at least 24–48 hours between sessions that target the same muscle groups.
For rest periods, take 60–90 seconds between sets when training for strength. In circuit or conditioning formats, keep rest minimal. The exercise adapts well to both contexts — what changes is the intent, not the movement itself.
How to Progress or Regress Based on Your Level
The elevated plank row sits on a clear difficulty continuum, which makes it easy to scale in either direction without switching to a different exercise entirely.
If the standard setup is too demanding, work back through these regressions in order:
- Raise the surface higher (a countertop is the gentlest starting point)
- Widen your foot stance to reduce the anti-rotation demand
- Drop to your knees, keeping a straight line from head to knees
- Remove the weight entirely and practice shoulder taps from a plank
- Try bird-dog rows from a quadruped position before returning to the full plank version
When you're ready to make it harder, follow this progression sequence — control first, complexity second, load last:
- Lower the surface incrementally toward the floor
- Narrow your foot stance
- Add tempo — slower eccentrics, longer pauses at the top
- Increase dumbbell weight in small increments
- Add a push-up between alternating rows
- Lift the opposite foot off the ground (single-leg variation)
- Move to a full floor-level renegade row
- Progress to a feet-elevated decline variation — though this one is strictly for advanced athletes, as it dramatically increases extension forces on the spine
A few safety points worth keeping in mind:
- Use hex dumbbells only — round dumbbells can roll under load and cause falls or wrist injuries
- Keep your wrists neutral throughout; the elevated surface already reduces wrist stress compared to the floor version, making it a better fit for anyone with wrist sensitivity
- Keep shoulders packed — depressed and pulled back, away from the ears — on both sides
- Never slam the dumbbell down between reps; control the descent every time
- If you have active wrist or shoulder pain, or can't maintain plank position even with the lightest weights, skip this exercise until those issues are resolved
Finally, a handful of coaching cues worth committing to memory. For setup: push the bench away to engage the support shoulder. For the row: drive your elbow to your hip, not your armpit.
And above everything else: keep your hips square to the floor. That last one is the cue that holds the whole movement together — if you take nothing else from this guide, take that.
Conclusion
The elevated plank row looks simple but rewards anyone who takes the time to do it right — lighter loads, deliberate tempo, and zero tolerance for hip rotation.
The elevation lowers the barrier to entry without giving anything away, keeping the anti-rotation core challenge and back-building benefits fully intact.
Treat it as a stability exercise that happens to include a row, and it becomes one of the most efficient full-body movements you can do with nothing more than a bench and a pair of dumbbells.