To stop losing your balance during single-leg deadlifts, you need to actively grip the floor with your toes, engage your core before you move, fix your eyes on a single point 3-4 feet ahead, and keep your hips square throughout the movement.
Slow down your tempo, maintain a soft bend in your standing knee, and squeeze tension through your shoulders and upper back to create full-body stability.
Keep reading for the complete breakdown of each technique, progressive training methods, and specific fixes for every balance problem you're experiencing.
Setting Your Foundation: Foot Position, Core, and Visual Focus
Your standing foot determines everything that happens above it.
Spread your toes wide and actively grip the ground like you're trying to grab the floor.
This creates what's called a tripod contact through three specific points: your big toe, pinky toe, and heel.
That active gripping isn't just about stability—it engages your arch and ankle stabilizers, which are doing the heavy lifting to keep you upright.
Keep your weight centered in the middle of your foot throughout the movement.
Many people shift back onto their heels thinking it helps with balance, but it actually does the opposite.
Even pressure across your entire foot surface gives you the most stable platform.
Your footwear matters more than you might think.
Barefoot training or minimalist shoes with flat soles give you better proprioception—your body's sense of where it is in space.
Traditional athletic shoes with elevated heels and cushioned soles work against you here because they reduce your contact area and dull the sensory feedback your foot sends to your brain.
Core engagement happens before you move.
Use what's called the thread method: imagine a string pulling from your belly button straight back to your spine.
This creates that hollow-body position you need.
Once you've established that tension, hold air in your diaphragm as you simultaneously push your hips back and tip your torso forward.
This coordinated breathing creates intra-abdominal pressure that acts like an internal weight belt, preventing that wobble that throws you off balance.
The timing here is critical.
Engage your core first, take the breath, then move.
Reversing this order leaves you unstable from the start.
Now for your eyes. Pick one specific point on the floor 3-4 feet in front of you, roughly at knee or hip height.
That point doesn't move. Your head and torso move together as a single unit—where your chest points, your eyes follow.
Tuck your chin slightly, as if you're holding an egg under it.
This keeps your neck aligned and prevents strain.
Looking up while your body descends creates instability through your entire kinetic chain.
Looking down too close to your feet throws off your balance just as badly.
That 3-4 foot distance gives you the optimal visual reference point to maintain control throughout the entire range of motion.
Creating Upper Body Tension and Stability
Creating tension through your lats and upper back dramatically improves your balance.
Imagine you're trying to crush something in your armpits or hold a pencil between your shoulder blades.
That mental cue forces you to activate the muscles that stabilize your torso.
Pull your shoulders down and back, away from your ears.
This is what lifters call “packing the shoulder,” and it stabilizes your entire upper body while preventing the weight from pulling you forward.
When you're holding weight, squeeze the handle or barbell like you're trying to leave fingerprints in it.
Stiffen your triceps and pull that tension down through your shoulders.
This firm grip does more than just secure the weight—it activates your entire kinetic chain from your hand through your shoulder, creating a solid connection that keeps everything locked in place.
Keep your arms rigid and in line with your armpits throughout the movement.
If you're working with weight in one hand, you'll want to use contralateral loading—that means holding the weight in the hand opposite to your standing leg.
This setup activates your core's diagonal muscle chain that connects your shoulder to your opposite hip, giving you significantly better stability than same-side loading.
Here's what to do with your free arm: extend it straight out to the side and make a tight fist.
That additional tension isn't just for show. It maintains square shoulders and prevents rotation, which is one of the fastest ways to lose your balance mid-movement.
Even that free arm becomes an active part of the exercise rather than just hanging there doing nothing.
Hip Positioning and Managing Your Raised Leg
Your hips must stay square to the floor throughout the entire movement.
Picture a level sitting across your pelvis that needs to remain perfectly parallel to the ground.
The most common balance error happens when the hip of your raised leg hikes up or rotates open—this immediately destabilizes everything above and below it.
A better mental cue: think of your pelvis as a bucket of water that you cannot spill from the front, back, or sides.
This image forces you to maintain control in all directions rather than just focusing on one plane of movement.
Your standing hip should stack directly over your standing foot.
Many people compensate for instability by shifting their hip out to the side, but this creates more problems than it solves.
Keep that vertical alignment locked in. Your back foot's toes should point straight down toward the floor, not turned outward.
When your toes rotate out, your hips follow, and you've lost that square position you worked to establish.
Your raised leg isn't passive—it's an active balance tool.
Contract the quads and glutes in your non-working leg to create tension.
Keep that leg relatively close to your body's midline rather than letting it swing wide.
When it drifts away from center, it acts like a pendulum throwing you off balance.
If you're struggling, modify the lever length by keeping your non-working leg bent at 90 degrees instead of fully extended.
This reduces the balance challenge while you're building the foundational control.
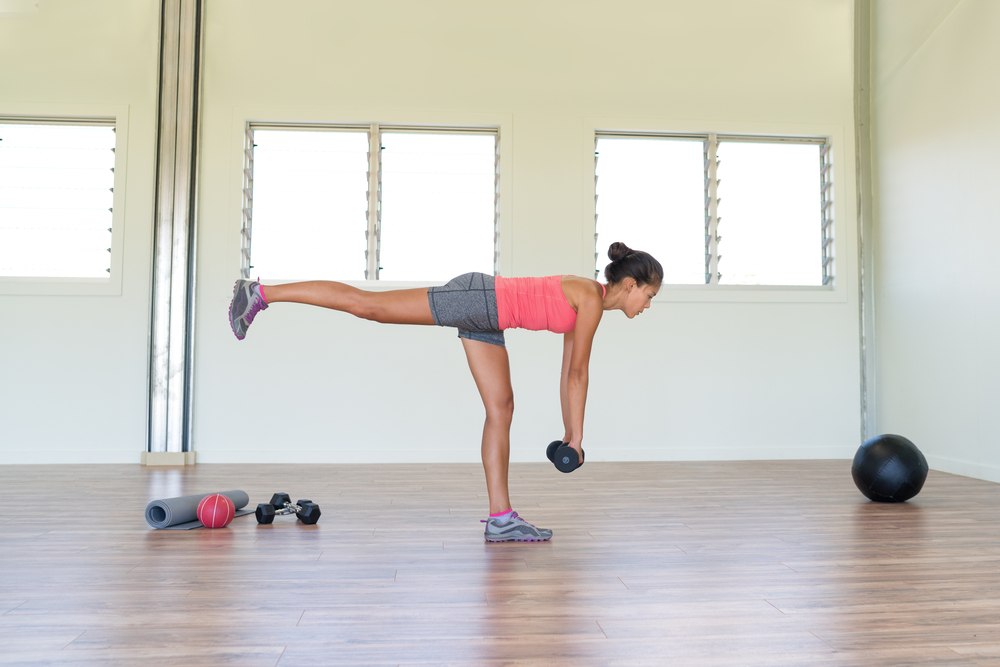
Think of your body as a seesaw.
Your torso lowers only as much as your back leg rises, maintaining a straight line from your raised heel through your spine to the top of your head.
This isn't just about aesthetics—that straight line represents proper force distribution through your entire posterior chain.
Executing the Movement Pattern Correctly
The movement starts at your hips, not your torso.
Push your hips backward to initiate the descent—don't lean forward with your chest.
Imagine a rope pulling your hips back or that you're pushing your glutes against a wall behind you.
This hip-driven pattern is what separates a proper hinge from just bending over.
Your standing leg needs a soft bend in the knee.
Never lock it straight, which creates instability and removes muscular engagement.
But don't bend it excessively either. Find that slight knee bend that allows you to load your hip properly while keeping your weight centered in the middle of your foot.
This sweet spot varies slightly between individuals, so experiment to find what gives you the most control.
Know when to stop.
Your end position is either where you can no longer maintain balance or where your back begins to round—whichever comes first.
There's no prize for touching the floor if it means sacrificing your form.
Most people should lower weights to knee height initially, then progress to mid-shin depth over time as their stability and mobility improve.
Tempo matters more than you think.
Rushing destroys balance.
Use a controlled 3-second lowering phase—this gives your stabilizer muscles time to activate and adjust.
At the bottom, pause for 1-2 seconds to truly own the position.
This pause eliminates momentum and forces you to demonstrate real stability rather than just bouncing through the movement.
On the way up, push through your standing foot as if you're pressing the floor away from you.
Squeeze your glute hard and drive your hips forward to return to standing.
Keep the weight close to your body throughout the entire range of motion.
When it drifts forward, it pulls you off balance.
Practice on a hard, flat surface when you're starting out.
Carpet or soft surfaces make balance more difficult because they reduce the stability feedback your foot receives from the ground.
Progressive Training Approach: From Zero to Loaded
Before you attempt the full movement, test your basic single-leg balance.
Stand on one leg with your opposite knee lifted high and hold for 10 seconds, gripping the floor with your toes and engaging your core.
If you can't hold this position for 10 seconds per side, practice this drill until you can.
There's no point moving forward if your foundation isn't solid.
The progression sequence:
- Wall-assisted hip hinge – Practice the hinge pattern with your raised shin pressed against a wall behind you. This creates a second stability point and lets you focus on the movement mechanics without requiring full balance control.
- Staggered stance – Move to a B-stance or kickstand deadlift where your back foot's toes lightly touch the floor behind you. Use a 70/30 weight distribution, keeping most of your weight on your front leg. This maintains most of the single-leg benefits while giving you a safety net.
- Assisted single-leg variations – Use a foam roller placed vertically beside you to rest one hand on for support. As your balance improves, move the roller farther away and apply less pressure until you're barely touching it with one finger. You can also hold onto a wall, bench, or doorframe with one hand while practicing, gradually reducing your reliance on the support.
Some people find that resistance bands anchored to a wall in front of them provide a subtle forward pull that actually enhances balance without removing the challenge entirely.
The band creates a counterbalance that can help you find your center of gravity.
Master the bodyweight pattern completely before adding any weight.
When you're ready to load the movement, start with a single 5-10 pound kettlebell or dumbbell held in the hand opposite your standing leg.
This contralateral loading activates your core sling system—the diagonal chain of muscles connecting your shoulder to your opposite hip—and gives you significantly better rotational stability than same-side loading.
Focus on control rather than weight.
Once you've mastered the single-weight pattern, you can progress to two weights held at your sides for more symmetrical loading, though this provides less rotational challenge.
Programming guidelines:
Perform 2-3 sets of 5-8 reps per leg when you're starting out.
Always begin with your weaker side and match the reps on your stronger side—don't exceed what your weaker side accomplished.
This naturally corrects imbalances over time.
Schedule single-leg deadlifts early in your workout when you're fresh.
They require high neurological demand, and attempting them when you're fatigued from other exercises will compromise both your balance and form.
Train them 1-2 times per week with adequate recovery between sessions.
As your balance and strength improve, you can increase to the 8-12 rep range while maintaining perfect form.
Fixing Common Balance Mistakes
If you're wobbling excessively, you have one of three problems: you're not gripping the floor hard enough with your toes, your core isn't braced properly, or you're moving too quickly.
Reset your foundation.
Plant your foot firmly, engage your core before you move, find your focal point, and slow down your tempo.
Most wobbling issues disappear when you address the basics.
Falling forward means either weak lat engagement, insufficient core bracing, or weight that's too heavy for your current stability level.
Tighten your grip on the weight, pull your shoulders back and down, and reduce the load.
Make sure the weight tracks along your shin rather than drifting forward away from your body.
When your hips rotate open, your standing hip lacks stability.
Keep your back foot's toes pointed straight down—this single cue often fixes the rotation immediately.
Engage your gluteus medius (the muscle on the side of your hip) harder, and reduce your range of motion until you can maintain square hips throughout the entire movement.
A locked standing knee creates a teeter-totter effect at your hip joint without any muscular engagement to control it.
Always maintain that soft bend to activate your quadriceps and properly load your hip.
If you're still struggling, experiment with your footwear.
Try the exercise in shoes if you've been barefoot, or barefoot if you've been in shoes.
The different sensory feedback can sometimes improve stability.
Some people find mirrors helpful for checking hip position, though others find them distracting.
Reduce your range of motion temporarily to master balance before progressing deeper into the movement.
Conclusion
Balance during single-leg deadlifts comes down to deliberate technique across multiple systems working together—your foot contact, core tension, hip position, and movement tempo all play a role.
Start with the basics, progress slowly through the assistance variations, and don't rush to add weight before you've mastered the bodyweight pattern.
Practice these techniques consistently, and the wobbling that once frustrated you will become a thing of the past.