Mastering the deep squat takes consistent daily practice starting with supported 10-20 second holds and progressively building to 10 minutes over several months, while simultaneously working on ankle, hip, and thoracic mobility through targeted stretches and exercises.
Most people see real improvements within 2-4 weeks if they practice 3-7 times weekly and address their specific mobility restrictions.
Keep reading for the complete roadmap, including week-by-week progression, form guidelines, and solutions to common problems that might be holding you back.
What the Deep Squat Is and Why Your Body Needs It
Picture yourself lowering down until your hips drop below your knees, heels planted firmly on the ground.
That's the deep squat—sometimes called the “primal squat” or “third-world squat.”
This wasn't always something that needed explaining.
For most of human history, this position served as the natural way people rested across cultures.
You'll still see it throughout Asia and Africa today, where people comfortably sit this way while eating, socializing, or taking breaks from work.
Modern Western populations have largely lost this ability.
Prolonged chair sitting and limited movement patterns have robbed us of what our bodies were designed to do.
The good news? You can get it back, and your body will thank you in multiple ways.
Your digestive system functions better in this position.
When you settle into a deep squat, your colon straightens completely.
This promotes more efficient elimination and reduces your risk of constipation, hemorrhoids, and diverticulosis.
The natural compression of your abdominal organs also aids digestion and can reduce bloating—something sitting in a chair simply can't replicate.
Your joints and spine get significant benefits too.
The position provides spinal decompression, relieving pressure on your intervertebral discs while promoting better alignment.
It creates space in your hip joints and strengthens the surrounding musculature at the same time.
Your ankles gain substantial dorsiflexion mobility, which translates directly to better movement mechanics when you walk, run, or climb stairs.
The muscular demands are impressive.
Holding a deep squat engages 21 muscles that cross your hip joint.
Your core stabilizers work to maintain the position, your glutes activate more effectively than they do in parallel squats, and you build isometric strength throughout your lower body.
The entire kinetic chain from your feet to your neck contributes to keeping you stable and balanced.
Unlike static chair sitting, the active muscle engagement in squatting maintains consistent blood flow and metabolic activity.
You're not truly sedentary in this position—your body stays engaged, which may help reduce the health risks associated with prolonged sitting.
Think of it as an active rest that keeps your systems running rather than shutting them down.
The Three Mobility Factors That Determine Your Success
Three specific areas will either enable or prevent you from sitting comfortably in a deep squat.
You need adequate mobility in all three—weakness in any single area creates compensatory patterns that make the position difficult or impossible to hold.
Ankle mobility sits at the foundation.
Your ankles must achieve adequate dorsiflexion, which means your shin needs to move forward over your toes while your heel stays planted.
This allows you to maintain balance and keep your torso upright.
When ankle mobility is limited, your body compensates by forcing your torso forward, which throws off the entire position and creates a cascade of movement problems.
You can assess your ankle mobility right now with a simple test.
Stand five inches from a wall, then lunge forward and try to touch your knee to the wall without lifting your heel.
If your heel rises off the ground or your knee collapses inward, you've identified a mobility restriction that needs work.
Hip flexibility determines how deep you can go.
Tight hip flexors—a direct result of prolonged sitting—restrict the depth you can achieve.
Your hips need sufficient internal and external rotation along with flexion capacity to reach proper depth without excessive forward lean.
When your hip flexors are tight, they physically prevent your thighs from moving close to your torso, cutting your squat short before you reach full depth.
Thoracic mobility keeps you upright.
Mid-back extension helps maintain an upright torso throughout the movement.
This becomes increasingly important as you add depth to the position.
Without adequate thoracic extension, you'll round forward at the shoulders and upper back, which compromises both form and comfort.
You can't skip any of these three areas.
Address all of them simultaneously for optimal results, because improving just one or two will leave you fighting against the limitation you haven't fixed.
Your Week-by-Week Training Roadmap
You'll build squat capacity through deliberate progression, not by forcing yourself into a position your body isn't ready for.
Here's how to approach the training systematically while respecting your current limitations.
Weeks 1-2: Establishing the Pattern
Position yourself near a doorframe, sturdy table, or TRX straps.
Hold onto this support and lower yourself gradually, allowing your body to adapt to the position.
Start with just 10-20 seconds, taking breaks as needed.
Your goal during these first two weeks is simply reaching the position comfortably, even if you need significant support to get there.
Practice this 3-5 times daily—frequency matters more than duration at this stage.
Weeks 3-4: Building Duration
Once the position becomes familiar, aim for 30-second holds without support.
You may need to take brief standing breaks within a single attempt, and that's fine.
Work toward accumulating 1-2 minutes total each day.
This is also when you should experiment with foot placement to find what works best for your body.
Try shoulder-width or slightly wider stances, with your toes turned out anywhere from 5 to 30 degrees depending on your hip structure.
Months 2-3: Increasing Capacity
Progress toward holding 2-5 minutes continuously.
Once you achieve one minute without breaks, add 10 seconds daily.
Many practitioners recommend working toward 5-10 minutes total daily practice, which you can split into multiple sessions if needed.
Start incorporating squat holds while watching television, reading, or during other sedentary activities—this makes the practice sustainable long-term.
The ultimate benchmark is sitting comfortably in a deep squat for 10 minutes, though reaching this level may take several months of consistent practice.
Some practitioners even eat meals in this position once they've mastered it.
Making Practice Stick
If three continuous minutes feels impossible, perform three 1-minute holds with brief rest periods between them.
The cumulative time under tension drives adaptation, so you're still getting results even with breaks.
Alternate between active squats where you maintain muscle tension throughout your body and passive rests where you relax into the position.
This balanced approach develops both strength and flexibility.
Practice 3-7 times weekly, even if only for brief periods.
Consistency beats intensity in this training.
Morning sessions work well as part of a stretching routine, but you can fit squat practice into any part of your day where you'd otherwise be sitting in a chair.
Targeted Exercises to Unlock Your Squat Depth
Addressing your specific mobility restrictions accelerates progress far more effectively than simply practicing the squat itself.
These exercises target the exact limitations preventing you from reaching and holding proper depth.
Breaking Through Ankle Restrictions
Weighted dorsiflexion stretches prove highly effective.
Place a weight plate or kettlebell on your knee while in a lunge position, then drive your knee forward over your toes and hold for 10 seconds.
Complete 4-5 repetitions per side. This loaded stretch creates the specific adaptation your ankles need for deep squatting.
Calf stretching with a bent knee specifically targets the soleus muscle, which is critical for squat depth.
Most people only stretch their calves with a straight leg, missing this deeper muscle entirely.
Eccentric calf raises on a step also create substantial mobility gains—lower yourself slowly and controlled through the full range of motion.
Try this mobilization technique: sit in as deep a squat as you can manage while holding a kettlebell for counterbalance, then rock side to side.
This mobilizes your ankle through its full range while you're actually in the squat position.
Band-distracted joint mobilizations provide excellent results for stubborn ankle restrictions.
Loop a resistance band around your ankle, positioning it on the talus bone rather than high on your shin.
Anchor the band behind you and perform slow dorsiflexion movements.
This helps the bones glide properly within the joint, addressing restrictions that stretching alone can't fix.
Opening Up Hip Limitations
The 90/90 position addresses both internal and external rotation simultaneously.
Sit with one leg in front of you at 90 degrees and the other to your side at 90 degrees, then switch sides.
Hold each position for 30-60 seconds.
You'll immediately feel which direction gives you more trouble.
Get on your hands and knees and perform hip circles, moving through fire hydrant patterns.
These mobilize your joint capsule through multiple planes of motion.
The pigeon stretch with resistance band assistance targets external rotation specifically—the band helps you relax into deeper ranges you couldn't access alone.
Banded hip mobilizations create distraction in the joint itself.
Loop a band around your hip where the femur meets the pelvis, anchor it to something stable, and explore deeper ranges of motion.
This separation allows movement you simply can't achieve through stretching alone.
The butterfly stretch addresses internal rotation and groin flexibility—perform 3 sets of 30-second holds.
Teaching Your Body the Complete Pattern
Goblet squats with a light weight held at chest level naturally shift your center of mass forward.
This counterbalance effect teaches proper mechanics and makes the deep position more accessible.
Pause goblet squats take this further—hold the bottom position for 5-10 seconds to build strength in these deep ranges.
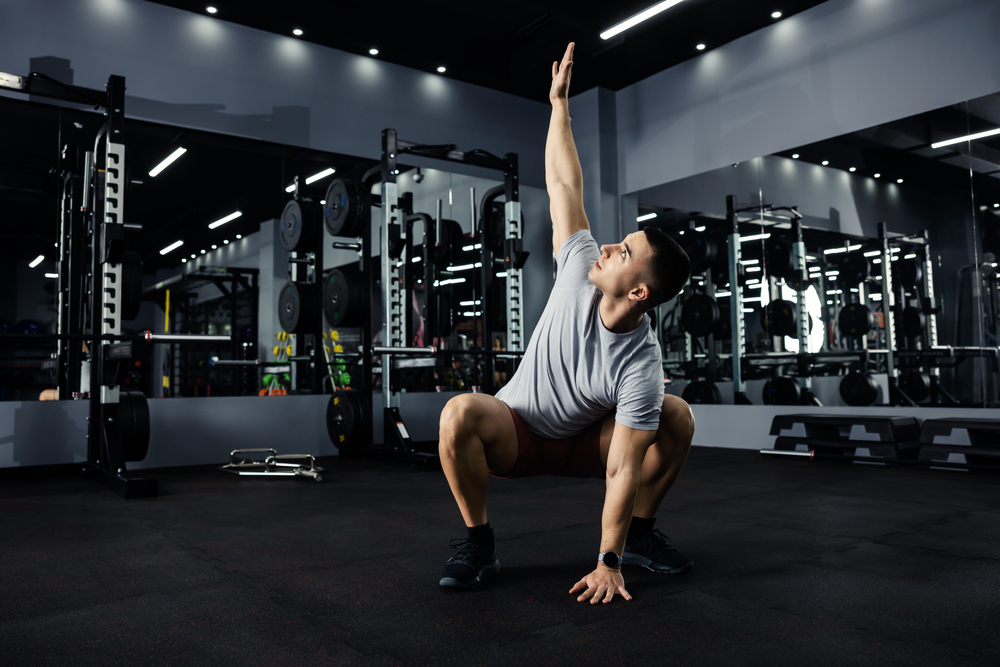
The toes-to-deep-squat progression works remarkably well for people who struggle to get into position.
Start by bending forward and touching your toes, then bend your knees and drop into a squat while maintaining hand contact with the ground.
Finally, raise your head and arms overhead one at a time.
This sequence naturally guides your body into the proper position.
Box-assisted squats provide progressive depth training.
Start with a higher box, squat down to touch it lightly, then gradually use lower boxes as your mobility improves.
This gives you a concrete target and prevents you from going deeper than your current capacity allows.
Proper Form and Common Mistakes to Avoid
Getting the mechanics right prevents compensations that limit your progress and potentially cause discomfort.
Here's what proper form looks like and how to fix the issues that commonly derail people.
Dialing In Your Form
Place your feet approximately shoulder-width apart or slightly wider.
Experiment with toe angle anywhere from straight ahead to 30 degrees outward—your hip anatomy determines what feels right.
There's no universal “correct” stance.
Maintain equal pressure through your entire foot: heel, ball, and outer edge.
Your heels must stay grounded.
Think of your feet as tripods distributing weight evenly across three points of contact.
Keep your spine neutral, maintaining its natural curves without excessive arch or rounding.
Your head should remain neutral too—not craning backward or dropping forward.
A helpful cue is “chin down, ribs down, abs braced.”
This keeps everything stacked properly.
Your knees should track over your second or third toe, neither collapsing inward nor splaying excessively outward.
Create “torque” by actively pressing your knees outward while gripping the ground with your feet.
This generates stability through tension.
Breathe deeply and continuously.
Taking deep breaths into your belly while maintaining core tension actually helps you relax into the position rather than fighting it.
Solving the Problems That Block Progress
Heels lifting off the ground signals insufficient ankle dorsiflexion.
Temporarily elevate your heels with small plates while you work ankle mobility drills daily.
Tight calves often contribute—foam rolling and static stretching of both your gastrocnemius and soleus muscles helps significantly.
Falling backward typically indicates poor hip mobility or a weak core.
Use supported squats where you hold onto a fixed object in front of you.
This allows you to achieve proper depth without fighting to stay balanced.
Simultaneously work on hip flexor stretching and glute activation.
Excessive forward lean usually stems from ankle restrictions or long femurs relative to your torso length.
Address ankle mobility first since that's the most common culprit.
Experiment with wider stances, and practice goblet squats where the front-loaded weight helps maintain upright posture.
Butt wink—that pelvic posterior tilt at the bottom—confuses many people.
Some degree is normal and harmless. Excessive rounding indicates you've exceeded your current hip flexion capacity.
Don't force depth beyond where your pelvis starts tucking significantly.
Work on hip mobility and gradually progress depth as your range improves.
Knee pain requires careful assessment.
Sharp pain requires professional evaluation.
Mild discomfort often resolves as tissues adapt to the new demands.
Ensure your knees track properly over your toes, avoid letting them collapse inward, and don't bounce or jam into the bottom position.
Start with shallow depths and progress gradually.
Making It Work for Your Body and Lifestyle
When to Proceed with Caution
Research demonstrates deep squats are safe for healthy knees when performed with proper technique—approximately 87% of studies show no increased injury risk.
However, specific conditions warrant a more careful approach.
If you have existing knee issues like meniscal tears, patellofemoral pain syndrome, or patellar tendinopathy, limit depth to pain-free ranges initially and progress under professional guidance.
The position may need modification or temporary avoidance during acute phases when inflammation is present.
Femoroacetabular impingement (FAI) creates pinching sensations in your hip at depth.
If you experience this, experiment with wider stances and greater toe-out angles.
Front-loaded squat variations often feel better than back-loaded ones because they change the demands on your hip joint.
Active disc issues or severe spinal conditions require medical clearance before attempting deep squats.
Excessive butt wink under load can stress your lumbar discs, so maintain a neutral pelvic position throughout the movement.
Previous ankle injuries from sprains, fractures, or surgical repairs may have created scar tissue or joint restrictions.
These often respond well to targeted mobility work but may require extended timeframes compared to someone without that history.
Always stop if you experience sharp pain.
Discomfort from stretching differs fundamentally from pain signaling potential injury.
If you're uncertain which you're experiencing, consult a qualified physiotherapist who understands movement.
Practical Modifications That Bridge the Gap
Elevated heel squats using weightlifting shoes, small plates, or specialized wedges reduce ankle mobility demands while you develop that capacity.
Gradually decrease the elevation over time as your dorsiflexion improves.
Assisted squats holding TRX straps, doorframes, or countertops allow you to achieve depth without the full stability demands.
Reduce the assistance progressively as your control improves—you'll naturally need less support as weeks pass.
Partial depth squats to a box or bench provide a safe stopping point, preventing you from going deeper than your current capacity allows.
Lower the box height systematically as your mobility and strength increase.
Bodyweight-only practice is essential before adding load.
Master the unweighted position first, spending months if needed to develop the prerequisite mobility and control.
Loading a pattern you haven't mastered yet creates compensations.
Fitting This Into Your Broader Training
Deep squat holds complement but don't replace other exercise forms.
Continue your cardiovascular training, strength work with weighted squats to depths appropriate for your mobility, and other movement patterns.
The deep squat specifically addresses mobility and resting position capacity—it doesn't develop cardiovascular fitness or build maximal strength.
Many strength athletes incorporate 5-10 minutes of deep squat holding during warmups or as accessory work.
This primes the nervous system, enhances joint preparation, and maintains the mobility needed for loaded lifting.
You can adopt a similar approach regardless of your training style.
Realistic Timeline Expectations
Most people see noticeable improvements within 2-4 weeks of daily practice.
Significant gains in comfort and duration typically manifest within 6-8 weeks.
Achieving 5+ minute holds may require 2-4 months for those starting with limited mobility.
Reaching the 10-minute benchmark often takes 6-12 months of consistent practice.
Your starting point determines your trajectory.
Those with athletic backgrounds or existing flexibility progress faster.
Individuals with desk jobs, previous injuries, or advanced age may need extended timeframes but can still achieve excellent results.
The practice requires patience and consistency rather than aggressive forcing.
Beyond the specific physical benefits, mastering the deep squat represents reclaiming a fundamental human movement pattern.
This position was natural for your ancestors and remains instinctive for young children before chair culture conditions them otherwise.
Restoring this capacity improves functional movement, reduces injury risk in sports and daily activities, and potentially contributes to longevity and independence as you age.
Embrace the process of gradual adaptation, celebrate small improvements, and trust that your body will respond to regular, intelligent practice.
Conclusion
Start with supported holds today, even if you can only manage 20 seconds.
Practice consistently rather than perfectly, address your specific mobility restrictions, and trust the progressive timeline.
Your body will adapt to this natural position if you give it the regular practice and targeted work it needs.