To perform the lying bicep curl with perfect form, lie face-up on a flat bench with your arms hanging straight down, then curl the dumbbells upward using only your elbows while keeping your upper arms completely still — no swinging, no momentum.
Keep reading for a full breakdown of every variation, the form cues that matter most, and how to program it for real arm growth.
What the Lying Bicep Curl Is and Why It Works
Most curl variations let you cheat — a slight body sway, a little hip drive, and suddenly your back is doing half the work. The lying curl removes that option entirely. With your torso supported on a bench, there's nowhere to shift the load, so your biceps have to do the job on their own.
That's useful, but it's not the main reason this exercise stands out. What makes it genuinely different is where it loads the muscle.
Emerging research suggests that training a muscle under a deep stretch may roughly double hypertrophy compared to training it at shorter lengths — and the lying curl is one of the few curl variations that actually achieves this for the biceps.
There are two distinct versions, and they work quite differently:
- Supine (face-up): You lie on your back with arms hanging down behind and below your torso. This position pulls the long head of the biceps across the shoulder joint, loading it at maximum length — exactly where stretch-mediated growth happens.
- Prone (face-down/spider curl): You lie chest-down on an incline bench with arms hanging in front of the body. This shortens the long head and shifts the work toward the short head of the biceps and the brachialis.
The primary muscles targeted are the biceps brachii (both heads) and the brachialis. The brachioradialis and forearm flexors contribute as secondary movers, while the anterior deltoid acts as a stabilizer.
The trade-off is worth knowing upfront: you'll need to drop 30–50% of the weight you'd normally use for standing curls, the supine version demands decent shoulder mobility, and both variations tend to produce more soreness than standard curls — sometimes for several days.
None of that is a reason to avoid it. It just means you need to approach it with lighter loads and a bit more patience than you might expect.
How to Do the Supine Lying Dumbbell Curl (Step-by-Step)
Before you pick up the dumbbells, adjust your weight selection. This movement is mechanically harder than a standing curl — the stretched position puts the biceps tendon at a disadvantage — so start with 30–50% less than you'd normally use. If you curl 40 lb dumbbells standing, start here with 20–25 lbs.
- Lie face-up on a flat bench with your head near one end and your feet flat on the floor, knees bent.
- Let your arms hang straight down on either side of the bench, fully extended, with a supinated (palms-up) grip. Depending on your arm length and bench height, the dumbbells may nearly touch the floor — that's the point.
- Press your back flat against the bench and retract your shoulder blades slightly. Hold this position throughout the set.
- Curl the dumbbells upward by flexing at the elbows only. Your upper arms stay completely stationary — no drifting, no swinging.
- Curl until your forearms meet your biceps or the dumbbells are about 4–6 inches from your shoulders. Squeeze briefly at the top.
- Lower the dumbbells slowly and under full control back to complete elbow extension. Don't let the weight drop — the bottom of this movement is where the tendon is most vulnerable.
The eccentric is where most people leave results on the table. Lowering the weight quickly, especially into full lockout, is both the most common mistake and the biggest injury risk in this exercise. Take 2–4 seconds on the way down, every rep.
Dead-stop variation: Once the dumbbells reach the bottom, rest them fully on the floor. Actively flex your triceps to confirm complete elbow extension, then initiate the next rep from a dead stop. This eliminates the stretch reflex, forcing your biceps to generate tension from scratch at their longest length — the hardest and most growth-productive position in the movement.
How to Do the Prone Incline Curl (Spider Curl)
The spider curl is the supine curl's opposite in almost every way. Where the supine version loads the biceps at maximum stretch, this one delivers peak tension at the top of the movement — at full contraction. That makes the two variations natural complements rather than substitutes.
Set your adjustable bench to 30–45 degrees. A steeper angle reduces the range of motion; flatter puts more demand on the shoulder. Somewhere in the middle works for most people.
- Grip your dumbbells, barbell, or EZ-bar with a supinated (palms-up) grip at roughly shoulder width.
- Lie chest-down on the bench with your stomach and chest pressed firmly into the pad. Let your head extend over the top edge and plant your feet wide for a stable base.
- Let your arms hang straight down toward the floor, fully extended.
- Retract and depress your shoulder blades — pull them together and down — and hold that position throughout the set. This is easy to skip and important not to.
- Curl upward, keeping your upper arms vertical and completely stationary, until your wrists rise just slightly above your elbows or the weight reaches beneath your clavicles.
- Hold and squeeze for 1–2 seconds at peak contraction, then lower slowly.
One setup detail that differs from the supine version: don't let your arms go to complete lockout at the bottom. Keep a slight bend at the elbow throughout to maintain constant tension on the biceps.
Full extension here doesn't add a meaningful stretch benefit the way it does in the supine curl — it just bleeds tension off the muscle.
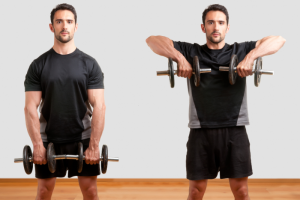
Your equipment choice shifts the stimulus slightly. Dumbbells allow independent arm movement and natural supination through the range. An EZ-bar reduces wrist strain and allows a bit more load.
A straight barbell permits the heaviest loading but can be uncomfortable on the wrists for some lifters. All three work — pick based on what feels most comfortable in your hands.
The Form Cues That Actually Matter
Elbow position is the one thing you can't compromise on. Across both variations, your elbows must stay completely fixed — no drifting forward, no flaring outward, no creeping backward. Only your forearms move. The moment your upper arms shift, you're recruiting the anterior deltoid and shortening the range of motion, which defeats the purpose of the exercise.
The exact elbow position differs slightly between variations:
- Supine: Upper arms hang close to your sides, tucked against the torso
- Prone: Upper arms stay perpendicular to the floor, directly below the shoulders
Grip. Use a supinated (palms-up) grip as your default. A practical tip: press your pinky fingers against the inside of the dumbbell plates rather than centering your grip on the handle. It feels minor, but it encourages more natural supination through the curl and tends to reduce wrist discomfort over a set.
Speaking of wrists — keep them straight and neutral the entire time. Any curling or extending at the wrist shifts tension into the forearms, fatigues them prematurely, and adds unnecessary strain to a joint that doesn't need to be involved.
Tempo matters more here than in most curl variations. A useful target:
- 2–3 seconds on the way up
- 1–2 second squeeze at the top
- 2–4 seconds on the way down
The eccentric — the lowering phase — is where the bulk of the growth stimulus comes from. Rushing it doesn't just reduce results, it increases injury risk, particularly at the elbow.
Breathing follows standard resistance training logic: exhale as you curl up, inhale as you lower, and keep your core braced throughout. It's a small thing that helps stabilize your torso and keeps the movement clean.
One last consideration worth taking seriously: shoulder mobility. The supine lying curl places real demand on shoulder extension under load — more than most people expect.
If you feel discomfort in the shoulder even with light weight, that's your cue to step back and work on mobility before continuing. This isn't a flaw in the exercise — it simply requires adequate joint preparation, and trying to push through shoulder pain here isn't worth it.
Common Mistakes to Avoid
Using too much weight is the most consequential error you can make here. The lying curl is mechanically harder than a standing curl, and the stretched position puts the biceps tendon at a real disadvantage.
Load it beyond what the tendon can handle and you're looking at elbow strain, shoulder strain, and in serious cases, biceps tendon tears. This is not an exercise where heavier is better — it's one where control and range of motion are the whole point.
The next two mistakes are closely related and often happen together:
- Elbows drifting forward during the curl brings the anterior deltoid into the movement and cuts the effective range of motion short. If your elbows are moving, your biceps aren't doing the work they should be.
- Elbows flaring outward shifts stress onto the wrists in a position where they're already under some load. Keep them tucked and aligned throughout.
Rushing the eccentric is where most people quietly sabotage their results. The lowering phase drives a significant portion of muscle adaptation — treating it as dead time between reps wastes half the stimulus.
Worse, dropping the weight quickly into full elbow extension is the single biggest mechanical risk in this movement. Slow it down every time, without exception.
Three more mistakes worth knowing:
- Rolling the shoulders forward during the curl shifts tension away from the biceps and onto the deltoids and traps. Keep your shoulder blades retracted and your chest open throughout.
- Flexing the wrists at any point in the movement pulls the forearm flexors into the equation and tires them out well before your biceps reach their limit.
- Cutting the range of motion short at the bottom is arguably the most counterproductive error of all. The stretched position at the bottom is the entire reason this exercise outperforms standard curls — shortening it there defeats the purpose entirely.
How to Program Lying Curls for Best Results
In most programs, lying curls belong after your compound pulling work — rows, pull-ups, chin-ups. Those movements already pre-fatigue the biceps, so you need less direct volume to get an effective stimulus.
The exception is if your biceps are a genuine weak point; in that case, move them earlier in the session or give them their own dedicated day.
Sets and reps: 3–4 sets of 8–15 reps is the most reliable range. Because the exercise is joint-friendly at lighter loads, higher-rep sets of 15–20 also work well and are worth rotating in periodically. Rest 60–90 seconds between sets — any longer is unnecessary for an isolation movement.
Weekly volume is where a lot of people either under- or overshoot:
- Minimum effective volume: 8 sets per week of direct biceps work
- Productive range for intermediates: 8–20 sets per week
- Upper recoverable limit: 20–26 sets per week
One important caveat: if your weekly pulling volume is already high, your biceps are getting substantial indirect work from rows and pull-ups. Factor that in before piling on direct curl sets.
For frequency, 2–3 sessions per week works well for most lifters. Rather than doing lying curls every session, rotate them with other curl variations.
This keeps the weekly stimulus varied and reduces repetitive stress on the tendons and connective tissue — something this exercise demands more attention to than most.
Progressive overload follows a simple two-step pattern. First, push your reps to the top of your target range before adding weight. If you're working in an 8–15 rep range, get to 15 clean reps before increasing the load. Then add 2.5–5 lbs and work back up again. Over the course of a training block, start with about 3–4 reps in reserve and gradually work toward 0–1 RIR across several weeks.
A practical warning for your first few weeks: expect more soreness from this exercise than you're used to from standard curls — sometimes lasting several days. Start conservatively with 2–3 sets at moderate weight and build from there. Jumping straight to full volume is a reliable way to make the next few days unpleasant.
Finally, a note on who should be cautious. Anyone with shoulder impingement, rotator cuff issues, active biceps tendinopathy, or a history of distal biceps tendon rupture should avoid the supine version.
For everyone else, the rule is simple: never let the weight drop uncontrolled into full elbow extension, and stop immediately if you feel sharp pain — not the normal deep stretch discomfort, but actual pain. The exercise is only worth doing if you can do it safely.
Conclusion
The lying bicep curl earns its place in any serious arm training program through one simple mechanism: it loads the biceps under a deep stretch that standard curls can't replicate, and that's where the real growth happens.
Get the form right — controlled eccentric, fixed elbows, appropriate weight — and it becomes one of the most productive curl variations you can do.
Start lighter than you think you need to, take the lowering phase seriously, and let the soreness tell you it's working.