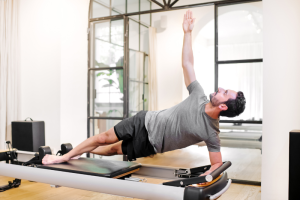
Deficit push-ups are a powerful way to increase chest, shoulder, and triceps activation by extending your range of motion with elevated hands.
To maximize muscle gains, focus on controlled reps, maintain proper form, and progressively increase difficulty with height, tempo changes, or added resistance.
Keep reading for a step-by-step breakdown on how to do them correctly and safely.
Proper Form: Step-by-Step Guide to Performing Deficit Push-Ups
Getting the most out of deficit push-ups comes down to proper form and controlled execution. A deeper range of motion increases muscle activation, but without the right setup and technique, it can also raise the risk of strain or injury. Here’s everything you need to know to perform deficit push-ups safely and effectively.
Setup and Equipment
The first step to performing deficit push-ups correctly is setting up a stable and comfortable base. The height and type of platform you use will impact both difficulty and safety.
- Choosing the Right Platforms for Elevation
The best options for elevating your hands are weight plates, yoga blocks, or dumbbells. Each comes with its own benefits and drawbacks:- Weight Plates: Provide a stable, even surface but can be slippery if stacked too high.
- Yoga Blocks: Comfortable on the hands and non-slip, but they may compress under heavy body weight.
- Dumbbells: Offer a natural grip position that reduces wrist strain, but they require strong wrist stability and can roll if not secured properly.
- Ensuring a Stable and Non-Slip Surface
Whichever platform you choose, place it on a flat, non-slip surface like rubber gym flooring or carpet. If using dumbbells, make sure they have a hexagonal shape or brace them against a wall to prevent rolling. - How High to Elevate the Hands for Optimal Range of Motion
A 2 to 4-inch elevation is a good starting point for most people. A lower height allows for a deep stretch while maintaining control. More advanced trainees can experiment with 5 to 6 inches to increase difficulty, but anything beyond this requires exceptional shoulder mobility and stability.
Step-by-Step Execution
With your platforms set up, it’s time to get into position and execute the movement with precision.
Starting Position
Begin in a standard push-up position, with your hands on the elevated surfaces and feet positioned together or slightly apart for balance. Maintain a straight line from head to heels, engaging the core and glutes to prevent sagging in the lower back. Hand placement should be slightly wider than shoulder-width, allowing for a full range of motion without excessive strain on the shoulders.
Lowering Phase (Descent)
Slowly bend your elbows, keeping them at a 45-degree angle from the body rather than flaring them straight out. Lower your chest between the platforms, ensuring your shoulders don’t collapse forward. Aim to lower your chest below the level of your hands for a deep stretch in the pectoral muscles. The movement should be slow and controlled—avoid bouncing at the bottom to prevent shoulder strain.
Pressing Phase (Ascent)
Once you reach the lowest point, pause briefly to maintain control and maximize muscle tension. Press through your palms, engaging the chest, shoulders, and triceps to push back up. Keep your body rigid throughout the movement, avoiding excessive arching in the lower back or letting the hips sag. Fully extend your arms at the top but don’t lock out your elbows to keep constant tension on the muscles.
Breathing Technique
Proper breathing enhances performance and stability. Inhale as you lower yourself to create intra-abdominal pressure for core support. Exhale forcefully as you push back up, helping generate power and maintain a steady rhythm. Avoid holding your breath, as this can cause unnecessary strain and limit endurance.
Common Mistakes and How to Avoid Them
Deficit push-ups are an advanced movement, but performing them incorrectly can reduce their effectiveness and increase the risk of injury. Many lifters make subtle mistakes that compromise form, limit muscle engagement, or place unnecessary stress on the joints. Here’s how to recognize and correct the most common errors so you can get the most out of your training.
Collapsing the Lower Back
One of the most frequent mistakes is allowing the lower back to sag, which often happens due to a weak core or lack of engagement. This not only reduces the effectiveness of the push-up but also puts unnecessary strain on the lower spine.
To fix this, focus on keeping your core braced throughout the entire movement. Imagine pulling your belly button toward your spine to create tension in the abdominal muscles. Engaging your glutes and legs also helps maintain a neutral spine. If you struggle with keeping your lower back straight, start with a smaller deficit or perform regular push-ups while improving core strength with exercises like planks and hollow body holds.
Flaring the Elbows Too Wide
Letting the elbows flare out to the sides places excessive stress on the shoulders, which can lead to discomfort or even injury over time. While a wide arm position may make push-ups feel easier at first, it reduces chest activation and increases strain on the shoulder joints.
For optimal joint safety and muscle engagement, keep your elbows at a 45-degree angle from your torso. This positioning protects the shoulders while still allowing for a full range of motion. A good cue is to imagine tucking your elbows slightly inward as you lower yourself, rather than letting them flare straight out. Filming yourself or using a mirror can help ensure your arms are positioned correctly.
Rushing the Movement
Fast, uncontrolled reps reduce time under tension, which is key for muscle growth. Many people drop quickly into the bottom position and use momentum to push back up, limiting activation of the chest, shoulders, and triceps.
Slowing down your reps improves control and maximizes tension in the muscles. Aim for a 2-3 second descent, a brief pause at the bottom, and a controlled push back up. If needed, count out the seconds in your head to ensure you're maintaining the right tempo. Slower reps also help reinforce good form, making it easier to progress safely.
Using Unstable or Improper Equipment
Deficit push-ups require a stable base, and using unstable or improper platforms can lead to injury. Objects that are too high, uneven, or prone to slipping can throw off balance and increase the risk of falling or straining the wrists.
To ensure stability, choose non-slip surfaces and solid platforms such as weight plates, sturdy yoga blocks, or hexagonal dumbbells. If using dumbbells, place them parallel to each other and ensure your grip is firm. Avoid using rounded dumbbells or excessively high platforms unless you have strong wrist stability and experience with advanced variations.
Training Recommendations Based on Fitness Goals
Deficit push-ups can be tailored to fit different training objectives, whether your focus is strength, muscle growth, or endurance. Adjusting rep ranges, rest periods, and execution style will determine the type of results you achieve. Below, we break down how to structure your deficit push-up training based on your specific fitness goals.
For Strength Gains
If your goal is to build maximal upper-body strength, deficit push-ups should be treated like a strength exercise, with lower reps, higher intensity, and longer rest periods. The focus should be on slow, controlled reps to maximize muscle recruitment and improve pressing power.
- Perform 3–5 sets of 4–6 reps
- Use a slower tempo (lower for 3–4 seconds, brief pause at the bottom, and push up with force)
- Rest for 2–3 minutes between sets to allow for full recovery
- Increase difficulty by adding a weighted vest or resistance band for progressive overload
- Keep strict form while pushing through the sticking point to develop explosive strength
For Muscle Hypertrophy (Size Gains)
If building muscle size is the priority, focus on moderate rep ranges and controlled tension throughout the movement. The goal is to fatigue the chest, shoulders, and triceps while maximizing time under tension.
- Perform 3–4 sets of 8–12 reps
- Use a moderate rest period of 45–90 seconds to keep the muscles under consistent stress
- Maintain strict form and focus on a deep stretch at the bottom of the movement
- Squeeze the chest and triceps at the top to maximize contraction
- Experiment with pause reps at the bottom for extra muscle engagement
For even greater hypertrophy, incorporate slow negatives (eccentric reps), where you take 4–5 seconds to lower yourself before pushing back up. This increases muscle breakdown, leading to more growth over time.
For Endurance and Conditioning
If you’re training for muscular endurance or general conditioning, deficit push-ups should be performed at a higher rep range with shorter rest periods to build stamina and improve muscular efficiency.
- Perform 3–4 sets of 15–20 reps
- Rest for 30–60 seconds between sets to maintain endurance demands
- Use a faster but controlled tempo (lower for 1–2 seconds, quick press back up)
- Maintain perfect form throughout—don’t let fatigue compromise technique
- Consider supersetting with other bodyweight movements like dips or plank holds for added intensity
This approach improves muscle endurance while still strengthening the chest, shoulders, and triceps, making it useful for athletes, fighters, and those looking to improve overall fitness.
How to Progress and Make Deficit Push-Ups More Challenging

Once you’ve mastered the basic deficit push-up, increasing the difficulty is essential for continued strength and muscle gains. Progression ensures that your muscles keep adapting, leading to improved endurance, hypertrophy, and overall performance. Here are several effective ways to make deficit push-ups more challenging while maintaining proper form and maximizing results.
Increasing the Deficit Height
A simple way to progress deficit push-ups is by gradually increasing the height of your hand placement. A higher deficit deepens the stretch in the chest and shoulders, forcing the muscles to work harder during both the lowering and pressing phases.
- Start with 2-4 inches of elevation (weight plates or yoga blocks).
- Once comfortable, progress to 5-6 inches using taller blocks or sturdy platforms.
- Advanced athletes can experiment with 8+ inches, but this requires excellent shoulder mobility and stability to prevent injury.
- Always increase height gradually to allow the joints and muscles to adapt without excessive strain.
If you notice discomfort in your shoulders or struggle to maintain proper form, reduce the height until your mobility improves.
Adding Weight
Deficit push-ups can be turned into a weighted strength exercise by adding external resistance, increasing the load on the chest, shoulders, and triceps. This is an excellent method for developing pressing power and muscle hypertrophy.
- Use a weighted vest for a balanced and secure resistance option.
- If you don’t have a vest, a loaded backpack (with books or weights) works as a simple alternative.
- Resistance bands can be looped around your back to increase tension at the top of the movement.
- Avoid placing a weight plate on your back unless a training partner can help stabilize it.
Start with 5–10% of your body weight and progressively increase as you get stronger. Keep reps slow and controlled—don’t let momentum reduce the effectiveness of the movement.
Slowing Down the Tempo
One of the most effective ways to increase difficulty without adding weight is by slowing down each repetition. By extending the eccentric (lowering) phase, you create more time under tension, which is crucial for muscle growth and strength development.
- Lower yourself over 3-5 seconds instead of dropping down quickly.
- Pause at the bottom for 1-2 seconds before pressing back up.
- Control the ascent rather than rushing—aim for a 2-second push back up.
This method not only builds muscle endurance but also strengthens stabilizer muscles, improving overall push-up mechanics. If your reps become too slow to complete with good form, slightly reduce the tempo while maintaining control.
Incorporating Pause Reps
Adding a pause at the bottom of the push-up increases muscle activation and eliminates momentum, making the movement significantly harder.
- Lower until your chest is just below hand level and hold for 2–5 seconds.
- Maintain tension in your chest, shoulders, and core—don’t let your body relax.
- Press up explosively after the pause.
This method improves explosive strength and reinforces stability in the deeper range of motion. It’s especially beneficial for athletes and those working on improving their bench press strength.
Explosive Deficit Push-Ups
For those looking to develop upper-body power and fast-twitch muscle fibers, explosive deficit push-ups introduce a plyometric challenge. These require more force and help improve overall pressing speed.
- Lower into a deep stretch as usual, then push up explosively, aiming to generate maximum force.
- If comfortable, progress to clap push-ups or pushing off the platforms.
- Ensure wrist and shoulder stability before attempting advanced variations.
These are best suited for athletes or advanced trainees who have already built a strong foundation with standard deficit push-ups.
Integrating Deficit Push-Ups into a Workout Routine
To maximize the benefits of deficit push-ups, they should be strategically placed within your workout routine based on your training goals. Whether you want to build strength, muscle, or endurance, their positioning within a session and frequency of use will affect their effectiveness. Below, we’ll cover the best times to perform them, provide a sample workout, and discuss optimal training frequency.
Best Times to Perform Deficit Push-Ups
The placement of deficit push-ups within your workout depends on whether they are a primary exercise or an accessory movement.
- Beginning of the Workout (Primary Movement)
If deficit push-ups are a key part of your strength or hypertrophy training, they should be performed early in your session when your muscles are fresh. This ensures maximum force output, better form, and more effective progressive overload.- Best for strength-focused workouts.
- Ideal if progressively adding weight to push-ups.
- Useful for building pressing endurance before moving to heavier lifts.
- Middle of the Workout (Accessory Exercise)
If you’re training with heavier compound lifts (e.g., bench press, dips, overhead press), deficit push-ups can serve as an accessory movement. Performing them after your main lifts allows you to target the chest, shoulders, and triceps without compromising form due to fatigue.- Best for hypertrophy-focused routines.
- Works well in a superset with another upper-body movement.
- Can be performed with tempo variations for added difficulty.
- End of the Workout (Finisher or Endurance Work)
If your goal is endurance or muscular fatigue, deficit push-ups can be done at the end of a session to fully exhaust the upper body. This approach works well for high-rep sets, time-based challenges, or as part of a conditioning circuit.- Best for high-rep endurance training.
- Can be combined with drop sets or burnout sets.
- Useful for bodyweight-focused workouts.
Sample Upper-Body Workout Incorporating Deficit Push-Ups
Here’s how deficit push-ups can fit into a well-structured upper-body routine. Adjust sets and reps based on your fitness level and goals.
Strength-Focused Upper-Body Workout
- Barbell Bench Press – 4 sets of 3–5 reps
- Deficit Push-Ups – 3–5 sets of 4–6 reps (weighted if possible)
- Pull-Ups or Lat Pulldown – 3 sets of 6–8 reps
- Overhead Press (Barbell or Dumbbell) – 3 sets of 6–8 reps
- Triceps Dips or Close-Grip Bench Press – 3 sets of 8–12 reps
- Face Pulls or Band Pull-Aparts – 3 sets of 12–15 reps
Muscle Hypertrophy (Size Gains) Workout
- Incline Dumbbell Press – 4 sets of 8–12 reps
- Deficit Push-Ups – 3–4 sets of 8–12 reps (slow and controlled)
- Bent-Over Rows or Seated Rows – 3 sets of 10–12 reps
- Arnold Press or Machine Shoulder Press – 3 sets of 8–12 reps
- Lateral Raises or Reverse Flys – 3 sets of 12–15 reps
- Triceps Rope Pushdowns – 3 sets of 12–15 reps
Endurance and Conditioning Workout
- AMRAP (As Many Reps As Possible) Deficit Push-Ups – 3 sets of 15–20 reps
- Jump Rope or Rowing Machine – 30 seconds max effort
- Kettlebell Swings or Medicine Ball Slams – 3 sets of 20 reps
- Mountain Climbers or Battle Ropes – 30 seconds max effort
- Bodyweight Dips or Diamond Push-Ups – 3 sets of 15–20 reps
- Plank Hold (with Shoulder Taps) – 3 sets of 30–45 seconds
This setup ensures a balanced approach, whether your focus is strength, muscle building, or endurance.
How Often to Train Deficit Push-Ups for Optimal Results
The frequency of deficit push-ups in your routine depends on recovery, volume, and overall workout structure.
- Strength Training – 2–3 times per week (higher intensity, lower reps).
- Muscle Growth (Hypertrophy) – 2–4 times per week (moderate reps and progressive overload).
- Endurance & Conditioning – 3–5 times per week (higher reps and volume, lower intensity).
If deficit push-ups are your primary pressing movement, allow at least 48 hours of recovery between sessions to prevent overtraining. However, if they’re used as an accessory exercise, they can be done more frequently with variations in intensity and rep ranges.
Conclusion
Deficit push-ups are a powerful tool for building strength, muscle, and endurance by increasing range of motion and muscle activation.
By maintaining proper form, progressing strategically, and integrating them effectively into your routine, you can maximize their benefits.
Stay consistent, track your progress, and keep challenging yourself for continued gains.