To do a goblet squat correctly, stand with your feet slightly wider than shoulder-width with toes angled outward, hold a dumbbell or kettlebell close to your chest, then squat down by pushing your hips back and knees outward while keeping your chest up—descend until your thighs are at least parallel to the floor, then drive through your heels to stand back up.
The key is maintaining an upright torso, keeping your weight planted through your entire foot, and making sure your knees track in the same direction as your toes throughout the movement.
Keep reading for the complete breakdown of setup, form cues, common mistakes to avoid, and how to progress this exercise safely.
Getting Your Setup Right: Stance, Grip, and Initial Position
Your stance sets the stage for everything that follows.
Position your feet somewhere between 2 to 6 inches outside your hip width—essentially a bit wider than your shoulders.
Point your toes outward at roughly 30 to 45 degrees.
This outward angle isn't arbitrary; it reduces the mobility demands on your ankles and lets your hips engage more effectively during the movement.
Here's the thing: your anatomy is unique.
What works perfectly for someone else might feel awkward for you.
Spend time experimenting with slightly narrower or wider stances until you find what feels stable and natural.
If you want to discover your body's preferred toe angle, try this simple test: stand on a slippery surface like hardwood flooring in socks with your feet hip-width apart and toes forward.
Squeeze your glutes hard, rock back slightly onto your heels, and let your feet naturally rotate outward.
Where they settle is likely your optimal angle, and it's completely normal if your left and right feet differ slightly.
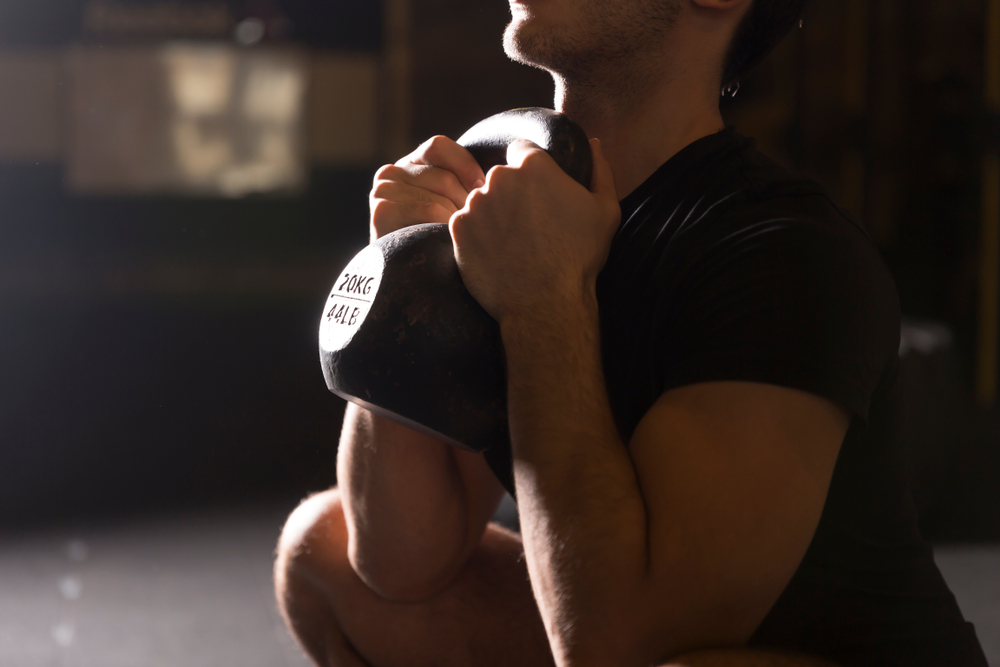
Now for the grip. If you're using a dumbbell, hold it vertically with both hands cupped underneath the top plate, keeping the top end pointing toward the ceiling.
With kettlebells, you have three solid options: the horn grip where you hold the sides of the handle, the belly hold where you flip the kettlebell upside down and grasp around its sides, or a hybrid approach with your thumbs hooked through the horns.
Regardless of which weight you choose, keep it close to your chest just below your chin.
Tuck your elbows into your sides.
The weight should never rest passively against your collarbones or drift away from your body during the movement—maintaining this tight position is non-negotiable for good form.
Your feet need to work, not just stand there.
Distribute your weight evenly across three points: your big toe, pinky toe, and heel. Imagine gripping the floor with your feet or creating a screwing motion where you twist your feet outward into the ground without actually moving them.
This active foot engagement creates tension throughout your lower body and gives you a stable base to work from.
The Movement Breakdown: Descending and Ascending with Control
Before you even start moving, take a deep breath into your stomach and brace your core hard.
Pull your ribs down into your body—this creates the tension you need to protect your spine under load.
The descent happens in one coordinated motion.
Push your hips backward while simultaneously bending your knees.
Don't do one before the other; they work together.
As you lower yourself, actively push your knees outward so they track directly over your toes.
This outward knee drive is critical—it fires up your glutes and prevents your knees from collapsing inward, which is both inefficient and potentially dangerous.
Keep your torso as vertical as possible throughout the descent.
Your chest stays up, shoulders stay back. The anterior load of the goblet squat naturally encourages this upright position, so resist any temptation to lean forward excessively.
You're aiming for depth where your thighs reach at least parallel to the floor, and ideally your hips drop below knee level.
At this bottom position, your elbows should track between or even touch the inside of your knees if your mobility allows.
But here's the rule that trumps everything: never sacrifice form for depth.
If your lower back starts rounding, your heels lift off the ground, or your knees cave inward, you've descended beyond your current capability.
Back off and work within a range where you can maintain proper mechanics.
Coming back up requires power and control.
Drive forcefully through your heels and the full surface of your feet. Your chest stays elevated, and you maintain that core tension you created at the start.
As you push through the hardest part of the lift—that sticking point about halfway up—exhale forcefully.
At the top, squeeze your glutes to achieve complete hip extension.
The movement should feel controlled and powerful, not rushed or jerky.
Your upper body plays a bigger role than you might think.
Squeeze the weight with a “crush grip” that engages your chest, lats, and upper back muscles.
Pull your shoulder blades together slightly and keep your elbows driving toward your body.
This upper-body tension creates full-body stability and prevents the weight from pulling you forward out of position.
Think of it this way: the goblet squat demands total-body engagement, not just leg work.
Breathing, Spine Position, and Body Mechanics That Matter
Your breathing strategy should match the load you're lifting.
For light to moderate weights, use a natural pattern: inhale as you descend, exhale as you come back up.
This rhythm works well for higher repetition sets and keeps oxygen flowing without overthinking the mechanics.
Heavier loads demand a different approach.
Take a deep breath at the top before you start descending, then hold that breath with tight abdominal bracing throughout the descent and bottom position.
This creates maximum intra-abdominal pressure, which stabilizes your spine under heavy load.
Exhale forcefully during the ascent or right after you clear the hardest portion of the lift.
Just don't hold your breath for extended periods—that unnecessarily spikes your blood pressure.
Your spine needs to stay neutral from start to finish.
That means a flat to slightly arched lower back, never rounded.
A rounded lower back under load is asking for trouble.
Your neck follows the same principle: keep it neutral with your chin slightly tucked.
Don't jut your head forward or crane it up toward the ceiling.
The weight you're holding in front naturally encourages an upright torso, so let that anterior load work in your favor.
Keep your heels firmly planted throughout the entire movement.
Your weight should never shift forward onto your toes—this compromises your stability and reduces the effectiveness of the exercise.
Think about it: you can generate far more power pushing through your heels than balancing on the balls of your feet.
Knee tracking is non-negotiable.
Your knees must follow the direction of your toes throughout the movement.
They shouldn't cave inward or bow excessively outward.
If you notice your knees collapsing inward, that's a clear signal of weak hip abductors and glutes.
Address this immediately—reduce your weight and focus on pushing your knees out deliberately during each rep.
One often-overlooked factor: your shoes matter more than you think.
Train in flat-soled shoes or go barefoot if your gym allows it.
Thick-soled running shoes with excessive heel cushioning throw off your mechanics and change how your muscles recruit.
You want a stable, firm connection to the ground, not a squishy platform that wobbles under load.
Six Common Mistakes and How to Fix Them Fast
Knees caving inward is one of the most dangerous faults you'll encounter, and it stems from weak hip and glute muscles.
The fix is straightforward: actively think about spreading the floor apart with your feet as you squat, or consciously push your knees outward throughout the movement.
A mini resistance band placed just above your knees provides excellent proprioceptive feedback—you'll feel it when your knees start to collapse, which helps you strengthen those stabilizing muscles while building better movement patterns.
Heels rising off the ground signals either insufficient ankle mobility or an attempt to squat deeper than your current capabilities allow.
Keep your weight shifted back toward your heels and reduce your squat depth until you can maintain full foot contact with the floor.
Work on ankle mobility through dedicated stretching between sessions.
As an interim solution, elevate your heels on weight plates—about half an inch does the trick—to reduce the ankle mobility requirement while you build flexibility.
Excessive forward lean compromises the entire benefit of the goblet squat and puts unnecessary strain on your lower back.
Keep the weight tight against your chest and actively engage your core throughout the movement.
The key distinction: sit back into your hips rather than bending forward at your waist.
These are different movement patterns, and the latter defeats the purpose of the exercise.
You'll also see people letting the weight drift forward away from their body.
This shifts your center of gravity and makes the exercise both unnecessarily difficult and dangerous.
Keep your elbows positioned underneath or slightly behind the weight, and actively think about pulling it into your chest throughout every phase of the movement.
Not squatting deep enough limits both muscle engagement and the range of motion benefits you're training for.
If flexibility is your limiting factor, dedicate time to mobility work.
If you're using too much weight, reduce the load so you can achieve proper depth while maintaining good form.
Remember: partial reps with heavy weight aren't more impressive than full-range reps with appropriate weight.
Holding your breath throughout the entire set causes dizziness when working with lighter loads and reduces your oxygen supply unnecessarily.
Match your breathing pattern to the load—use natural breathing for lighter weights and strategic breath holds for heavier lifts as detailed in the previous section.
Programming and Progression: From Beginner to Advanced
Your training approach should match your current skill level and goals.
Here's how to structure your goblet squat work based on what you're trying to achieve.
If you're learning the movement pattern, start with 2 to 3 sets of 10 to 15 reps using light weight—even just your bodyweight or a light book works initially.
Your focus is on perfect technique, not how much you're lifting.
Practice five days a week if possible to groove the movement pattern into your nervous system.
Use slow, controlled tempos: take 2 seconds to lower, pause for 1 second at the bottom, then take 1 to 2 seconds to rise.
For muscle building, perform 3 to 5 sets of 10 to 15 reps with moderate to heavy weight.
Your last rep should be challenging while still allowing you to maintain perfect form. Rest 60 to 90 seconds between sets.
The weight should be heavy enough that you couldn't squeeze out more than 1 or 2 additional reps with proper technique—that's your sweet spot for hypertrophy.
For strength development, execute 3 to 5 sets of 5 to 8 reps with heavier loads.
Focus on controlled, powerful repetitions rather than speed.
Rest 2 to 3 minutes between sets to allow full recovery—you need that rest to maintain intensity and quality across all your sets.
For muscular endurance, complete 2 to 4 sets of 20 to 30 reps with light to moderate weight.
Keep rest periods under 45 seconds to maintain cardiovascular demand.
This turns the goblet squat into more of a conditioning exercise.
Once you can perform 10 or more repetitions with excellent technique at a given weight, it's time to increase the load.
A good strength benchmark to aim for: performing a goblet squat with one-third of your bodyweight for 5 reps, eventually progressing to half your bodyweight.
You can also progress through volume instead of weight.
Move from 3 sets of 5 reps to 5 sets of 10 reps over time with the same weight.
That's jumping from 15 total repetitions to 50, which dramatically increases your training stimulus without touching the weight you're using.
Tempo manipulation offers another progression avenue.
Slow down the lowering phase to 3 or 4 seconds, add a 2 to 3 second pause at the bottom, or try 1.5 rep schemes where you descend, come halfway up, descend again, then stand fully.
These variations increase time under tension and make lighter weights feel significantly harder.
For an advanced challenge, try the Goblet Squat Challenge: hold 40 to 80 pounds at chest height and descend to the bottom position.
Hold there for 15 seconds, then stand up and perform as many full repetitions as possible up to 15 reps.
If you complete all 15, increase the weight next session.
Mobility Solutions and Practical Variations to Try
Limited ankle mobility often holds people back from achieving good squat depth.
As a short-term solution, elevate your heels on weight plates or use weightlifting shoes with elevated heels.
This reduces the ankle mobility requirement and allows you to reach greater depth while maintaining proper form.
Treat this as a temporary teaching tool, not a permanent crutch—simultaneously work on improving your ankle mobility through dedicated stretching and mobility drills.
The goblet squat itself doubles as a mobility exercise if you use it correctly.
At the bottom position, gently press your elbows against the inside of your knees to create a “prying” motion that stretches your hips.
This makes each rep serve dual purposes: building strength and improving range of motion.
Variations expand what the exercise can do for you.
Heel-elevated goblet squats using plates or wedges under your heels increase quad emphasis while working around ankle mobility limitations.
Pause goblet squats, where you hold the bottom position for 2 to 3 seconds, build strength in the most challenging range and simultaneously improve your mobility.
Tempo goblet squats using a 3-1-1 or 4-1-2 tempo—that's seconds down, pause, then seconds up—dramatically increase time under tension without adding weight.
Place a mini resistance band just above your knees to increase glute activation and reinforce proper knee tracking.
The band provides constant feedback, making it harder for your knees to cave inward.
For unilateral work, try single-leg variations where you elevate one foot behind you Bulgarian split squat style.
This challenges your balance and addresses any strength imbalances between legs.
You can perform goblet squats with dumbbells, kettlebells, medicine balls, or even weighted backpacks.
Kettlebells are often preferred because of their natural grip position, but dumbbells are more accessible in most standard gyms and work just as well.
A few practical tips to maximize your training: Start each session with 2 to 4 warm-up sets using progressively heavier weights before you hit your working weight.
Place the weight on a bench or box at the start so you're not wasting energy repeatedly picking it up from the ground between sets.
If you're a beginner, program goblet squats earlier in your workout as a primary exercise.
More advanced lifters typically use them later as an accessory movement after heavier compound lifts.
They also work excellently in supersets or circuit training when you want to keep your heart rate elevated while building strength.
Conclusion
The goblet squat remains one of the most effective exercises for building lower body strength while teaching proper squat mechanics.
Perfect your form first with lighter weights, then gradually progress through the variations and loading strategies that match your goals.
Master this movement and you'll build a solid foundation for more advanced lifting while developing strength, mobility, and body awareness that carries over to countless other exercises.