The five best parallettes exercises are the L-sit, parallettes push-ups, parallettes dips, pike push-ups, and planche progressions—each one targets different aspects of upper body and core strength while building the foundation for advanced calisthenics skills.
These movements range from beginner-friendly options to elite-level progressions that will challenge even experienced athletes.
Keep reading to learn exactly how to perform each exercise, avoid common mistakes, and structure your training for the fastest results.
Why Parallettes Deserve a Place in Your Training Arsenal
Most bodyweight training equipment promises results but delivers limitations.
Parallettes are different—they solve real problems while opening doors to movements you can't replicate anywhere else.
The most immediate benefit you'll notice is wrist comfort.
When you train on the floor, your wrists bend backward at an uncomfortable angle that creates strain over time.
Parallettes keep your wrists neutral, which means you can train harder and longer without that nagging joint stress that cuts sessions short.
But neutral wrists are just the beginning.
The elevated hand position fundamentally changes what your muscles experience during each rep.
When you perform push-ups on parallettes, for instance, your chest can drop below the level of your hands—a range of motion that's physically impossible on the floor.
This deeper stretch activates more muscle fibers and creates a stronger contraction when you press back up.
What makes parallettes particularly valuable:
- The stable grip platform gives you confidence when attempting advanced skills like planche progressions or L-sits, where balance and control matter more than raw strength
- Both beginners working on basic push-ups and advanced athletes training for one-arm handstands can use the same equipment effectively
- You can throw them in a bag and train anywhere—hotel rooms, parks, your living room during commercial breaks
Parallettes also serve as your entry point into straight-arm strength work, which represents some of the most impressive and demanding skills in calisthenics.
Movements like the planche and front lever require you to generate force with locked elbows, and parallettes make learning these skills safer and more manageable than starting on the floor.
Getting your setup right matters from day one.
Place your hands in a neutral position on the bars with your thumbs initially resting on top.
As you get comfortable, you can wrap your thumbs around for a full grip that provides more control during dynamic movements.
Keep your hands centered on the bars—this gives you optimal balance and prevents the equipment from tipping during exercises.
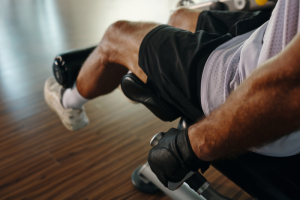
When choosing parallettes, consider three factors: stability (wobbling equipment kills your confidence and ruins form), height (taller bars accommodate deeper dips and more ground clearance for L-sits), and spacing (wider bars work better for dips, while closer spacing suits push-ups and planche work).
Most quality parallettes offer adjustable positioning to handle different exercises effectively.
L-Sit – Building Your Core and Hip Flexor Foundation
The L-sit looks deceptively simple—you're just sitting in the air with your legs out—but it's one of the most effective isometric holds for building both core strength and hip flexor power at the same time. This single position forces your entire midsection to work while your hip flexors hold your legs horizontal against gravity.
How to execute the L-sit correctly: Sit between the parallettes and grip the bars firmly. Press down hard through your hands to lift your entire body off the ground with your arms locked straight. Extend your legs out in front of you so they're parallel to the ground, forming that 90-degree angle between your torso and legs. Your shoulders should stay depressed—pulled away from your ears—and your core needs to stay engaged throughout the entire hold.
Here's what separates a clean L-sit from a struggling one: you need to push your hands down into the parallettes with real force. This creates shoulder depression, which is often the limiting factor for people just starting out. Keep your chest elevated and your back straight. Point your toes and flex your quadriceps hard throughout the hold. When you look at yourself from the side, you should see a straight line running from your shoulders to your hips.
Your progression path from zero to full L-sit
Start with foot-supported L-sits where your heels stay on the ground. This lets you practice the shoulder pressing mechanics without having to support your full bodyweight yet. Once you can hold this position comfortably, move to tuck L-sits with your knees bent and pulled toward your chest. This reduces the lever arm and makes the position much easier to hold.
Next comes the one-leg L-sit variation. Alternate extending one leg at a time while keeping the other tucked. This builds unilateral strength and prepares you for the demands of the full position. Finally, work toward the full L-sit with both legs extended straight out.
Training this movement effectively means following specific parameters. Hold each progression for 10-15 seconds initially, then work your way up to 20-30 seconds before you advance to the next level. Practice 2-3 times per week with 60-90 second rest periods between sets. Once you can hold a progression for more than 8 seconds across 3 sets, you're ready to move forward.
The L-sit hammers your lower rectus abdominis hard, along with your hip flexors that work overtime to keep your legs elevated. Your deltoids, triceps, and serratus anterior provide the pressing power, while your lats offer critical stabilization throughout the hold.
Push-Ups and Dips – Your Compound Pressing Powerhouses
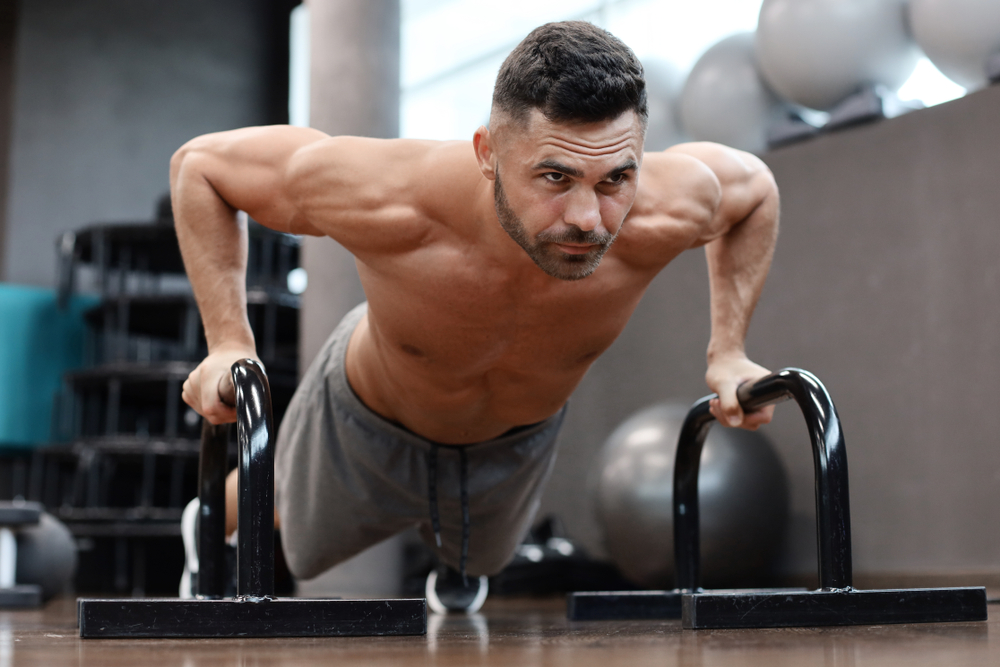
Parallettes Push-Ups
Regular floor push-ups work fine, but parallettes push-ups give you something floor work simply can't—the ability to descend below the level of your hands.
This creates a deeper stretch in your chest and shoulders, which translates to more muscle fiber recruitment and better overall development.
Grip the parallettes firmly with your hands roughly shoulder-width apart or slightly wider.
Position yourself in a straight plank with your shoulders directly over your wrists.
Lower your body down between the bars until your shoulders reach the level of the parallettes or drop below them.
Then press back up explosively while keeping your body in a straight line from your head to your heels.
Form details that actually matter: Keep your elbows relatively close to your body instead of flaring them out wide—your elbow pits should face forward.
Your wrists stay neutral on the parallettes, which is part of why this variation feels so much better on your joints.
Maintain constant tension in your core to prevent your hips from sagging down or piking up.
Your torso and hips should move together as one solid unit.
When you're ready to progress beyond standard parallettes push-ups, you have several options.
Feet-elevated push-ups (placing your feet on a bench) increase the difficulty significantly.
Archer push-ups have you shifting your weight to one side during each rep, building unilateral strength.
Pseudo-planche push-ups position your hands further back toward your hips, which loads your shoulders more intensely.
Advanced athletes can even try explosive plyometric push-ups where your hands leave the bars completely.
Aim for 3-4 sets of 8-12 repetitions if you're focused on muscle growth.
Take 3-4 seconds to lower yourself down, pause briefly at the bottom to eliminate any momentum, then press back up with intention.
Parallettes Dips
Dips hit your triceps, chest, and anterior deltoids simultaneously, which makes them one of the most efficient upper body exercises you can do.
Parallettes give you a stable, neutral grip position that's perfect for this movement.
Position yourself between the parallettes with your hands gripping the bars and your arms fully extended.
Your feet should be off the ground, and your shoulders need to be pulled back and down—depressed and slightly retracted.
Here's a key detail: lean forward slightly if you want to emphasize your chest more, or keep your torso upright to target your triceps harder.
Lower yourself slowly and under control.
Descend until your elbows reach approximately 90 degrees—your upper arms should be roughly parallel to the ground at the bottom.
Press yourself back up forcefully, extending your arms completely and imagining you're trying to bring the parallettes together beneath you.
Five mistakes that sabotage your dips:
- Rushing through the movement without controlling the descent
- Not achieving full range of motion at the bottom
- Letting your shoulders creep up toward your ears
- Using leg momentum to cheat out extra reps
- Failing to lock out completely at the top of each rep
If you can't yet perform full bodyweight dips, start with foot-assisted dips where your feet remain on the ground to support some of your weight.
Resistance band-assisted dips work well too, providing more support at the bottom where you're weakest.
Practice negative dips—starting at the top and lowering yourself slowly over 3-5 seconds—until you build enough eccentric strength.
Once you can perform clean negatives, you're ready for full dips.
Advanced progressions include adding weight with a dip belt or weighted vest, increasing your depth beyond 90 degrees, slowing down the tempo (especially on the way down), or performing L-sit dips where your legs stay extended throughout the entire set.
For muscle growth, execute 3-4 sets of 6-12 repetitions.
If you're chasing pure strength, perform 3-6 reps with added resistance.
Form always takes priority over volume—five perfect reps beat fifteen sloppy ones every time.
Push-Ups and Dips – Your Compound Pressing Powerhouses
Parallettes Push-Ups
Regular floor push-ups work fine, but parallettes push-ups give you something floor work simply can't—the ability to descend below the level of your hands.
This creates a deeper stretch in your chest and shoulders, which translates to more muscle fiber recruitment and better overall development.
Grip the parallettes firmly with your hands roughly shoulder-width apart or slightly wider.
Position yourself in a straight plank with your shoulders directly over your wrists.
Lower your body down between the bars until your shoulders reach the level of the parallettes or drop below them.
Then press back up explosively while keeping your body in a straight line from your head to your heels.
Form details that actually matter: Keep your elbows relatively close to your body instead of flaring them out wide—your elbow pits should face forward.
Your wrists stay neutral on the parallettes, which is part of why this variation feels so much better on your joints.
Maintain constant tension in your core to prevent your hips from sagging down or piking up.
Your torso and hips should move together as one solid unit.
When you're ready to progress beyond standard parallettes push-ups, you have several options.
Start with knee push-ups if you need to build foundational strength first.
Feet-elevated push-ups (placing your feet on a bench) increase the difficulty significantly.
Archer push-ups have you shifting your weight to one side during each rep, building unilateral strength.
Pseudo-planche push-ups position your hands further back toward your hips, which loads your shoulders more intensely.
Advanced athletes can even try explosive plyometric push-ups where your hands leave the bars completely.
Aim for 3-4 sets of 8-12 repetitions if you're focused on muscle growth.
Take 3-4 seconds to lower yourself down, pause briefly at the bottom to eliminate any momentum, then press back up with intention.
The benefits extend beyond just bigger muscles—you're also building functional pressing strength that carries over to other movements while reducing wrist strain compared to floor variations.
Parallettes Dips
Dips hit your triceps, chest, and anterior deltoids simultaneously, which makes them one of the most efficient upper body exercises you can do.
Parallettes give you a stable, neutral grip position that's perfect for this movement.
Position yourself between the parallettes with your hands gripping the bars and your arms fully extended.
Your feet should be off the ground, and your shoulders need to be pulled back and down—depressed and slightly retracted.
Here's a key detail: lean forward slightly if you want to emphasize your chest more, or keep your torso upright to target your triceps harder.
Lower yourself slowly and under control.
Descend until your elbows reach approximately 90 degrees—your upper arms should be roughly parallel to the ground at the bottom.
Press yourself back up forcefully, extending your arms completely and imagining you're trying to bring the parallettes together beneath you.
Avoid using momentum or kipping with your lower body to cheat out extra reps.
Five mistakes that sabotage your dips:
- Rushing through the movement without controlling the descent
- Not achieving full range of motion at the bottom
- Letting your shoulders creep up toward your ears
- Using leg momentum to cheat out extra reps
- Failing to lock out completely at the top of each rep
If you can't yet perform full bodyweight dips, start with foot-assisted dips where your feet remain on the ground to support some of your weight.
Resistance band-assisted dips work well too, providing more support at the bottom where you're weakest.
Practice negative dips—starting at the top and lowering yourself slowly over 3-5 seconds—until you build enough eccentric strength.
Once you can perform clean negatives, you're ready for full dips.
Advanced progressions include adding weight with a dip belt or weighted vest, increasing your depth beyond 90 degrees, slowing down the tempo (especially on the way down), or performing L-sit dips where your legs stay extended throughout the entire set.
For muscle growth, execute 3-4 sets of 6-12 repetitions.
If you're chasing pure strength, perform 3-6 reps with added resistance.
Form always takes priority over volume—five perfect reps beat fifteen sloppy ones every time.
Pike Push-Ups – Your Gateway to Handstand Pressing Strength
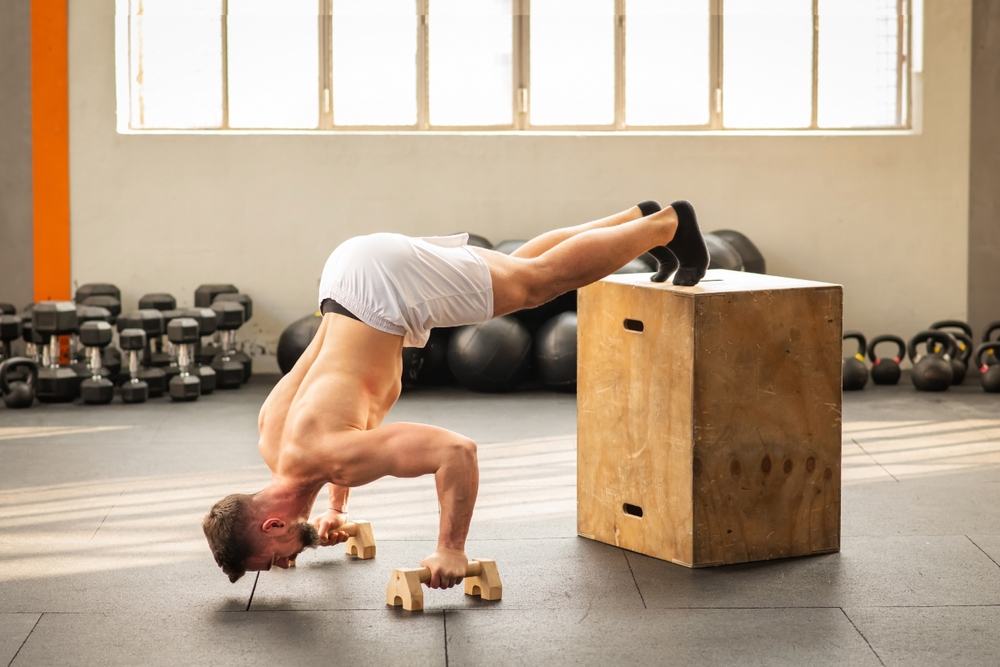
Pike push-ups are your essential progression exercise for building the shoulder strength and movement pattern you need for handstand push-ups.
This movement mimics vertical pressing while keeping your feet on the ground, which makes it accessible yet highly effective for developing the specific strength required for inverted work.
Setting up your pike position: Start in a high plank position with your hands on the parallettes.
Walk your feet toward your hands while lifting your hips up, forming an inverted V or downward dog shape.
Your body should create a pike at the hips.
Keep your legs as straight as possible, though a slight knee bend is acceptable if you have tight hamstrings.
Here's where most people get pike push-ups wrong—they drop their head straight down between their hands.
Don't do this.
Your head should move forward and down toward a point in front of your hands, not between them.
This creates the proper tripod position (two hands and forehead forming a triangle) that you'll eventually use for handstand push-ups.
Getting this movement pattern right now saves you from having to relearn it later.
Four critical form elements that ensure proper skill transfer:
- Your elbows must remain relatively vertical throughout the movement—they shouldn't flare out to the sides or shift backward
- Keep your forearms perpendicular to the ground as you move
- Maintain shoulder protraction (pushed forward) throughout the entire rep
- Press your hands firmly into the parallettes to generate more tension and strength
Lower your head toward the ground until your forehead nearly touches the floor just in front of your fingertips.
The parallettes give you a significant advantage here—you can drop your head below hand level, which is physically impossible when doing pike push-ups on the floor.
This extra depth means more range of motion and better strength development.
Press back up forcefully until your arms are fully locked out.
Your shoulders should never elevate toward your ears during any part of the movement.
Keep them depressed and protracted, pressing down hard into the parallettes throughout each rep.
Progressive loading that builds real strength
Start with your feet on the ground until you can perform 5-8 quality reps with good form.
Once you hit this benchmark, elevate your feet on a bench or box.
This changes everything—the pressing angle becomes steeper and more of your bodyweight shifts onto your shoulders.
The higher you place your feet, the more challenging the exercise becomes, gradually approaching a true handstand position.
Train pike push-ups 3-4 times per week with adequate recovery between sessions.
These work perfectly as a warm-up exercise before attempting full handstand push-ups, priming your shoulders for the heavier work ahead.
Breathing matters more than you think.
Exhale on the pressing phase as you push yourself back up, and inhale on the descent.
Consistent breathing prevents pressure buildup and helps maintain better performance throughout your sets.
Planche Progressions – Mastering Straight-Arm Pushing Strength
The planche represents the gold standard for straight-arm pushing strength in calisthenics.
It demands extreme shoulder, core, and scapular strength that takes months or years to develop.
Parallettes make planche training safer and more accessible—they reduce wrist strain significantly and provide better clearance from the ground, giving you room to learn the movement without your feet scraping the floor.
Planche Lean – Your Foundation
The planche lean is where everyone must start.
It teaches the forward lean mechanics and shoulder positioning that every planche variation requires.
Start in a standard plank position on the parallettes with straight arms and your body in a line.
Now lean forward, shifting your shoulders ahead of your hands until your belly button moves over the base of the parallettes.
Keep your arms completely straight and your scapulae protracted—shoulder blades pushed apart with your upper back slightly rounded.
Hold this forward lean position for 30-60 seconds.
This feels awkward at first because you're loading your shoulders in a way they've never experienced.
The more forward you lean, the harder your shoulders have to work. That's the point.
Tuck Planche – Your First True Planche Position
Once you can hold a solid planche lean for 45-60 seconds, you're ready to attempt the tuck planche.
This is your first real planche position where your feet actually leave the ground.
Place your hands on the parallettes slightly wider than shoulder-width.
From a plank position, lean forward just like you practiced in the planche lean.
Pull your knees tightly into your chest and round your upper back as much as possible through maximum scapular protraction.
Continue leaning forward until you find the balance point—your feet will lift off the ground naturally.
Your body should be horizontal with your shoulders significantly forward of your hands.
The non-negotiable rule: arms must remain completely straight throughout.
Never bend your elbows, even slightly.
The moment you bend your arms, you're doing something else entirely.
Critical Technical Elements That Make or Break Your Planche
Getting these details right separates people who progress steadily from those who stall for months:
Arm and hand positioning: Your elbow pits should face forward with fingers pointing forward or slightly outward.
This external rotation protects your shoulder joints and creates better leverage.
Shoulder mechanics: Depress your shoulders (push them down away from your ears) and protract them (push them forward).
Your upper back should be rounded, not flat.
Many people try to keep their back straight because that's what they've learned in other exercises—don't make this mistake.
Hip position: Maintain a posterior pelvic tilt through hip tucking.
This engages your core more effectively and helps distribute your weight.
Weight distribution: The key to lifting your feet off the ground is getting your bodyweight forward over your hands.
The further forward you can shift while maintaining control, the easier it becomes to achieve the horizontal body position.
Your Complete Progression Pathway
- Planche leans – Hold for 30-60 seconds before moving forward
- Tuck planche – Start with 10-second holds, work toward 30 seconds
- Advanced tuck planche – Gradually extend your knees away from your chest
- Single-leg planche – Extend one leg while keeping the other tucked
- Straddle planche – Both legs extended with a wide spread
- Full planche – Legs together in the final position
Each step represents a significant strength increase.
Rushing through these progressions is the most common reason people get injured or plateau.
Training Methodology for Consistent Progress
Practice planche progressions 3-4 times per week.
Most of your work should fall in the 5-9 second hold range for optimal strength development.
Once you can hold a progression for more than 8 seconds across 3 sets, you can consider advancing to the next level—but don't rush it.
Most setbacks happen when people advance too quickly before they've built adequate strength at their current level.
Planche training shouldn't exist in isolation.
Combine it with pulling exercises like pull-ups and rows to maintain shoulder health and muscular balance.
Planche work pairs particularly well with back-focused training days since the movements complement each other without competing for recovery resources.
Supplementary work matters: Include wrist conditioning exercises regularly—your wrists take tremendous loading during planche training.
Flexibility work helps too, particularly hip flexor and shoulder flexibility.
Consider using wrist wraps when you first start planche training to protect against acute injury while your wrists adapt to the new demands.
Use parallettes specifically for wrist protection and elevation.
Some athletes also find that wrist wraps provide helpful support during the adaptation phase, though you shouldn't become dependent on them.
The planche hammers your front deltoids harder than almost any other movement—they're the primary driver.
Your entire core musculature works intensely to maintain body position.
Your serratus anterior, pectorals, and even your biceps (for stabilization) all engage in intense isometric contraction.
Your entire shoulder girdle learns to generate and sustain force in ways that few other exercises demand.
Programming Your Parallettes Training for Maximum Results
Proper programming separates athletes who progress steadily from those who spin their wheels for months.
The difference isn't talent or genetics—it's understanding how to structure your training intelligently.
Warm Up Like Your Results Depend On It (Because They Do)
Never touch the parallettes with cold joints.
Your wrists take loading they're not accustomed to in daily life, and your shoulders work through ranges of motion that most people never explore.
Start every session with wrist circles in both directions, then move to shoulder mobility drills that open up your range.
Scapular activation exercises—like scapular push-ups and shoulder shrugs—wake up the stabilizing muscles that keep you safe during more demanding work.
Wrist preparation deserves special attention.
Parallettes place unique demands on these joints, loading them in ways that typing, lifting weights, or even regular push-ups don't replicate.
Spend 3-5 minutes on dedicated wrist work before each session.
Your wrists will adapt over time, but only if you give them the preparation they need upfront.
Structure Your Sessions for Success
Start with simpler movements before attempting advanced skills.
Practice parallettes push-ups and support holds before you move to planche work or handstands in a single session.
This isn't just about warming up—it's about motor learning.
Your nervous system performs better when you build from familiar patterns to novel ones.
Here's a sample session structure that works:
- Warm-up and mobility work (5-8 minutes)
- Skill work at highest difficulty (planche progressions, L-sits – when you're fresh)
- Strength work at moderate difficulty (pike push-ups, dips)
- Volume work or easier variations (standard push-ups, holds)
- Accessory work (pulling exercises, core work)
Quality always beats quantity.
Five perfect reps with proper form deliver better results than fifteen sloppy repetitions where your shoulders elevate, your core sags, and your elbows flare.
Record yourself periodically to check form—you can't feel what you can't see, and video reveals technical breakdowns you'd never notice otherwise.
Rest, Recovery, and Training Frequency
Rest 60-90 seconds between sets for strength-focused training.
This gives your nervous system time to recover without letting your muscles cool down completely.
For skill work like planche progressions or L-sit practice, you might need slightly longer rest periods since the neuromuscular demands are higher.
Allow at least one full day of recovery between intense parallettes sessions that target the same movement patterns.
Your shoulders, wrists, and elbows need time to adapt to the training stress.
Training the same patterns daily doesn't accelerate progress—it increases injury risk and stalls strength gains.
Weekly frequency recommendations:
- L-sits and planche progressions: 3-4 sessions per week
- Push-ups and dips: 2-3 sessions per week (can train more frequently as they're less neurologically demanding)
- Pike push-ups: 3-4 sessions per week, works well as a warm-up for other pressing work
- Combined parallettes session: 2-3 times per week for full-body approaches
Making Smart Progression Decisions
Knowing when to advance and when to consolidate your current level determines your long-term success.
The rule is simple: once you can hold a progression for more than 8 seconds across 3 sets, or complete the target rep range with good form for 3 sets, you're ready to advance.
But “ready to advance” doesn't mean you must advance immediately.
Spending extra time at a progression builds a deeper strength foundation.
Many athletes benefit from staying at a level for 2-3 weeks after they hit the progression criteria, ensuring they've truly mastered the position before moving forward.
Integrating Parallettes Work With Other Training
Parallettes training shouldn't exist in isolation.
Combine it with pulling exercises to maintain shoulder health and muscular balance.
Pull-ups, rows, and face pulls provide the posterior chain work that balances all the anterior pushing.
Include mobility work regularly—hip flexor stretches, shoulder dislocates with a band, and thoracic spine extensions help maintain the range of motion you need for advanced skills.
Conditioning work fits well on off days, but keep the intensity reasonable if you're training parallettes skills hard.
Running, cycling, or light circuit training won't interfere with your progress, but don't gas yourself so thoroughly that you can't recover for your next parallettes session.
Common Programming Mistakes That Kill Progress
The biggest mistake is trying to do too much too soon.
Athletes attempt planche progressions when they can barely hold an L-sit for 5 seconds.
They add weight to dips before they can perform 12 clean bodyweight reps.
They train the same movements daily without allowing recovery.
Another frequent error: neglecting the basics once you can do them easily.
Keep practicing standard parallettes push-ups and dips even when you're working toward advanced progressions.
These movements maintain your base strength and serve as excellent warm-ups for harder work.
Adopt a Long-Term Skill Development Mindset
Advanced progressions like the full planche or freestanding handstand push-ups take years, not months.
Athletes who accept this reality from the start make better training decisions and experience fewer injuries.
Patience with advanced progressions isn't weakness—it's intelligence.
Progress isn't linear.
Some weeks you'll crush your training.
Other weeks you'll feel weaker despite doing everything right.
Sleep quality, stress levels, nutrition, and even ambient temperature affect performance.
Judge your progress over months, not days.
Track Your Progress Effectively
Keep a simple training log that records hold times, rep counts, and form improvements.
Note when exercises feel easier or harder than expected. Track which progressions you're working on and how long you've been at each level.
This data reveals patterns you'd miss otherwise—maybe you progress faster with higher frequency, or maybe you need more rest between sessions than you thought.
Your training log also provides motivation during plateaus.
When progress feels slow, looking back at where you were three months ago reminds you how far you've actually come.
Conclusion
These five parallettes exercises give you everything you need to build exceptional upper body and core strength, from beginner-friendly movements to elite-level progressions that challenge even advanced athletes.
Start with the basics, focus on perfect form over impressive numbers, and trust the progression pathways outlined here—they work because they respect how your body actually adapts to new demands.
Put in consistent effort over months and years, and you'll develop strength capabilities most people never achieve.