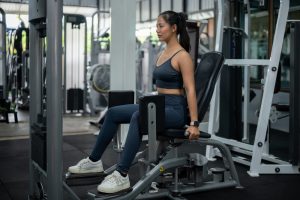
The sumo deadlift is a wide-stance variation that shortens the bar path, shifts more work to your quads and adductors, and typically reduces spinal loading compared with conventional pulling.
If you want a lift that can play to certain body types, support lower-back comfort, and still build serious strength, keep reading for a full breakdown of how it works and how to master it.
How Sumo Deadlift Differs from Conventional (and Why It Matters)
Sumo and conventional are both deadlifts, yet they load your body in different ways that change how the bar moves, which joints work hardest, and how your back feels under load.
Understanding those levers helps you choose the style that fits your build, your history, and your goals.
Range of Motion and Mechanical Work
Sumo’s wide stance and more upright torso shorten the bar’s vertical travel, so the lift usually requires less total mechanical work—about 25–40% less than conventional.
You still have to break the floor and lock the bar out, but the distance is shorter and the start position places your hips closer to the bar.
In practice, that can make heavy singles feel more “accessible,” while volume sets create a bit less systemic fatigue for the same load on the bar.
Joint Positions and Moments
You stand wider with toes turned out and grip inside your legs.
The trunk sits more upright and the shoulders hover just in front of the bar rather than well ahead of it.
Those geometry changes shift joint demands: knee and ankle moment arms differ from conventional, so your knees work harder early, while hip moments are broadly similar between styles.
Balance also feels different because a wide base and toe-out ask you to control the frontal plane—keeping knees tracking over toes and pressure over mid-foot—rather than riding a narrow, straight-ahead groove.
Muscle Emphasis Across the Pull
Because the shins stay nearer to vertical and the knees extend sooner, you see more quad involvement early in sumo.
Conventional tends to light up the erector spinae and biceps femoris more across the pull.
As the bar clears the knees in sumo, adductor magnus and glute contribution rises, which is why a clean “hips through” finish matters.
None of this means one style is “better” for building muscle; it means the patterns differ, so accessories and cues should match the demands of the style you choose.
Spinal Loading
A more vertical trunk reduces the leverage on your low back.
Classic biomechanics work estimates about ~10% lower L4/L5 extensor moments and ~8% lower shear in sumo compared with conventional.
That’s helpful if you tolerate upright pulling better, yet it doesn’t remove the need for a hard brace and a bar path that stays close—two things that keep stress where you want it and away from where you don’t.
What This Means for You
If you have a longer torso relative to height, sumo may feel slightly more natural because you can reach the bar without folding as much.
Shorter-torso lifters often find conventional lines up well with their leverages. These differences are small, so you should try both rather than decide on paper.
Hip comfort is the other gatekeeper: sumo asks for more external rotation and frontal-plane control.
If deep hip flexion with toe-out feels smooth (no impingement or pinching), you’ll likely find a stronger start in sumo; if not, narrow the stance or keep conventional as your main pull while you build mobility and adductor strength.
For a quick field test, run two short blocks:
- Train each style for 3–4 weeks with the same weekly exposure (one heavy day, one technique/variation day), same RPE targets, and the same accessories.
- Track bar speed or RPE on top sets and note how your back and hips feel the day after.
- Choose the style that moves better, feels steadier off the floor, and lets you recover well—then keep the other as a secondary lift to round out your strength.
Who Benefits Most from Pulling Sumo
Sumo works well for many lifters, but not for everyone in the same way.
The best fit comes down to how you’re built, how your hips move, and whether you prefer a more upright pull that can feel easier on the back.
Anthropometry and Leverages
Lifters with longer torsos relative to height often feel at home in sumo because the upright trunk and closer hips make it easier to reach the bar without folding over.
Shorter-torso lifters may find conventional lines up better with their leverages.
The differences aren’t huge, so you should test both styles rather than decide from a chart.
If your top sets in sumo feel steadier off the floor and your back recovers well the next day, that’s a sign the geometry suits you.
Hip Mobility and Frontal-Plane Control
Sumo asks for more hip external rotation and better side-to-side (frontal-plane) control than conventional.
You’ll need to keep your knees tracking over your toes while pressure stays over mid-foot, which is easier if your adductors are strong and your hips rotate comfortably.
If that control is missing, the bar tends to drift and the knees cave, which stalls the lift early.
The Comfort Check: Deep Flexion with Toe-Out
Set up wide with toes out and sink into your start position.
If you can reach the bar with a neutral spine and no pinch at the front of the hip, you likely tolerate sumo well.
A sharp pinch or jam suggests your stance or toe-out is too aggressive for now—narrow a bit, turn the toes slightly in, and build capacity with adductor work and gentle mobility before pushing heavy loads.
Quick self-screen (1–2 minutes):
- Sit into your start position and breathe; hold for 3–5 slow breaths. No pinching and knees track over toes? Green light.
- Perform 3–5 controlled singles at ~40–50% 1RM. Bar stays close, knees don’t collapse, and you feel the floor under mid-foot? Keep going. If not, adjust stance/toe-out and retest.
When Sumo Is a Strategic Choice
Sumo can be a smart pick in a few common situations:
- Back tolerance: You prefer a more upright trunk and often feel better the day after pulling. (Sumo’s posture typically reduces low-back demand compared with conventional, though bracing still matters.)
- Quad strength bias: Your quads and adductors outpace your posterior chain, and you want a start that lets you push the floor early.
- Competitive rules and preference: You compete in powerlifting and like the feel of a shorter bar path; the stance is legal, and your training indicates reliable lockouts.
- Injury history management: Hips feel fine in deep flexion with toe-out, and prior back issues calm down when you pull upright and keep the bar tight.
How to Decide: A Short Trial That Gives a Clear Answer
Run a simple two-block experiment. Train sumo for 3–4 weeks and conventional for 3–4 weeks (or vice versa) with the same weekly structure: one heavy/primary day and one technique/variation day at matched RPEs.
Track bar speed or RPE on top sets, note off-the-floor consistency, and record next-day hip/back comfort.
Choose the style that moves cleanly, holds positions under fatigue, and fits your recovery. Keep the other as a secondary lift to cover gaps.
Red Flags and Easy Modifications
If you can’t reach the bar without rounding, narrow the stance slightly and reduce toe-out while you build hip rotation and adductor strength.
If knees cave or feet slip, favor firmer, grippy footwear and cue “spread the floor” to keep pressure out through the feet.
When hip comfort is mixed, blend styles for a phase: pull conventional heavy while you train sumo as a lighter technique day until positions improve.
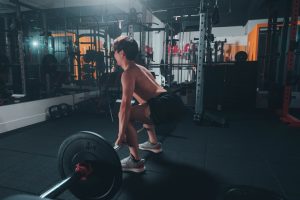
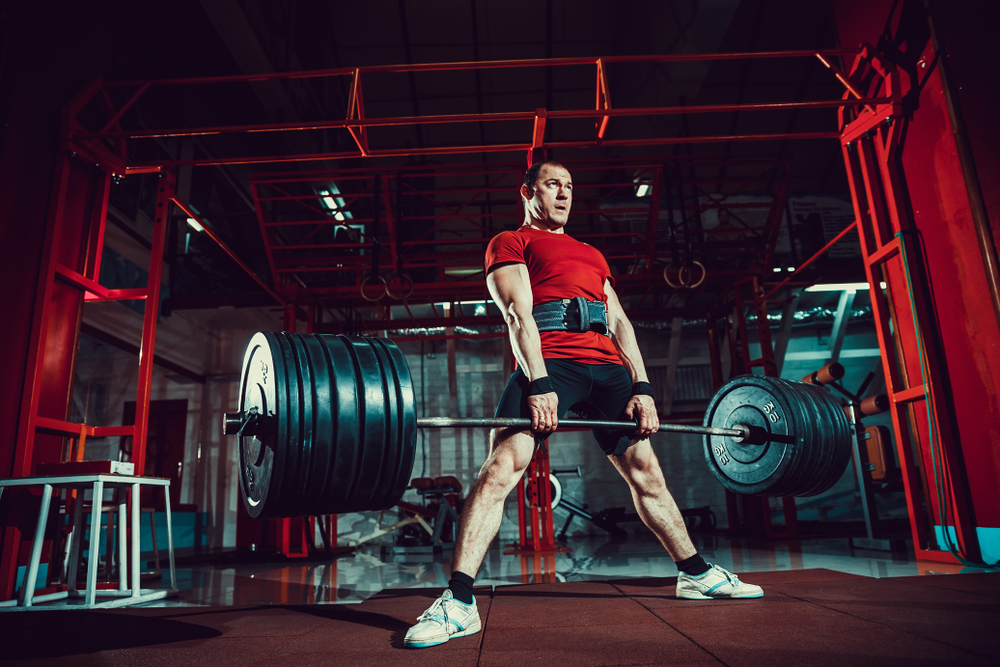
The Sumo Deadlift Setup—A Repeatable Checklist

You’ll pull more consistently when your setup never changes.
Use this quick checklist the same way every session so positions lock in and the bar leaves the floor the same way each time.
1) Feet and stance
Set your stance wide enough that, in the start position, your shins are nearly vertical and your knees track over your toes.
Turn toes out ~30–45° so your hips can open without the knees caving.
Feel a solid tripod foot (heel, big toe, little toe) with pressure over mid-foot, not the toes or heels.
If you can’t reach the bar with a neutral spine, narrow the stance a touch or reduce toe-out and retest.
2) Bar and grip
Roll or place the bar over mid-foot, usually about 1 inch from your shins.
Grip just inside your thighs—as narrow as you can without the hands rubbing the legs on the way up.
Warm up with double-overhand to build hand strength; use hook or mixed for heavy sets and singles.
Rotate sides if you use mixed to spread stress on the supinated arm.
3) Hips and torso
Bring your hips close to the bar horizontally, lift your chest, and set a neutral spine.
Your shoulders sit slightly in front of the bar so you can push through the floor rather than yanking from behind it.
If your hips shoot behind your heels, you’re too low; if your hips hike high and your chest drops, you’re too far behind the bar.
4) Brace and wedge
Take a big 360° breath, expand into belt or midsection, and brace hard.
Pull the slack out of the bar until you feel the plates kiss the collars and your lats switch on.
Wedge your hips toward the bar so you feel tension in the lats and adductors before the bar moves.
The bar should already be touching your shins; think “chest tall, lats tight.”
5) The pull sequence
Push the floor apart so the knees track out as you extend the knees early, keeping the bar glued to your legs.
Stay over mid-foot and keep the bar stacked under your shoulders while it passes the knees.
Finish by pushing hips to the bar once it’s above the knees—no lean-back or hyperextension at lockout.
If the bar drifts forward, you lost lat tension or let the knees collapse; reset and cue “spread the floor, squeeze the oranges in your armpits.”
6) The descent
Break from the top with hips back first, keep knees out, and maintain your hinge.
Guide the bar down your legs to the floor—don’t let it free-fall. Reset your feet and breath if the bar lands off mid-foot.
Quick micro-checks you can run between reps
- Bar path: touches shins on the way up and down.
- Balance: pressure over mid-foot; feet don’t spin.
- Posture: chest tall, ribs down, neck neutral.
- Tension: you feel lats and adductors before lift-off.
Follow this order every time—feet, bar, grip, hips/torso, brace/wedge, then push and finish—and your sumo pull will feel the same from warm-ups to heavy singles.
Cues and Corrections for Common Technique Errors
Clean cues solve most problems before they show up on the bar.
Use the ones below during warm-ups, then match each error with a simple fix so your heavy sets don’t fall apart.
Feet through the floor, spread the floor.
Create outward pressure so your knees track over your toes and your feet don’t spin.
Think about pushing the platform apart as the bar leaves the floor; you’ll feel your adductors and quads share the load and the bar will stay close.
Chest tall, lats tight (squeeze oranges in your armpits).
Set your torso and glue the bar to your shins.
Pull the slack out until the collars kiss, keep ribs down, and keep your shoulders just in front of the bar so it rises straight up your legs.
Hips to the bar. Finish without leaning back.
Once the bar clears your knees, drive your hips forward into the bar and stand tall; no hyperextension, no shrug.
Hips rise early / bar stalls off the floor.
This usually means you’re quad-limited, under-wedged, or starting with knees behind your ankles.
Nudge your stance so knees are over ankles, wedge hard before you pull, and add pauses or tempo to build the start: pause-sumo with a 2–3 count just off the floor or tempo-sumo at 3–0–3 for 3–6 reps.
Slot in quad and adductor work (front squats, Cossacks, split squats, Copenhagen progressions) after your main sets.
Knees cave / bar drifts forward.
You likely turned the toes too far out or lost lat tension.
Bring the stance in slightly, reduce toe-out a notch, and cue “spread the floor” from your first breath.
Reinforce lats with every rep—think “armpits to pockets”—and use mid-shin pauses to feel the right groove.
If the bar marks your shins on the way up and down, you’re on track.
Soft lockout. The bar is high but your hips lag behind.
Practice hips-through timing with light singles where you pause an inch above the knee, then finish.
Add block pulls set just below the knee and pair them with hip-extension accessories (RDLs, hip thrusts, back extensions).
Keep the finish crisp: “hips to the bar, stand tall,” no lean-back.
How to put this into practice today.
Pick one cue per weakness and keep it for the whole session.
For example, if you struggle off the floor, open each warm-up with “spread the floor,” then run 2–3 sets of pause-sumo at RPE 6–7 after your top work.
If the bar drifts, anchor “lats tight” on every rep and sprinkle 2–3 rep sets with a 2-count pause at mid-shin.
When lockout is the limiter, finish with 3–4 sets of block pulls and a hip-extension accessory.
Keep notes on which cue fixed the rep; that becomes next week’s starting cue.
Training Sumo Deadlift—Programming That Works
Good programming lets you practice the same strong positions often enough to improve while staying fresh enough to recover.
Use a simple split, anchor it with clear loading rules, and plug in variations and accessories that attack your weak links.
Weekly Structure and Frequency
Most lifters progress well with 1–2 sumo exposures per week.
A common split is one heavy/primary day plus one secondary/variation day that targets your sticking point or positioning.
- One-day option: If life is busy, run a single primary day and sprinkle one sumo variation as your first accessory.
- Two-day option: Keep the primary day heavy and specific, then make the secondary day slightly lighter with a clear technical focus.
Primary Day: Heavy, Specific Work
Run 3–5 working sets of 1–5 reps at RPE 7–9 (≈ 75–90% 1RM) with full rest (2–4+ minutes). Hold your technique standard: if hips shoot up, knees cave, or the bar drifts, end the set even if the target reps aren’t complete. A reliable format:
- Top set: 1–3 reps @ RPE 8–9.
- Back-offs: 2–4 sets of 2–5 reps @ RPE 7–8 (or 5–10% lighter than the top set).
This gives you a quality peak plus volume in good positions.
Secondary Day: Pick the Right Variation
Choose one sumo-specific variation based on your limiter and run 3–4 sets of 3–6 reps @ RPE 6–8. Keep intent sharp and bar path tight.
- Off-the-floor strength / early position control:
- Pause-sumo with a 2–3 count just off the floor.
- Tempo-sumo at 3–0–3 for smoother knee tracking and balance.
- Lockout strength:
- Block pulls (just below knee) to rehearse a clean “hips to the bar” finish.
- Start strength, sparingly:
- Deficit sumo ≤ 2.5 cm to avoid changing the pattern too much while nudging start strength.
Rotate the variation every 4–6 weeks or when progress stalls.
Accessories That Carry Over
Match accessories to sumo’s demands—quads, adductors, hips, and trunk. Place them after your main work and cap sets before technique degrades.
- Quads & adductors: front squats, high-bar squats, Cossack squats, split squats, Copenhagen progressions.
- Hips & trunk: RDLs/hip hinges, hip thrusts, back extensions, planks.
- Isometrics on lighter weeks: adductor squeezes to maintain groin strength without fatigue.
Two to four total accessory movements per session is plenty.
Sample Week (Two-Day Layout)
- Day 1 – Primary Sumo
- Sumo Deadlift: Build to a top double @ RPE 8; 3×3 @ RPE 7–8 (−5–8% from top set).
- Front Squat: 3×5 @ RPE 7.
- Back Extensions: 3×10–12, controlled.
- Copenhagen Side Plank (short-lever): 2×20–30s/side.
- Day 2 – Variation Focus
- Pause-Sumo (2–3 ct just off floor): 4×3 @ RPE 7.
- Hip Thrust or RDL: 3×6–8 @ RPE 7–8.
- Cossack Squats: 3×6–8/side, smooth reps.
- Plank: 2–3×45–60s.
One-day alternative: Run the Day 1 template, then add a light variation (e.g., tempo-sumo 2×3 @ RPE 6) before accessories.
Progression You Can Trust (4–6 Weeks)
Advance load only when bar path and positions stay tight.
- Add 5–10 lb (2.5–5 kg) weekly to the top set if last week’s top set was RPE ≤ 8 and the bar stayed close with clean knee tracking.
- Otherwise, hold the load and add one back-off set or 1–2 reps across back-offs to grow capacity.
- Deload for one week when RPEs creep high at the same loads, bar speed stalls, or positions degrade. Drop volume 30–50% and intensity ~5–10%, keep technique crisp.
Practical Loading and Rest Notes
Use small jumps on heavy singles/doubles and slightly larger jumps on back-offs.
Rest long enough that each set looks like the first; short rests hide fatigue in your positions.
Chalk, consistent bracing, and the same setup sequence every rep do more for weekly progress than chasing an extra plate too soon.
Safety, Equipment, and Warm-Up for Long-Term Progress
Longevity with sumo comes from smart grip choices, steady load progressions, and a warm-up that targets the hips and adductors.
Keep the setup repeatable, respect your joints, and build small habits that make every rep safer.
Safety Notes You Should Act On
Mixed grip carries a distal biceps rupture risk on the supinated arm.
If you use it, keep that elbow locked, rotate which hand is supinated in training, or favor hook grip for heavy singles and peaks.
Sumo also raises frontal-plane and adductor demands, so progress load gradually and keep a small, steady dose of Copenhagen work in the week to protect the groin.
Your trunk is more upright than in conventional, which typically means lower spinal extensor moment and shear (≈10% and ≈8% reductions at L4/L5), but you still need a hard 360° brace and a bar path that stays tight to your legs.
If anything pinches at the front of the hip in the start position, pull stance/toe-out back a notch and rebuild the wedge before you chase load.
Equipment That Actually Helps
Footwear. Choose flat, thin, grippy soles (deadlift slippers are ideal).
Going barefoot doesn’t raise peak force or bar speed versus shoes, and shoes slightly increase displacement and work.
The bottom line is simple: use thin, firm, grippy footwear you won’t slip in.
Grip. Hook and mixed both work.
Train hook on submax sets to build tolerance; if you pull mixed, rotate sides during training and keep the supinated elbow straight.
Straps are fine for volume work when grip is the limiter, but they’re not allowed in powerlifting meets.
Belt. Wear the belt where you brace best, often a touch lower in sumo.
Expect a small change in setup angles when you add a belt; that’s normal.
Set pressure evenly around the torso and use the same breath-and-brace ritual on every rep.
Rules (powerlifting). Sumo stance is legal. Straps are not.
Shin-length socks are mandatory in federations like IPF/USAPL. Plan your meet day gear accordingly.
A Warm-Up That Targets Sumo’s Demands (≈8–10 minutes)
You’re priming hips, adductors, and your start position—not chasing a sweat.
- General (2–3 minutes): easy bike or row to raise temperature.
- Hips/adductors—dynamic (1–2 sets each, smooth and pain-free):
- Cossack squats x 6–8/side
- Frog rocks x 8–10 controlled reps
- 90/90 transitions x 6–8/side
- Groin strength primer (1–2 sets each side):
- Short-lever Copenhagen holds x 20–30 seconds
Use a low dose here; this is activation, not fatigue. These are well supported for groin-injury prevention and adductor strength.
- Short-lever Copenhagen holds x 20–30 seconds
- Specific bar prep (3–4 progressive sets):
- Empty-bar Romanian pulls x 8 focusing on hinge and lats.
- Singles at ~30%, then 50%, then 65% 1RM for 3–5 reps total (e.g., 1–2 singles per load), rehearsing your wedge and knee tracking.
Hit your cues: “spread the floor,” “lats tight,” “hips to the bar” at finish.
Readiness check before top sets: you can reach the start with a neutral spine and no front-hip pinch; the bar brushes your shins on the way up; your feet feel planted with pressure over mid-foot.
If any box fails, adjust stance or toe-out and take one more ramping single before you go heavy.
Keep these pieces consistent week to week.
Safe grip habits, groin-savvy accessories, and a targeted warm-up add up to stronger pulls and fewer setbacks.
Conclusion
The sumo deadlift offers a shorter pull, different muscle emphasis, and often a more back-friendly position—if it matches your build and mobility.
With a repeatable setup, targeted variations, and smart progression, you can pull heavier while staying healthy.
Keep refining your stance, cues, and accessories, and the lift will pay you back for years.