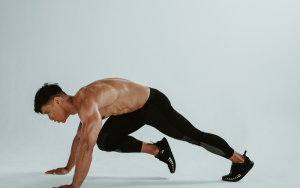
Plank walk-ups are a dynamic core exercise where you alternate one arm at a time between a forearm plank and a straight-arm plank, keeping your hips still and your body in one straight line the whole time.
Doing them correctly comes down to moving slowly, placing your elbows and hands in the exact same spot each time, and alternating which arm leads so your hips never rock side to side — keep reading for the full breakdown of setup, form cues, and common mistakes to avoid.
What Is a Plank Walk-Up (And Why It Belongs in Your Core Routine)
A plank walk-up combines two positions you probably already know: the high plank and the forearm plank. Instead of holding either one still, you move between them one limb at a time, lowering onto your elbows and then pressing back up onto your hands, while your torso stays completely still throughout.
You'll see this exercise called by several different names, and none of them are wrong:
- Up-down plank – describes the movement pattern
- Plank-up – shorthand used by trainers and coaches
- Plank press – emphasizes the pressing action back to high plank
- Walking plank – a nod to the alternating limb movement
One thing worth clearing up: a plank walk-up isn't the same as a plank walkout. A walkout starts from standing, then you walk your hands forward until you're in a plank before walking back up.
A walk-up, on the other hand, is performed entirely on the ground, shifting between forearm and high plank.
Mixing these up can lead you to the wrong exercise entirely, so it's worth knowing the distinction before you start programming either one.
As for what actually counts as a rep: one full cycle means going from high plank down to forearm plank, then back up to high plank again. Lowering onto your elbows without pressing back up only gets you halfway there.
So why bother with this instead of just holding a plank? A static hold trains your core to resist collapse in one fixed position.
A walk-up adds movement to that equation, forcing your core to control rotation and extension while your base of support constantly shifts under you.
That's a much closer match to how your core actually works in daily life and sports, where stability rarely means staying frozen in place.
This is classified as an intermediate-level exercise. If you can already hold a clean high plank and forearm plank without your hips sagging or shifting, you're ready to add the dynamic element. If static holds still feel shaky, that's your cue to build a stronger foundation first.
Muscles Worked and What Makes This Exercise Effective
Your rectus abdominis and transverse abdominis do most of the work here, resisting the urge to let your spine extend or twist as your arms move.
These are the same muscles that keep your torso rigid during a static plank, but the walk-up asks more of them since they now have to stabilize a moving base rather than a fixed one.
A long list of secondary muscles pitches in to support the movement:
- Obliques – control rotation and keep your hips from twisting
- Serratus anterior and shoulder stabilizers – manage your shoulder blades as you shift weight between hands and elbows
- Deltoids and triceps – power the press back up to high plank
- Chest (pectorals) – assist during the pressing phase
- Erector spinae – prevent your lower back from rounding or arching
- Glutes and quads – keep your hips level and legs locked in place
This is genuinely a full-body exercise, even though the core carries most of the demand.
Static vs. dynamic: why the movement matters. A standard plank is purely isometric: your muscles contract and hold, without changing length. A walk-up adds both eccentric contractions (as you lower to your forearms) and concentric contractions (as you press back up). That combination trains your core to control movement, not just resist it, which carries over better to real-world stability challenges.
Direct research on plank walk-ups specifically doesn't exist yet, but studies on closely related dynamic plank variations point in a clear direction.
Research on the “body saw” movement found high core and serratus anterior activation while keeping spinal load relatively low, suggesting that adding motion to a forearm plank challenges your abdominal wall without punishing your back.
Separate research on the long-lever plank found significantly higher activation in the upper rectus abdominis, lower abdominal stabilizers, and external obliques compared to a standard plank hold.
Taken together, this suggests that asymmetric, limb-driven movement is what pushes core activation higher than a static hold alone.
Step-by-Step Instructions for Proper Form
Getting the setup right matters more than any other part of this exercise, since everything else builds on it. Here's how to move through a clean rep from start to finish:
- Set up your high plank. Place your hands directly under your shoulders, fingers spread wide and pointing forward, arms fully extended. Your feet should be hip- to shoulder-width apart with your weight resting on your toes.
- Brace your core. Draw your navel toward your spine and squeeze your glutes and thighs. You're aiming for one continuous line running from your head through your shoulders, hips, and heels. Keep your neck neutral by looking at a spot on the floor roughly a foot ahead of your hands, rather than straining your neck up.
- Lower one arm at a time. Bend one arm and place that forearm on the floor, letting your elbow land exactly where your hand just was. Then lower your other forearm the same way, arriving in a forearm plank. Control this descent — don't let yourself drop or collapse onto your elbows.
- Press back up, one arm at a time. Place one hand back down where your elbow was and start straightening that arm. Then push through your other hand to return fully to high plank. That's one complete rep.
- Switch your lead arm. Alternate which arm initiates the movement on each rep. This keeps both sides developing evenly and prevents the compensation patterns that come from always leading with the same side.
Throughout the entire movement, your hands and elbows should land in roughly the same spots each time — think “elbows replace hands, hands replace elbows.”
This keeps your body from creeping forward or drifting backward as you cycle through reps. Speed is not your friend here: treat each transition like a brief pause rep, stabilizing before you move the next limb, rather than rushing through the sequence.
On breathing: the one rule you can't break is holding your breath. Doing so spikes your blood pressure and actually reduces your stability, which works against everything you're trying to build with this exercise. Beyond that, the exact timing is flexible — some people find it easier to exhale as they lower to their forearms and inhale on the way back up, while others prefer the reverse. What matters most is keeping your breath steady and rhythmic, roughly one full breath per rep, and exhaling through whichever phase feels hardest for you personally.
Common Mistakes and How to Fix Them
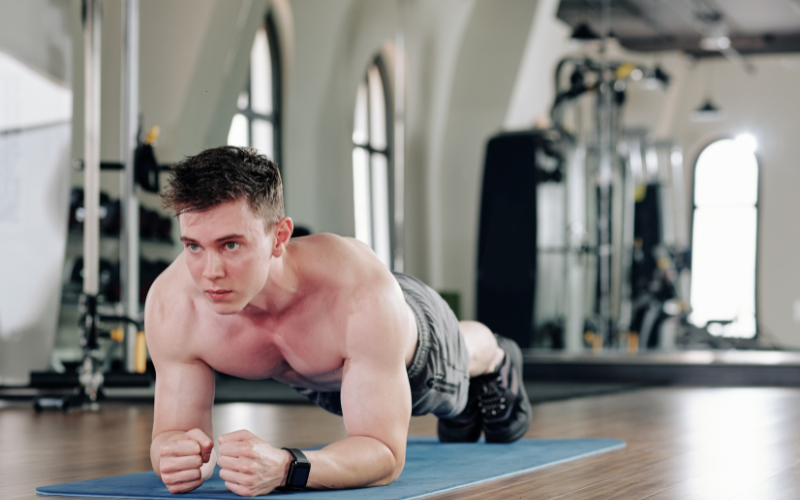
Most form breakdowns in this exercise show up in your hips first, since that's where a loss of core tension is hardest to hide. Here are the errors that come up most often, along with how to correct each one:
Hip rotation or sway during arm transitions. This is the single most common mistake, and it's a direct sign that your core has lost tension. When you lower or press one arm, your hips twist toward the side that's moving. Fix it by widening your stance slightly, bracing your core before you move each limb, squeezing your glutes throughout, and slowing your tempo until the rotation disappears.
Sagging hips and an arched lower back. Letting your hips drop toward the floor shifts the load onto your lumbar spine instead of your core, which is exactly what you don't want. Engage your glutes and core harder, and if you can't maintain the line, drop to your knees until you build the strength to hold it on the floor.
Piking your hips too high. Overcorrecting in the other direction — lifting your hips well above your shoulders — takes tension off your core and turns this into a different exercise entirely. Keep your shoulders, hips, and heels aligned in one straight plane.
Rushing the movement or relying on momentum. Jerky, fast transitions reduce how much your core actually has to work, and they often lead to sloppy hand and elbow placement. Treat every limb transfer like its own mini-rep: stabilize, move one arm, stabilize again before moving the next.
Poor hand or elbow placement. Elbows landing too wide, or hands reaching too far forward, make the position unstable and can strain your shoulders. Keep elbows directly under your shoulders and place your hands exactly where your elbows were.
Head dropping or shoulders creeping toward your ears. Craning your neck up or shrugging your shoulders adds unnecessary tension and throws off your alignment. Keep your neck long, your gaze slightly ahead of your hands, and actively push the floor away to keep your shoulders down.
Always leading with the same arm. Defaulting to one lead arm every time creates uneven strength and control between your two sides. Make alternating arms a deliberate habit, not an afterthought — switch your lead every single rep.
A simple way to catch most of these in real time: imagine balancing a full cup of water on your lower back, and picture your goal as keeping it from spilling side to side. If you can hold that image while moving smoothly through the sequence, you're probably doing it right.
Modifications, Progressions, and Recommended Sets/Reps
Before attempting the full dynamic movement, make sure you can hold both a high plank and a forearm plank on their own for at least 20 to 30 seconds without your hips sagging or shifting.
If either static hold feels shaky, that's your starting point — the walk-up will only expose those same weaknesses in a more demanding format.
If you need to scale down:
- Knee-supported version – perform the entire sequence from your knees instead of your toes, keeping a straight line from your head through your hips to your knees. Don't let your hips sink back toward your heels as you move.
- Incline version – place your hands on a raised, sturdy surface like a bench or step. The higher the surface, the easier the exercise; lower it gradually as your strength improves.
Both modifications let you practice the same arm-transition pattern while reducing the amount of bodyweight your core has to control.
Once the standard version feels solid, here's how to make it harder:
- Slow tempo or pause reps – add a 2–3 second count to each phase, or pause briefly in forearm plank before pressing back up, to remove momentum entirely
- Narrow stance – bringing your feet closer together increases the anti-rotation demand on your core
- Shoulder taps – add a tap after returning to high plank for an extra rotational challenge
- Added push-ups – insert a push-up between transitions to increase upper-body demand
- Instability surfaces – place your hands or feet on a stability ball or balance trainer
- Weighted or decline variations – add a plate across your back, or elevate your feet on a bench
For sets and reps, aim for roughly 2 to 3 sets of 5 to 12 reps per side, or 30 to 60 seconds of continuous work, performed 2 to 3 times per week with a rest day in between sessions. These numbers are a reasonable starting range, not a rigid prescription — how you perform each rep matters more than hitting a specific count.
Use your form as the real signal for when to change your approach. If your hips are sagging, swaying, or you're holding your breath to get through reps, that's a clear cue to regress: drop to your knees, elevate your hands, or slow down further.
If you're moving with full control for every rep in a set, you're ready to progress — add reps or time first, then layer in the harder variations above once the basic version is clean.
Safety Considerations and Who Should Modify or Avoid It
Wrist sensitivity. The high plank phase repeatedly loads your wrists in extension, which can aggravate existing sensitivity. Reduce the strain by keeping your hands directly under your shoulders with fingers spread wide, actively pushing the floor away rather than sinking into your wrists, or switching to push-up handles or dumbbells with a neutral grip to take the extension out of the equation entirely. If you feel sharp or worsening pain, stop — a forearm-only exercise may serve you better for the time being.
Shoulder problems, including impingement. The repeated pressing transitions place real demand on your shoulder girdle, which can flare up existing issues. If you feel pain during the press-up phase, modify the movement or skip it until you've addressed the underlying shoulder issue.
Lower-back pain or acute injury. Uncontrolled hip sagging shifts load directly onto your lumbar spine, so anyone with an acute back injury should avoid this exercise altogether. If you have general back sensitivity rather than an acute injury, strict alignment becomes even more important — this exercise can help build the core support your spine needs, but it's worth checking with a healthcare provider if you're dealing with current pain.
Pregnancy and diastasis recti. Full planks generate significant intra-abdominal pressure and load on the abdominal wall, which matters if you're pregnant or recovering postpartum. Watch for “coning” or “doming” running down your midline during the movement — that's a sign your abdominal wall isn't handling the load well. If you notice this, switch to a wall or incline plank instead, and consult a pelvic-health physical therapist for guidance specific to your situation. Some practitioners consider full planks off-limits entirely until significant abdominal separation has been cleared.
General safety practices that apply to everyone:
- Warm up your wrists, shoulders, and core before starting
- Perform the exercise on a non-slip surface, using a mat if you're on a hard floor
- Stop immediately if you feel sharp pain, numbness, or unusual joint strain
- Get professional guidance if you're uncertain whether this exercise is appropriate for your situation
None of these considerations mean you need to avoid the exercise forever — most of them point toward a modification rather than a hard stop.
The goal is matching the version of this movement to where your body is right now, not forcing the full version before you're ready for it.
Conclusion
Plank walk-ups reward patience: nail the static holds first, keep your hips dead still as your arms move, and let your form dictate when you're ready to progress.
The biggest wins come from slowing down and controlling every transition, not from rushing through reps or chasing higher numbers.
Get the fundamentals right, and this exercise becomes one of the most effective tools you have for building real, functional core strength.