If you’re wondering whether the hex (bar) deadlift belongs in your program, the short answer is yes—you can usually lift 5–10 % more weight with less lower-back strain and higher power output than with a straight bar.
Keep reading to see exactly how to set it up, program it, and sidestep the usual stumbling blocks.
The Trap-Bar Advantage—What Makes This Pull Different
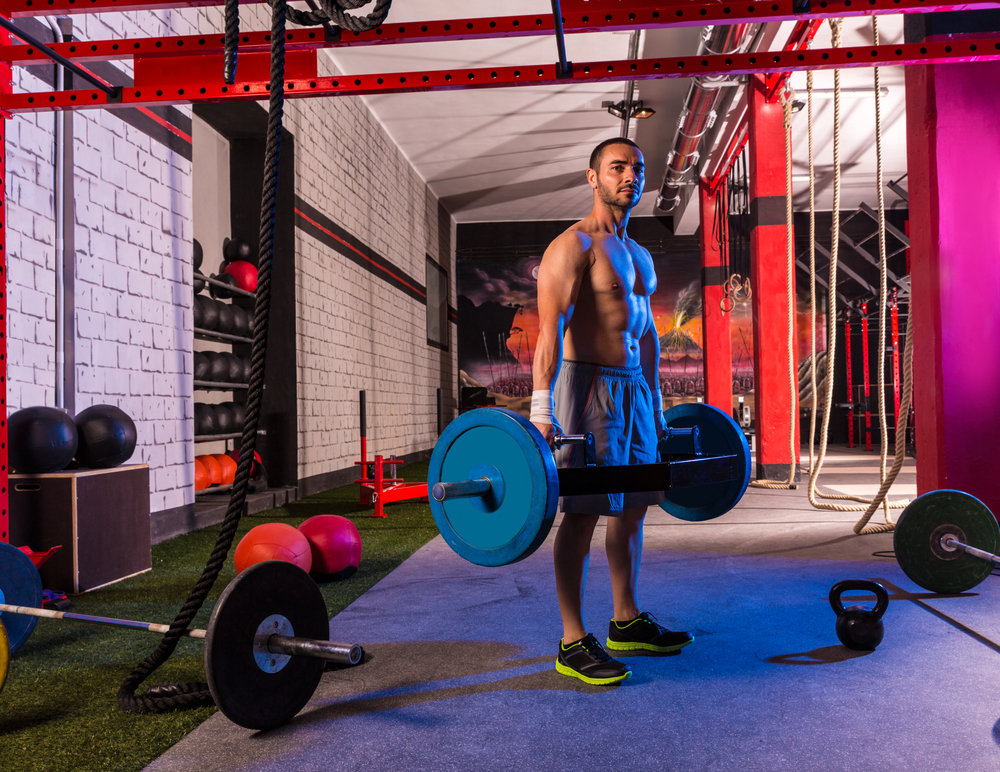
Step into the hexagonal frame and the bar instantly feels friendlier: the weight sits beside you, not out in front, so every rep starts in a stronger, more balanced position.
Because the load tracks through your mid-line instead of pulling you forward, you can keep your chest higher, spare your lower back from the sharp shear forces common to straight-bar pulls, and usually squeeze out an extra five to ten percent on the bar without grinding.
The hardware itself does a lot of heavy lifting:
- Geometry built for leverage The six-sided frame wraps around your feet, placing the sleeves in line with the centre of gravity. Neutral handles—often offered in both high and low heights—let you choose how far you need to hinge, making set-up simple whether you have tight hips or circus-level mobility.
- A back-friendly torso angle Since you no longer need to reach past your shins to find the bar, you can drive through the floor with a more upright spine. Less forward lean means less moment arm at the lumbar spine, which translates into lower compressive and shear stress each time you pull.
- Extra kilos without extra risk Most lifters load five to ten percent more than they manage on a straight-bar deadlift. The shorter bar path and easier balance let you express strength instead of fighting physics.
- Real-world validation The U.S. Army rewrote its Combat Fitness Test around a three-rep max trap-bar pull precisely because soldiers could train heavy while keeping back-injury rates down. That large-scale switch offers a clear vote of confidence for anyone worried about safety under load.
- Handles that meet you where you are Low handles mimic a conventional deadlift’s depth; high handles shave a couple of inches off the pull, handy on deload weeks, during rehab, or for tall athletes who struggle to reach the floor in good position.
Practical takeaway: if you want heavier numbers, happier lumbar discs, and a smoother learning curve for beginners or field athletes, the trap bar is likely the smartest deadlift variant you can program.
Use it to push top-end strength, chase high-velocity power work, or simply give your spine a break while still loading the hinge pattern hard.
Science Snapshot: How Your Joints and Muscles Actually Work Here
Think of the trap-bar pull as a hinge that quietly shifts some of the work forward from your hips to your knees and lets you accelerate the load faster than a straight-bar ever allows.
Across the research the same pattern shows up again and again.
When trained lifters pull with a hex bar at both 65 % and 85 % of their one-rep max, peak force, velocity, and overall power all come out on top compared with a straight-bar deadlift.
That extra horsepower stems from leverage: bringing the load beside you shortens the moment arm at the hip, so you can push hard without fighting as much forward drag.
In practical terms you generate force sooner in the concentric, which is why athletes chasing explosiveness often favour the trap-bar jump or dynamic pull.
Joint-moment data tells the second half of the story.
With a conventional bar the hip joint usually dominates—roughly a 3.7-to-1 hip–to-knee moment ratio.
Stand inside the hexagon and that ratio slides toward 1.8-to-1.
You still hinge, so the glutes and hamstrings stay active, but your quads now contribute meaningful drive right off the floor.
That front-loaded help explains why most lifters feel “taller” and more balanced during the lift and why you can often tack on an extra five to ten percent of load without form breaking down.
Muscle-activation work backs this up.
EMG studies find the vastus lateralis (outer quad) lights up noticeably more with the trap bar, while hamstrings and spinal erectors peak slightly higher under the straight bar.
For anyone with chronically tight hips or a history of low-back grumbles, that shift offers a way to keep training heavy pulls without parking all the stress on a sensitive area.
A three-rep-max study on trained women adds finer detail: hex-bar reps showed faster bar speed, bigger knee-extensor moments, and larger hip- and knee-flexion angles at lift-off, yet hip moments themselves peaked higher during conventional and sumo pulls.
Translation—you still hit the posterior chain, but you gain a quad-friendly leg-drive boost right where you need it most.
What should you do with this information?
- Use the trap bar when you need power: lighter loads (40–60 % 1 RM) respond especially well because velocity potential is higher.
- Rotate it in when your lower back feels beat up; the reduced lumbar shear buys recovery without losing total-body loading.
- If your squat lags behind your hinge, the hex bar’s quad emphasis offers a stealth way to bring that up while sticking to one compound move.
Bottom line: the trap-bar deadlift still trains the big posterior muscles you want, but it layers on extra quad stimulus and higher power output—making it a smart, joint-friendly hinge that hits more athletic qualities per rep than its straight-bar cousin.
Technique Walk-Through: From Foot Placement to Controlled Descent
A trap-bar pull only has two directions—up and down—but the details between those points decide whether you cash in on its back-friendly leverage or grind through a sloppy rep.
Lock in the sequence below and every attempt will feel smoother, heavier, and more repeatable.
- Find your stance Line the handles with the middle of each foot, then settle your feet hip- to shoulder-width apart. Keep the whole sole—heel, big toe, and little toe—rooted so balance never shifts to your toes.
- Hinge into position Push your hips straight back first, then bend the knees just enough for your hands to reach the handles. Grip tight, twist the bar slightly to preload it, and pull your shoulder blades down and toward your pockets to lock the lats.
- Brace like a cylinder Draw a deep breath, letting the air expand your belly, obliques, and lower back in every direction. Clamp the rib cage over that pressure so your torso turns into a rigid lever.
- Drive the floor away Think leg press: push through the mid-foot, not the toes, so hips and shoulders move as one unit. The bar should rise in a straight line with no tipping or rocking.
- Finish tall, not back Stand fully erect with hips and knees locked, glutes tight, and ribs still down. Resist the urge to lean back; hyper-extension just steals tension from the muscles you’re trying to train.
- Reverse under control Unlock the hips first, sliding them behind you, and only bend the knees once the plates clear them. Maintain the brace until the plates settle—treat the descent as productive time, not an afterthought.
Quick fixes when things go off script
- Knees cave inward? Push them out against the floor and drive through the entire foot.
- Hips shoot up first? Cue yourself to “push the floor” and film a rep to check bar path.
- Lower back rounds? Start with the high handles or elevate the plates so you can hinge without losing lumbar position.
Master these checkpoints and your trap-bar deadlift becomes a reliable tool for loading the hinge pattern hard while keeping the spine happy.
Programming Playbook: Strength, Size, and Power in One Tool

Programming a trap-bar deadlift doesn’t demand wizardry—just match the load, volume, and intent to the quality you’re chasing, then plug the lift into the week so it never fights with squats or other heavy hip-dominant work.
For max strength, aim for three to five work sets of three to six reps at 80–90 percent of your current one-rep max and rest a full two to three minutes.
You’ll pull heavy enough to tax the nervous system but not so often that recovery stalls.
When hypertrophy is the goal, dial the load down to 65–75 percent, push for eight to twelve reps, and keep rest under two minutes—enough fatigue to swell the quads and glutes without melting form.
To squeeze out explosive power, drop to 40–60 percent, limit each set to one to three reps, and move the bar as if it were trying to escape; pairing these pulls with box jumps or sled pushes sharpens the neural drive even further.
Slot the exercise into the calendar one or two times a week and leave at least forty-eight hours before you hammer another big axial-loading lift.
A simple Monday–Friday layout works well: start the week with a strength-focused trap-bar session followed by unilateral legs, an upper-back row, and core work; close the week with dynamic trap-bar pulls or jumps, hinge assistance such as Romanian deadlifts, knee-dominated lunges, and an anti-rotation press.
Over a month, wave the intensity—hard week, harder week, deload—then retest or bump the prescribed load by two-and-a-half to five kilos if bar speed still looks crisp.
Progression stays straightforward: add weight only when all work sets hit the target reps at the prescribed RPE (around eight for strength, seven for size, and six or lower for power), and trim volume back whenever bar speed slows or your lower back feels more than routine fatigue.
Deload every four to six weeks by swapping to high-handle versions or cutting volume in half, and you’ll keep the lift productive for years instead of blocks.
Variations, Progressions, and Loaded Carries to Keep Driving Adaptation
Even the smartest program stalls when the stimulus never changes, so rotating trap-bar tweaks lets you keep piling on strength, size, or power without abandoning the movement pattern you’ve already mastered.
- High-handle pulls Raising the grip by 5–7 cm shortens the hinge, so use them on deload weeks, in-season phases, or any time hip mobility feels tight. Keep loads heavy (80 % + 1 RM) to maintain neural drive, but drop total volume by a third because the shorter stroke reduces total work.
- Deficit pulls Standing on a 2–4 cm platform forces an extra few degrees of knee and hip flexion. Stay in the 65–75 % range, aim for sets of five to eight, and pull with deliberate tempo to groove that deeper start before you chase maximal weight again.
- Paused starts Hover the plates a centimetre off the floor for a full two-count, then finish the rep. Pauses teach positional strength; sprinkle two paused reps at the front of every working set for three to four weeks, then retest your conventional start.
- Band or chain loading Tension climbs as you stand, so the nervous system never gets to coast through the top third. Use 40–60 % straight weight plus 20–25 % band/chain tension and fire off singles or doubles between speed squats or jumps for a classic contrast block.
- Farmer’s walks Clip collars on, stand tall, and march 20–40 m. Start with 30–40 % of trap-bar 1 RM per hand; progress either by distance or by cutting rest down to 60 s between trips. Carries fortify grip, trunk stiffness, and gait mechanics without more spinal compression.
To weave these options into the year, alternate one variation for three to six weeks at a time, matching it to the broader training goal—high handles during heavy accumulation blocks, deficits for hypertrophy phases, bands or chains when power takes centre stage, and carries during conditioning cycles.
Keep one variable (load, volume, or density) moving forward while the others hold steady, and the trap bar will keep delivering fresh adaptation long after the novelty wears off.
Gear, Safety, and Who Stands to Gain the Most
Good hardware and smart support gear let you cash in on the trap bar’s friendly mechanics without adding new headaches.
Start with the bar itself: an open-back design makes loaded carries effortless because you can step straight in and out, while a closed hex frame offers rock-solid symmetry for heavy singles and testing days.
Check the handle knurling and width before you buy or sign off on a gym purchase—smaller lifters sometimes fight wide, aggressively knurled grips that shred skin long before the legs give out.
Footwear matters more than people think.
A flat, incompressible sole—Chuck Taylors, wrestling shoes, or minimalist trainers—minimises wobble so every newton you drive into the floor goes into the plates, not a squishy heel.
Add a lifting belt once loads push past about 80 % of one-rep max, chalk up for tougher sets, and save straps for high-rep work when grip threatens to end the session earlier than planned.
Who reaps the biggest reward?
- Beginners or rehab lifters who need a forgiving hinge pattern with less lumbar shear.
- Field and court athletes chasing power without sacrificing practice freshness.
- Long-femur lifters who struggle to stay upright in a straight-bar deadlift.
Who might skip it?
- Powerlifters in meet prep, because competition rules demand a straight bar.
- Athletes focused on maximal hamstring tension, such as sprint specialists dialling in posterior-chain dominance.
- Very small-framed trainees who can’t position themselves comfortably between the handles.
Match the right bar, shoes, and support kit to your body and goals, and the trap-bar deadlift becomes a high-leverage move that feels as safe as it is strong.
Conclusion
The trap-bar deadlift lets you move more weight with less lower-back stress while still hammering the big muscles that drive strength and power.
Because you can shift seamlessly from heavy triples to speed pulls—or swap in high handles, pauses, and carries—you’ll keep progress rolling without overhauling your program.
Slip it into your next training block and see how quickly the numbers climb.


