Building strong, sculpted legs doesn't require a gym membership or heavy weights – just a simple resistance band and 20-30 minutes of your time.
The best resistance band leg workout combines 7 scientifically-backed exercises targeting every major lower body muscle group through compound movements that deliver maximum muscle activation with minimal equipment.
Keep reading for the complete step-by-step workout system, including proper form cues, progression strategies, and everything you need to transform your lower body strength from anywhere.
Getting Started: Equipment and Resistance Level Selection
You don't need a garage full of equipment to build powerful legs – just the right resistance bands and a clear understanding of what works for your fitness level.
The key to success lies in choosing quality bands that match your strength and provide room for progression.
Start with a set of at least three resistance bands covering light, medium, and heavy resistance levels.
This variety allows you to target different muscle groups effectively and progress over time without constantly buying new equipment.
Beginners should focus on ultra-light to very light resistance in the 3-7 pound range, which provides enough challenge to build proper movement patterns without overwhelming your muscles.
If you're at an intermediate level, light to medium resistance bands offering 12-18 pounds will push your strength development further.
Advanced users benefit from heavy to ultra-heavy bands providing 25-55 pounds of resistance for serious muscle building.
Finding your ideal resistance level comes down to one simple test – you should be able to complete 12 to 15 repetitions with good form, struggling on those final reps but maintaining proper technique throughout.
If you're sailing through 15 reps without breaking a sweat, it's time to move up to heavier resistance.
Conversely, if you can't maintain form past 8-10 reps, drop down to lighter resistance until your strength improves.
Quality matters more than you might think when investing in resistance bands.
Look for bands made from natural latex or high-grade synthetic materials that won't snap under tension.
Cheap bands often break at the worst possible moments and can cause injury.
Reinforced handles, protective sleeves, and sturdy anchor points indicate a band built to last through countless workouts.
Your workout space needs surprisingly little room – just enough to step sideways about 12 inches and lie down with your arms extended.
A 6×8 foot area works perfectly for the entire routine.
Make sure you have a clear floor surface free of sharp objects or rough textures that could damage your bands.
Pre-Workout Preparation and Safety Fundamentals
Your muscles and joints need proper activation before they can handle resistance training safely and effectively.
Jumping straight into banded exercises without preparation sets you up for poor performance and potential injury.
Start your dynamic warm-up with leg swings, moving each leg forward and backward in a controlled pendulum motion for 10-12 swings per leg.
Follow this with dynamic hip circles, standing on one foot while drawing large circles with your lifted knee – this opens up your hip joint and activates the stabilizing muscles you'll need throughout the workout.
Side leg lifts come next, lifting each leg out to the side and back down in a smooth motion to wake up your hip abductors.
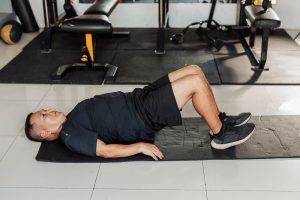
Finish with bodyweight glute bridges, lying on your back and lifting your hips up and down for 10-15 repetitions to fire up your posterior chain.
Joint activation goes beyond simple movement – you're preparing your hips, knees, and ankles to work together under resistance.
These dynamic movements increase blood flow to your working muscles and activate the neural pathways that control coordinated lower body movement.
Your joints need this gradual transition from rest to work mode.
Safety starts with proper band positioning and never exceeds what your bands can handle.
Always check your bands for nicks, tears, or weak spots before each workout – a snapping band can cause serious injury.
When positioning bands around your legs, ensure they're flat against your skin without rolling or bunching up.
Never stretch a band beyond three times its resting length, as this creates dangerous tension levels that can cause failure.
The most common setup mistake is placing bands too high or too low on your legs, which changes the exercise mechanics and reduces effectiveness.
Another frequent error is allowing bands to roll up your legs during exercises, creating uneven tension and potential pinch points.
Many people also rush through the warm-up or skip it entirely, leading to poor movement quality and increased injury risk.
You're ready for the workout intensity when you can complete the warm-up routine without stiffness or discomfort, your joints move freely through their full range of motion, and you feel energized rather than fatigued.
If you're feeling unusually stiff, sore from previous workouts, or lacking energy, consider reducing the workout intensity or taking an additional rest day.
The 7-Exercise Complete Resistance Band Leg Workout
This carefully selected sequence targets every major muscle group in your lower body while building functional strength and stability.
Each exercise flows logically into the next, creating an efficient circuit that maximizes your training time.
Banded Squats form the foundation of your workout, simultaneously targeting your glutes, quadriceps, and hip abductors.
Place the resistance band around your thighs just above your knees and stand with feet shoulder-width apart, toes pointing slightly outward.
As you lower into the squat, actively push your knees outward against the band's resistance – this engages your glutes and activates stabilizing hip muscles that often get neglected in regular squats.
Keep your core engaged, chest lifted, and back flat as you push through your heels to return to standing.
The band forces proper knee tracking and prevents the common mistake of allowing knees to cave inward. Complete 3 sets of 12-15 repetitions.
Lateral Band Walks specifically strengthen your gluteus medius, hip abductors, and outer thighs – muscles that provide critical stability during all lower body movements.
Position the band just above your knees for an easier variation or around your ankles for increased difficulty. Assume a quarter-squat position with feet hip-width apart and pointed forward.
Step your right foot approximately 12 inches to the right, then control your left foot as it follows, maintaining hip-width distance between your feet.
The key is never standing up between steps – maintain that athletic stance throughout the entire set while keeping constant tension in the band.
Complete 3 sets of 12-15 steps in each direction.
Resistance Band Glute Bridges activate your glutes, hamstrings, and core stabilizers through a movement pattern that directly translates to better posture and athletic performance.
Loop the band around your legs just above your knees and lie on your back with knees bent and feet hip-width apart on the floor.
Engage your abs and squeeze your glutes as you press through your heels, lifting your pelvis until your knees reach a 90-degree angle.
For an advanced variation, lift one foot an inch off the ground and push with the opposite leg only, alternating legs each rep.
This single-leg version dramatically increases the challenge and addresses any strength imbalances between sides. Perform 3 sets of 12-15 repetitions.
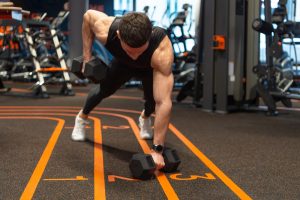
Romanian Deadlifts develop your hamstrings, glutes, and lower back through the hip hinge movement pattern – one of the most important movement skills for daily activities and athletic performance.
Stand on a long resistance band with feet hip-width apart, grasping the band in each hand.
Keep your back straight as you hinge at your hips, sending your hips backward and allowing your torso to lean forward while creating a deep stretch in your hamstrings.
The movement should feel like you're reaching back to touch a wall behind you with your hips.
Return to standing by squeezing your glutes and driving your hips forward while straightening your knees. Complete 3 sets of 12-15 repetitions with controlled tempo.
Banded Clamshells isolate your gluteus medius, gluteus minimus, and hip stabilizers – smaller muscles that play an outsized role in knee health and lower body stability.
Loop the band around your legs just above your knees and lie on your right side with knees bent at 90 degrees.
Keep your feet together as you raise your left knee toward the ceiling, creating tension in the band.
Focus on initiating the movement from your hip, not your knee, and tighten your core to keep your upper body stable throughout the motion.
This exercise addresses the weakness and imbalances that contribute to knee pain and poor movement patterns. Perform 3 sets of 15 repetitions on each side.
Standing Glute Kickbacks build posterior chain strength through hip extension, directly improving your power for activities like running, jumping, and climbing stairs.
Loop the band around your ankles and stand with feet hip-width apart.
Keep your back straight and squeeze your glutes as you raise your right leg directly behind you, creating tension in the band.
The movement should come entirely from your hip, with your knee staying straight throughout.
Control the leg as you lower it back to the starting position – this eccentric control is where much of the strength building occurs. Complete 3 sets of 15 repetitions on each leg.
Banded Lateral Lunges provide comprehensive lower body engagement, targeting your quadriceps, glutes, inner thighs, and stabilizers through a multi-plane movement that mimics real-world activities.
Loop the band around both ankles and step wide to one side, shifting your weight over that leg while keeping your chest up and the opposite leg straight.
This exercise works your adductors, abductors, quads, glutes, and hamstrings simultaneously while challenging your balance and coordination.
The lateral movement pattern is often neglected in traditional training but provides critical strength for injury prevention and athletic performance.
Perform 3 sets of 10-12 repetitions on each leg, focusing on controlled movement rather than speed.
Workout Structure and Programming Strategy

The circuit training format transforms these seven exercises into a time-efficient muscle-building system that fits into even the busiest schedules.
You'll complete all seven exercises in sequence, then repeat the entire circuit two more times for a total of three complete rounds.
This approach maximizes efficiency while maintaining workout quality.
Moving from exercise to exercise with minimal rest keeps your heart rate elevated and creates a metabolic challenge that burns calories during and after your workout.
The circuit format also allows certain muscle groups to recover while others are working, which means you can maintain intensity throughout the entire session without excessive fatigue.
Rest periods of 60-90 seconds between exercises provide the sweet spot for muscle recovery and sustained performance.
This timeframe allows your muscles to partially recover while preventing complete rest that would diminish the metabolic benefits of circuit training.
If you're just starting out, lean toward the 90-second mark to ensure you can maintain proper form throughout all three rounds.
More experienced users can push toward 60 seconds to increase the challenge and cardiovascular demand.
The entire workout takes just 20-30 minutes from start to finish, making it perfect for busy schedules or as a quick lower body session when you can't make it to the gym.
This duration includes your warm-up, the three circuit rounds, and a brief cool-down.
The compact timeframe doesn't compromise effectiveness – resistance band training's constant tension principle means you're working your muscles intensely throughout each movement.
Each exercise follows a standard protocol of 3 sets with 12-15 repetitions, creating approximately 315-378 total repetitions across the entire workout.
This rep range sits in the sweet spot for muscle building and endurance development.
The higher rep count works particularly well with resistance bands because they provide variable resistance that increases throughout the range of motion, making those final reps especially challenging even with lighter overall load.
Modifying intensity based on your fitness level requires strategic adjustments rather than completely different exercises.
Beginners should start with lighter resistance bands and focus on completing 12 repetitions per set with perfect form, taking the full 90 seconds of rest between exercises.
If you can't complete 12 reps with good form, reduce the band tension or take longer rest periods until your strength improves.
Intermediate users can push toward 15 repetitions per set while maintaining the 60-90 second rest periods.
You might also experiment with adding a brief pause at the most challenging point of each movement to increase time under tension.
Advanced users can progress beyond 15 reps, incorporate single-limb variations where possible, or reduce rest periods to 45-60 seconds for increased metabolic demand.
You can also combine multiple resistance levels within the same workout, using heavier bands for larger muscle exercises like squats and deadlifts while maintaining moderate resistance for isolation movements like clamshells.
Progressive Training System and Advanced Techniques
Smart progression transforms a simple resistance band workout into a comprehensive strength-building system that continues challenging your muscles as they adapt and grow stronger.
The key lies in systematically advancing through structured phases rather than randomly increasing difficulty.
Your first two weeks focus entirely on form mastery with lighter resistance bands.
During this phase, concentrate on learning proper movement patterns, understanding how each exercise should feel, and building the mind-muscle connection that separates effective training from going through the motions.
You might feel like you're not working hard enough, but this foundation phase prevents injury and ensures maximum results in later weeks.
Complete each exercise slowly and deliberately, focusing on hitting the exact positions described for each movement.
Weeks three and four shift toward strength building with increased volume and intensity.
Progress to 1-3 sets of 12-20 slow repetitions, emphasizing controlled movement throughout each rep.
This rep range increase challenges your muscular endurance while the slower tempo increases the total work your muscles perform.
You should feel significantly more challenged during this phase while maintaining the perfect form you developed in weeks one and two.
Week five and beyond introduces heavier resistance bands and advanced techniques that take your training to the next level.
This is where you graduate from basic movements to sophisticated training methods that maximize muscle activation and strength development.
The progression never stops – you can continue advancing for months using these principles.
Time under tension principles form the cornerstone of effective resistance band training.
Unlike free weights where momentum can reduce muscle work, resistance bands reward slow, controlled movement with maximum muscle activation.
Each repetition should take 4-6 seconds total – 2-3 seconds lowering into the movement and 2-3 seconds returning to the starting position.
This extended time under tension creates the metabolic stress that drives muscle growth and strength gains.
The constant tension characteristic of resistance bands means you must maintain control throughout the entire range of motion.
Never let the band snap back into place, as this wastes the eccentric portion of the movement where significant strength gains occur.
Instead, actively control the band's return to create continuous muscle tension from start to finish.
Advanced training techniques multiply your results without requiring additional equipment or time.
Pause reps involve holding the most challenging position of each exercise for 2-3 seconds before completing the movement.
For instance, during banded squats, pause at the bottom position while maintaining outward pressure against the band.
This technique increases muscle activation and builds strength at your weakest points.
Single-limb variations dramatically increase the challenge while addressing strength imbalances between sides.
Transform glute bridges into single-leg versions, perform kickbacks one leg at a time, or execute lateral lunges as single-leg movements.
These variations not only increase difficulty but also improve balance, coordination, and unilateral strength that translates to better athletic performance and injury prevention.
Progressing from lighter to heavier resistance bands requires strategic timing and careful attention to your body's adaptation signals.
When you can complete all prescribed repetitions with perfect form and feel like you could do several more reps, it's time to advance to the next resistance level.
This typically occurs every 3-4 weeks for beginners and every 4-6 weeks for more experienced users.
Rather than jumping immediately to the heaviest band available, progress incrementally through your resistance levels.
If you started with light bands, move to medium resistance before advancing to heavy.
This gradual progression allows your connective tissues, joints, and stabilizing muscles to adapt alongside your primary movers, reducing injury risk and ensuring long-term success.
Form optimization strategies prevent the momentum and tension loss that sabotage many resistance band workouts.
Focus on initiating each movement from the target muscle group rather than using secondary muscles to generate momentum.
During lateral band walks, for instance, the movement should originate from your glutes and hip abductors, not from swinging your leg or shifting your entire body.
Maintain constant tension by never allowing the band to go slack during any portion of the exercise.
This means controlling both the working phase and the return phase of each movement.
Position yourself so the band has slight tension even at the starting position, ensuring immediate muscle engagement when you begin the movement.
These details separate effective training from wasted effort and determine whether you see real results from your time investment.
Recovery, Frequency, and Long-Term Results
Proper recovery and strategic training frequency determine whether your resistance band leg workouts deliver lasting results or lead to plateaus and overuse injuries.
The decisions you make after your workout matter just as much as the exercises themselves.
Your post-workout stretching routine targets the four major muscle groups that just worked hard during your training session.
Hold each stretch for 30-45 seconds to allow your muscles to lengthen and return to their resting state.
Start with hamstring stretches, either seated with one leg extended or lying on your back pulling your leg toward your chest.
Follow with glute stretches using a figure-four position while lying on your back or sitting in a chair.
Hip flexor stretches come next – step into a low lunge position and feel the stretch along the front of your trailing leg's hip.
Finish with quadriceps stretches, pulling your heel toward your glutes while standing or lying on your side.
These stretches serve multiple purposes beyond just feeling good.
They help maintain the flexibility gains you achieved during your workout, prevent muscle tightness that could affect your movement quality in future sessions, and reduce the likelihood of delayed onset muscle soreness that can interfere with your next workout.
Training frequency of 2-3 sessions per week provides the optimal balance between muscle stimulation and recovery time for most people.
Your muscles need 48-72 hours to fully recover and adapt to the training stimulus, which means spacing your workouts throughout the week rather than clustering them together.
A schedule of Monday, Wednesday, and Friday works well, as does Tuesday, Thursday, and Saturday.
This frequency allows you to make consistent progress without overwhelming your recovery capacity.
More frequent training doesn't necessarily mean better results.
Your muscles grow and strengthen during recovery periods, not during the workout itself.
Training too frequently can actually slow your progress and increase injury risk.
If you're eager to do more, consider alternating between upper and lower body workouts or adding light cardio on your off days rather than repeating the leg circuit.
Integration strategies allow you to combine resistance band training with other workout modalities for comprehensive fitness development.
Use your resistance band leg workout as a lower body day in a split routine, combining it with upper body weight training on alternate days.
The bands also work excellently as a warm-up before heavier weightlifting sessions or as a burnout finisher after traditional leg exercises.
For cardiovascular fitness goals, perform the circuit with shorter rest periods and treat it as a high-intensity interval training session.
For strength-focused goals, combine band exercises with bodyweight movements like pistol squats or single-leg deadlifts.
The versatility of resistance band training makes it compatible with virtually any fitness program or goal.
Your timeline for strength gains and muscle development follows predictable patterns that help set realistic expectations.
You'll notice improvements in movement quality and muscular endurance within the first 2-3 weeks as your nervous system adapts to the new movement patterns.
Visible muscle tone improvements typically appear around week 4-6, while measurable strength gains become apparent after 6-8 weeks of consistent training.
Significant muscle development and dramatic strength improvements usually manifest after 12-16 weeks of progressive training.
However, these timelines assume consistent adherence to your program, proper nutrition to support muscle growth, and adequate sleep for recovery.
Individual factors like training history, age, genetics, and lifestyle can influence how quickly you see results.
The key benefits of resistance band leg training extend far beyond simple muscle building.
Joint-friendly training represents one of the most significant advantages – the variable resistance of bands places less stress on your joints compared to heavy weights while still providing effective muscle stimulation.
This makes resistance band training ideal for people with joint concerns, those recovering from injury, or anyone seeking a lower-impact training option.
Improved movement patterns develop naturally through resistance band training because the bands force you to maintain proper alignment and control throughout each exercise.
Unlike machines that guide your movement path, bands require you to stabilize and control the movement yourself, which translates to better movement quality in daily activities and sports.
Constant tension advantages set resistance band training apart from traditional weight training.
The elastic properties of bands provide resistance throughout the entire range of motion, with peak tension occurring at the strongest part of the movement.
This creates a more complete muscle activation pattern and helps develop strength across your full range of motion rather than just at specific joint angles.
The cumulative effect of these benefits creates a training method that not only builds strength and muscle but also improves your overall movement quality, reduces injury risk, and provides a sustainable approach to long-term fitness.
These advantages become more apparent the longer you stick with your resistance band training program, making consistency the most important factor in your long-term success.
Conclusion
This complete resistance band leg workout delivers serious results through seven scientifically-backed exercises that target every major lower body muscle group in just 20-30 minutes.
The progressive system takes you from basic form mastery to advanced strength techniques, ensuring continuous improvement while being gentle on your joints.
Stick to the 2-3 sessions per week schedule with proper recovery, and you'll see noticeable strength gains and muscle development within 6-8 weeks of consistent training.

